Introduction
| At a Glance | |
|---|---|
| Product | PePwave Surf Home Wi-Fi Access Point (AP200) |
| Summary | 2.4 GHz 802.11b/g range extender that works with any AP / router. |
| Pros | • Doesn’t use WDS • Easy to set up • Independent WAN and LAN wireless encryption settings • Very good receive sensitivity |
| Cons | • 9 – 10 Mbps maximum throughput • Can’t use as Ethernet-connected AP • Limited routing options |
It seems that every time that I try a product intended to increase wireless range, I end up at the same place—uncertain whether it provides enough improvement to be worth the hassle and expense. So when PePwave asked me to try one of their Surf "Wi-Fi" modems, I wasn’t in any hurry.
But the more I looked at the Surf, the more it looked like PePwave has taken a different approach. Actually, PePwave doesn’t really pitch the Surf as a WLAN range expander or extender. That’s probably because the primary application for the Surf series is as CPE (Customer Premises Equipment) for wide area Wi-Fi installations in (a dwindling number of) cities and campuses.
The Surf series actually comes in six different flavors, but two basic platforms. The two non-AP models don’t have the "AP" function and the four "AP" versions do. Figure 1 illustrates how the Surf AP’s work. They actually function as 802.11b/g wireless routers, but with a WAN port that connects to any 2.4 GHz Wi-Fi network (the "Citywide Wi-Fi" shown in the diagram) instead of using an Ethernet connection to a cable or DSL modem.
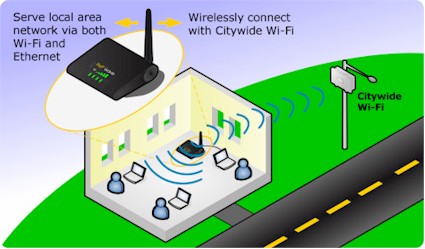
Figure 1: How the Surf Works
But you don’t have to use the Surf AP with a "citywide" Wi-Fi network; it will connect to any 2.4 GHz 802.11b/g wireless LAN. And if you’d rather be away from the crowd in the 5 GHz band, the AP 205 connects to 802.11a networks. Even though it has a dual-band chip in it, PePwave has limited it to operating in the 5 GHz band only.
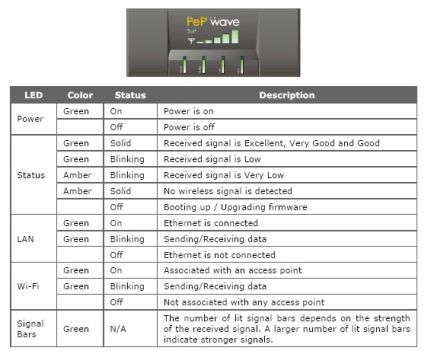
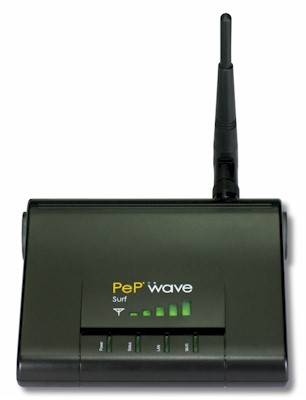
Figure 2 shows the front panel indicators, which provide an at-a-glance view of the Surf’s operating condition. The handy signal bar display that shows the wireless WAN connection is nice and bright and has a wide viewing angle. I wish I could say the same for the other four indicators— they are only clearly visable when viewed straight-on.
Figure 2: Front panel
The rear panel is a model of simplicity with 10/100 Ethernet, RP-SMA antenna connector and 5V power socket. There is also a Reset-to-factory-defaults button that you need a paperclip to push and a slot for a cable-type lock.
Note that the Surf AP does not support Power over Ethernet and that the Ethernet connector is for configuration only. The Ethernet port does not provide a wired WAN or bridged LAN connection, so you can’t use the Surf AP as a "classic" wireless router or AP.
Internal Details
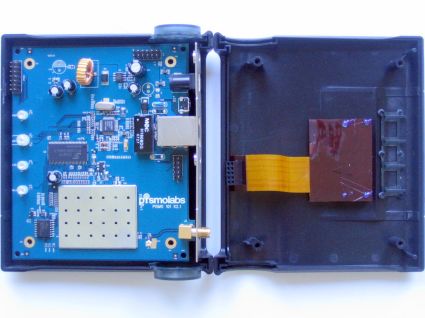
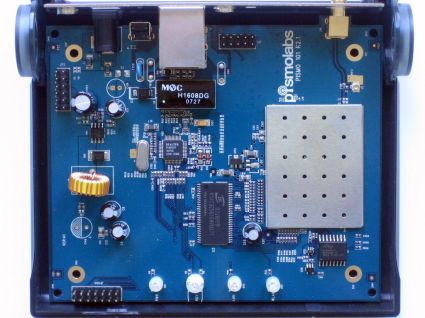
Figures 3 and 4 show the innards of the AP 200. You don’t see a processor because it’s part of the Atheros single-chip 2.4 GHz AP device located under the soldered-on RF shield. The FCC internal photo was no help either, being too fuzzy to determine the specific Atheros device.
The LED signal-bar display is on the small board you see mounted to the underside of the top cover. It connects to a 10 pin header on the main board via the flat cable that was disconnected for the photo.
Figure 3: Inside view
The other devices that you can see are a Realtek RTL8201 single-chip 10/100 Ethernet interface, 32 MB RAM chip and Spansion FL064A Serial interface chip.
Figure 4: Main board
And yes, that’s right, the AP 200 performs all of its tricks with a single radio chip. So since the radio is doing double duty as a Wi-FI WAN client and WLAN router, you’ll lose about half the wireless WAN throughput. You’ll see what this means later in the Performance section.
Setup and Administration
Setting up the AP 200 is pretty easy and done from its Ethernet port. It has a built-in DHCP server, so you just need to set the computer you plug in as a DHCP client. Once the computer connects, it will have an IP address in the 192.168.20.X subnet. Then just browse to 192.168.20.1 and you’ll be presented with the Connect screen shown in Figure 5, except you won’t be connected.

Figure 5: Connect screen
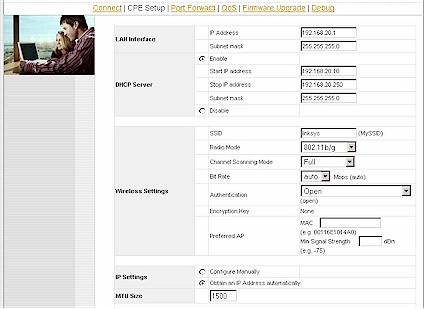
Clicking on the Advanced Config button takes you to the CPE Setup screen, the top half of which is shown in Figure 6.
Figure 6: CPE Setup – Top half
The LAN Interface and DHCP Server entries set the IP address of the AP 200 itself and its DHCP server range. The Wireless Settings section is for the 200’s wireless WAN connection. It comes with a default of MySSID entered. But if you blank that out, you’ll be presented with a pick list of in-range AP’s. The Channel Scanning Mode defaults to the Full mode, which looks at all channels for possible WLANs to connect to. You can also choose 1,6,11 or Single channel modes, but I didn’t find that I needed to.
Authentication sets the security mode, which is chosen from the default Open or Static WEP, 802.1x with dynamic WEP, WPA/WPA2 Enterprise (RADIUS) or WPA/WPA2 Personal (PSK) modes. Note that authentication / encryption is set independently for the WWAN connection and built-in AP. So if the WLAN you’re connected to is running WEP and you want to run WPA2-Personal, you can have at it.
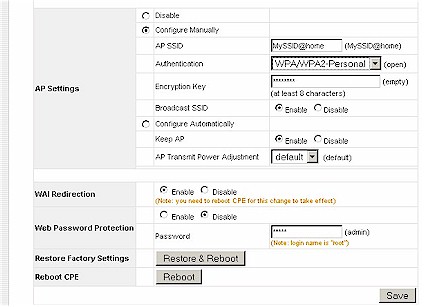
Figure 7 shows the bottom half of the CPE Settings page. The AP Settings section refers to the access point function that is disabled by default. The Configure Manually option lets you set SSID, Authentication (Open, WEP, WPA/2 Personal only) and whether to broadcast the SSID. Note that there is also a Transmit Power adjustment that can step down transmit power in 1 dB steps from 1 to 15 dB.
Figure 7: CPE Setup – Bottom half
The WAI Redirection option provides a way to ease the task of reconnecting the WWAN connection, should the automatic reconnection fail. If the WWAN connection has dropped and redirection is enabled, any user trying to access the Internet will be redirected to the Connect page.
It’s nice that the AP continues to function when the WWAN connection is down. But since the 200’s Ethernet port doesn’t allow a bridged LAN connection, associated wireless clients will be able to communicate only among themselves.
The admin interface requires no password by default, but the Web Password Protection option lets you lock it down. Note that there isn’t an HTTPS option for the admin functions.
Setup and Administration – more
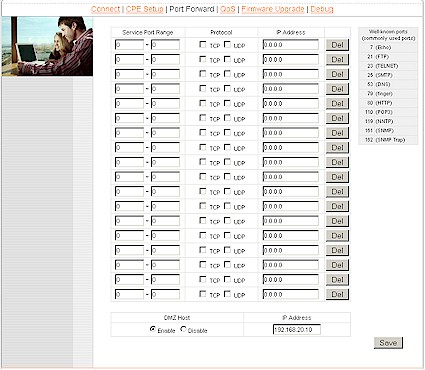
As I mentioned earlier, the "AP" in the AP 200 is actually a wireless router, as is evidenced by the Port Forwarding settings shown in Figure 8. There is also a DMZ option, which I used to run the IxChariot-based throughput tests.
Figure 8: Port forwarding
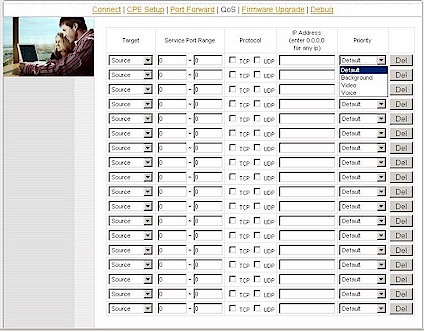
Figure 9 shows the settings for the 4-level priority-based QoS feature. There are no service pick-lists available, so you’ll need to know the ports used by the applications you want to control. Note that you can apply the QoS rules to individual or all users and for both up and downlink traffic.
Figure 9: QoS
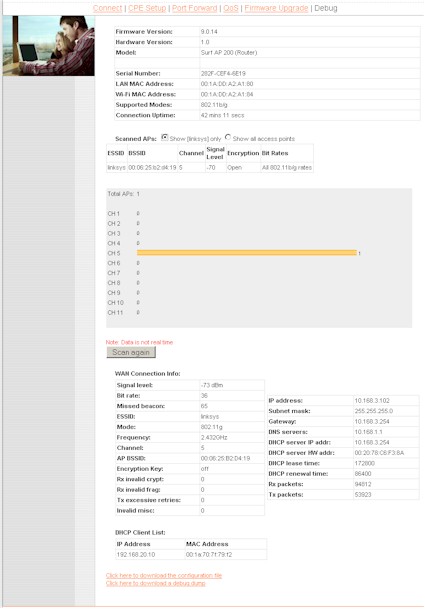
There’s not much to say about the Firmware Update feature, other than it has a button to check online for updated firmware. Figure 10 shows the Debug screen, which provides a wealth of handy information. It’s just too bad that the "Scanned AP’s" list that shows in-range WLANs isn’t real time and that you’ll get a "Connection will be lost, are you sure?" pop-up before it drops the WWAN connection to rescan.
Figure 10: Debug
I should note that the AP 200’s receive sensitivity seems to be pretty good. It picked up my neighbor’s WEP-encrypted AP, which is never picked up by any of the wireless clients that I test!
Performance
Those of you who aren’t fans of the Azimuth-based test procedure I use for testing WLAN products will be happy to see that I used a walk-around type of test for the AP 200. This is mainly due to the nature of the product, and the fact that it doesn’t have an bridged Ethernet interface.
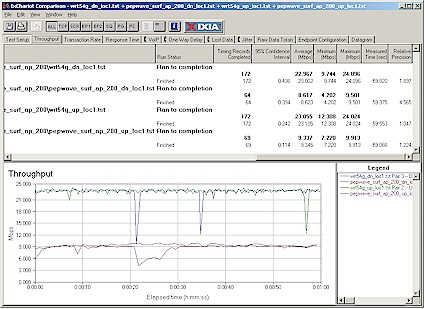
The approach I took was to set up my trusty Linksys WRT54G V1 in my downstairs office and a test notebook with a Linksys WPC54G V1 card. I first took baseline throughput measurements using IxChariot with the WRT54G, AP 200 and notebook in the same room. Those results are shown in Figure 11.
Figure 11: Baseline Throughput results
Up and downlink tests were run separately with the test notebook directly connected to the WRT54G (tests with wrt54g prefix) and with it connected via the AP 200 (tests with pepwave_surf_ap_200 prefix). You can that, due to the single radio doing double duty, throughput via the AP 200 is about 60% lower than when directly connected to the WRT54G.
I also checked throughput with WEP 128 and WPA2 enabled on the AP (the one the notebook was connected to) and measured no appreciable throughput loss.
I next moved the notebook to Test Location 4 ("the black hole of Wi-Fi") located in my kitchen. This location is one floor up and at the diagonal opposite end of my home. Check the old test method description for more details about the distances involved.
Finally, I moved the AP 200 to the five different locations shown in Figure 12 and reran the throughput tests in the downlink direction. (I spot-checked uplink performance and didn’t find much difference.)
The test rationale was that the throughput delivered to the notebook depends on both the throughput from the WRT54G to the AP 200 and from the AP 200 to the notebook. And that is going to depend on how each of the three radios is affected by the RF obstacles in my home’s construction.
One thing that the radios didn’t have to contend with were strong neighboring wireless LANs. Even though the AP 200 picked up my closest neighbors’ network (which is at least 500 ft. away through plenty of trees (leafless at this point), the signal level was very low.
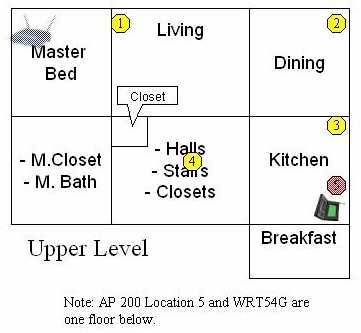
Figure 12: Test Locations
The results, summarized in Table 1, show that you’ll need to experiment to determine the right place to park the AP 200. They also show that the best place might not necessarily be the place you think it will be! The Table also includes the Baseline measurement made in my office via the AP 200 and a Direct measurement made with the notebook located in the Kitchen connecting directly to the WRT54G.
For example, Location 5, which was one floor below the test notebook, delivered very good throughput, even though there were plenty of sheetrock walls between it and the WRT54G.
| Location | Average Downlink Throughput 1 minute average (Mbps) |
|---|---|
| Baseline | 8.6 |
| Direct | 2.2 |
| 1 | 5.2 |
| 2 | 3.8 |
| 3 | 8.9 |
| 4 | 7.5 |
| 5 | 7.1 |
Table 1: Throughput Test Summary
The other notable example is Location 2. I thought that moving the AP 200 closer to the notebook would raise throughput from that of Location 1. But I found the opposite effect, perhaps due to the tile backsplash that was directly between the AP 200 and notebook in Location 1.
The other lesson learned is that it helps to think three-dimensionally when determining the best AP 200 location and to keep visualizing the direct line-of-sight paths between the three pieces to the puzzle.
Closing Thoughts
As I have with every other Wi-Fi range extension product, I have mixed feelings about the AP 200, but end up more positive tha usual. On the plus side, it’s a lot easier to deal with than WDS-based solutions, including the notoriously difficult Linksys WRE54G [reviewed].
Setup is more like dealing with a typical wireless router, except that the WAN side setup is more like connecting up a typical wireless client. Throughput is also pretty consistent, although variation can get quite significant depending on placement and signal path.
Once you set it up, the AP 200 is very good at staying connected and automatically reconnecting when you move it. I didn’t have to log into the admin interface once after the initial configuration, during all of my location testing. I just waited until the signal bar display stopped scanning back and forth and locked into a steady signal level indication.
The main downside is the throughput loss due to the single-radio configuration. This limits the AP 200’s use to lower-bandwidth applications, such as the web-surfing that the product is named after. If you have a typical cable or DSL Internet connection, you’ll probably be happy with the throughput the product provides.
But if you’re counting on doing large local file transfers or hi-def streaming, you may be disappointed. That said, you’ll probably do ok with standard-def or Slingbox video streams as long as you’re doing only one or two.
All things considered, if you’re willing to spend the $129 (plus shipping) that PePwave is asking for the product (it’s available only direct from them) to wirelessly reach that spot that just won’t yield to other things you’ve tried, I say go for it. In my case, I now can get a nice wireless 3-5 Mbps Slingbox stream in my "Wi-Fi black hole" and untether my kitchen laptop.

