Introduction

Several weeks ago, we published a roundup of N150 travel routers. All of the included products were based on “N150” single-stream technology. In that roundup, I thought that we had seen most of the form factors and feature sets that were likely to see in small, travel-oriented routers. But I was wrong.
This time, I’m llooking at two N300 class travel routers, Buffalo’s WMR-300 AirStation N300 Wireless Travel Router and NETGEAR’s PR2000 Trek N300 Travel Router and Range Extender. Only two routers makes for a mighty small round-up. But when we put the call out to manufacturers for their best-selling products, only two came in for this category.
With prices just slightly higher that the N150 class devices, you’d expect a bump in performance. But as we learned with the N150 routers, for this category, neither price nor performance are likely to be the deciding factors. Instead, ease of setup and feature set will tell you which one to buy.
Both routers are “N300” class, meaning that they support dual-stream 802.11n with a maximum link rate of 300 Mbps in the 40 MHz bandwidth mode and 130 Mbps in the recommended 20 MHz mode. Both routers provide basic routing and connection sharing for wired Ethernet connections as well as an AP (access point) mode. Both connected to the internet by merely plugging an Ethernet cable into my network and plugging them into power.
To help you to sort through key features, I complied the same chart used for the N150 travel routers. The chart should also make it easy to compare the N300 routers to the previously-reviewed N150 routers. Data was derived from product specification sheets, user manuals and, in some cases, contact with product marketing departments.
| Buffalo AirStation WMR-300N | NETGEAR Trek PR2000 | |
|---|---|---|
| Price | $38 | $35 |
| Form Factor | Matchbook | Soap Bar |
| Power Source | USB built-in cable | USB/AC |
| Included Power supply | N | N/A |
| Included Ethernet cable | Y | N |
| Dimensions (mm) | 33 X 33 X 20 (no case) | 86 X 86 X 32 |
| Weight | 49G (1.7 oz) (no case) | 179G (6.3 oz) |
| Chipset | Media Tek MT7620N | Media Tek MT7620N |
| Reset button | Y (Pin reset) | Y (Pin reset) |
| LED Indicators | 2 | 4 |
| Diskless setup | Y | Y |
| Pre-configured security | Y | Y |
| Default router address | 192.168.13.1 | 192.168.168.1 |
| WPS Pushbutton | Y | N (Software only) |
| WPS Pin Code | Y | Y |
| RADIUS | N | Y |
| Wired LAN Port | N | Yes (1 or 2) |
| SSID # (Guest Network) | 3 + Guest | 1 |
| USB port | N | 1 (sharing/printing/charging) |
| Media Server | N/A | N |
| Dual Band | N | N |
| Wireless type | N300 | N300 |
| DMZ | Y | Y |
| Port forwarding | Y | N |
| MAC Filtering | N | Y |
| URL Blocking | N | N |
| System Logging | Y | Y |
| DHCP Client List | Y | Y |
| DHCP Reservation | Y | Y |
| QOS | WMM | WMM + Rules |
| UPnP | Y | Y (with table) |
| DDNS | N | Y (3) |
| Wi-Fi Certified | N | N |
| Included accessories | Snap on storage cover | Micro USB power cable |
Table 1: Feature Table
Product Overviews
As you can see from the product collage above, the N300 travel routers come in two slightly different form factors than the N150 devices. The Buffalo AirStation WMR-300 is a two piece design that I call a "match book" style. The router itself only measures 1.25″ X 1.25″ X 0.79″. It’s powered by a built-in USB “pig tail” that you can connect to a USB power supply or to a USB port on a laptop. The maximum power consumption is 4.95W, so it’s just below the 0.5 amp rating of a standard USB port.
A convenient snap-on case allows for storage of the included 23″ flat Ethernet cable. On the front of the WMR-300 you’ll find two LED indicators as well as an AOSS / WPS button. The internet Access LED shows whether (solid green) or not (blinking green) you’re connected to the Internet. The Power LED is a multi-color LED that can show you, using color and blink sequences, diagnostic information. You can decode the various colors and blink sequences in the instruction manual which you can download here. Bottom line – if you see two solid green LEDs, the WMR-300 is working properly and is connected to the Internet.
The AOSS (AirStation One-Touch Secure System) allows you to securely connect to AOSS-enabled wireless clients and doubles as a WPS (Wi-Fi Protected Setup) button. On the bottom, you’ll find the 10/100 Ethernet port that is used either for your wired WAN or Bridged connection as well as a pin reset hole.

Buffalo WMR-300 router and case
The NETGEAR PR2000 uses a modified “wall wart” form factor. Not only can you plug it into AC power, you can also power it using the included Micro USB cable. The PR2000 also features an antenna that you can rotate for better range.
On the front panel, there are individual single color LEDs for power, Internet Wi-Fi and USB. There are no complicated blinking diagnostic sequences. Four solid green indicators shows that everything is working and that a USB device has been recognized. You can download the User Guide here.
On the top of the unit, there’s a three position “Internet Via” slide switch. The center position is off (recommended position when plugging in). The other two positions let you select whether you’ll be using a wired or a wireless connection for your Internet connection.
The image below, taken from the PR2000 user guide, shows the rear of the product with its two 10/100 Ethernet ports. In the Wired Internet position the device acts as a standard router. You plug your WAN connection into the blue Internet/LAN port. The yellow port gives you a standard 10/100 Mbps wired LAN connection. When the switch is in the Wireless position, the blue port becomes a second wired LAN port.

NETGEAR PR2000 rear panel callout
The rear of the device has a USB port that can be used for file sharing, print sharing, or for charging USB-powered mobile devices. The maximum power supplied by the USB port is 900 mA at 5 VDC – just shy of the 1 A required by some of the higher powered USB devices.
You can access files stored on the inserted USB storage device through the network neighborhood, via HTTP or FTP (disabled by default). For printer sharing, you’ll need to download and install the ReadySHARE printer utility available here. Also on the rear panel, there’s a PIN reset that you can use to return the device to factory defaults.
Inside
Both devices use the same Media Tek MT7602N SoC. The Ethernet controller and Wi-Fi radio are built into the chipset. According to Wikidevi, the Buffalo WMR-300 has 8 MB of flash (Macronix MX25L6406EM21-12G) and 64 MB of RAM (Hynix H5PS5162GFR-S6c)) The NETGEAR PR2000 has 64 MB of RAM (Etron Tech EM68B16CWCD-25H and an undetermined amount of Flash.
For those of you who are interested in the internal layout, below is a photo of each device from the FCC database.
 and PCB with heat sink removed (right)")
Buffalo WMR-300 with case (left) and PCB with heat sink removed (right)
 and PCB bottom (right)")
NETGEAR PCB top (left) and PCB bottom (right)
Setup
As noted in the introduction above, both devices seamlessly connected to the internet when I initially tested with a wired connection. Both devices arrive pre-configured with Wi-Fi security enabled and use the standard admin/password pair. A label on the bottom of each router shows the default SSID, network key, user name/password along with either a link or the IP address of the router. The image below shows the label for each router.
 and the NETGEAR PR2000 (right)")
Labels for the WMR-300 (left) and the NETGEAR PR2000 (right)
I did run into a small glitch when logging into the Buffalo WMR-300. In the last firmware update (V1.03 8/5/2013), the change log indicates that the LAN-side address changed from 192.168.11.1 to 192.168.13.1. That’s a bit surprising, as virtually every Buffalo router that I’ve reviewed has used the default 192.168.11.1 address. While the new subnet doesn’t change the functionality of the router, the user guide, the label and the quick start guide still all refer to the original “.11” subnet.
Operating Modes
The Buffalo WMR-300 supports only two operation modes: Router and AP (which Buffalo calls bridge mode). Missing in the Buffalo device is the WISP mode that allows you to connect to a wireless network for your WAN connection. The NETGEAR PR2000 supports all five operating modes as summarized in the table below:
| Buffalo AirStation WMR-300N | NETGEAR Trek PR2000 | |
|---|---|---|
| Router | Y | Y |
| AP Mode | Y | Y |
| Hot Spot (WISP) Mode | N | Y |
| Client Mode | N | Y |
| Repeater | N | Y |
Travel Router Operating Modes
VPN Passthrough
As noted in our previously review of N150 travel routers, VPN passthrough is especially important for business travelers as they are likely to use VPN technology to securely connect to their corporate networks. And, for security when using public Wi-Fi networks, using a VPN is also a really good idea. If you travel internationally, you’ll also find that a VPN can provide you to US-based services such as Pandora, Netflix, Hulu, etc. These services block access for IP addresses originating outside the US.
The table below summarizes the VPN passthrough support for each of the N300 routers. The NETGEAR PR2000 supports all three types of passthough, but the Buffalo WMR-300 only supports PPTP. According to Wikipedia, “PPTP has been the subject of many security analyses and serious security vulnerabilities have been found in the protocol.” IPSec is generally considered much more secure.
| Protocol | Buffalo Airstation WMR-300N | NETGEAR Trek PR2000 |
|---|---|---|
| IPSec Passthrough | N | Y |
| PPTP Passthrough | Y | Y |
| L2TP Passthrough | N | Y |
Travel Router VPN Passthrough comparison
I tried testing both the NETGEAR Trek and the Buffalo AirStation with Hot Spot Shield, the VPN service that I have installed on my iPad. It’s what I use at public hotspots and when I travel internationally to stay connected to US-based media content. While Hot Spot Shield doesn’t disclose their underlying technology, I’m assuming that it’s IPSec. The NETGEAR Trek, with all VPN pass through protocols enabled, was able to negotiate a secure tunnel, and mywanip.com showed an IP address different than the one that my ISP has assigned to me. When I connected my iPad to the Buffalo WMR-300, it was unable to establish a VPN session.
WPS
I tested both products to make sure that WPS worked as expected. I tested using the built-in WPS client in my WD TV Live media streamer. Both devices successfully negotiated a WPS connection using the push button method. The Buffalo WMR-300 has a physical button that you can press for a couple of seconds. On the NETGEAR PR2000, you have to log into the browser interface, navigate to Advanced settings, and select the WPS Wizard. Frankly, without a pushbutton, it would be easier to enter in the network key into the client than to go through the hassle of using a “software pushbutton” to start the WPS negotiation.
Hands On
Although the features table (above) should help you make a choice, I’ll share a few thoughts from using both products.
The WMR-300 is one of the smaller travel routers we have tested. I liked that it had a storage compartment that stores the flat Ethernet cable. Out of all of the travel routers tested, the AirStation was the only one that supported multiple SSIDs. A total of 3 SSIDs are available plus an additional guest network. The first three SSIDs use the same LAN subnet, but you can enable client isolation. The third SSID is reserved for WEP clients. This is a nice feature since WEP is more easily cracked than the current WPA2/AES wireless encryption standard.
Not only is there a guest network, but it has a few features not normally found in guest networks. Optionally, of course, you can enable security. But in addition, you can create users and require them to enter credentials before they can use the guest network. A login is valid for 24 hours and thereafter must be re-authorized. The guest network is on a different subnet. The gateway is 172.31.54.1 and clients on this subnet have no access to the router admin page or any other devices on the 192.168.13.0/24 network.
The user interface (see gallery below) isn’t as slick as found on the NETGEAR PR2000, but it gets the job done. Every menu page has a strip of help content that relates to the items on the page. The WMR-300 doesn’t support DDNS, but arguably that may not be something you’d use when traveling. It does support port forwarding, but not port range forwarding or port triggering. It’s missing features such as MAC access control and URL blocking, and, as noted above, doesn’t support IPSec or L2TP pass through. You can enable remote management on a port of your choice, but only HTTP is supported.
When you’re not using the WMR-300 for your travels, it’s easy to turn it into an AP. Just change the mode on the home page of the admin UI and it becomes a wired to wireless bridge.
If you already own another NETGEAR router, the PR2000’s UI is going to look very familiar to you. The PR2000 uses the “NETGEAR genie” user interface that has “BASIC” and “ADVANCED” tabs. Like most other travel routers, it lacks a guest network, but it does, like the N150 D-Link and TP-LINK routers, support WPA/WPA2 Enterprise (RADIUS) mode. \
Compared to desktop routers, like the WNDR2800 that I currently use, the feature set of the PR2000 is a fairly small subset. It lacks port forwarding/port triggering as well as URL blocking. MAC filtering is a “Permit” list, not a Deny list. Firewall features are limited to Port Scan and DOS Protection. It does support a DMZ, has a built-in SIP ALG and VPN passthrough support for IPSec, PPTP and L2TP. You can block services for an individual IP address or for a range of address as well as create a schedule for blocked services.
The PR2000 supports three DDNS providers (DynDNS.org, No-IP.com and 3322.org). Optionally, you can enable a traffic meter that lets you control either the monthly volume of traffic (in MB) or monthly time limits (in hours). In addition to WMM support for QoS, there are a number of pre-defined Qos rules that you can enable
I tested switching between a wired WAN connection and a wireless WAN connection by unplugging the WAN Ethernet cable and turning the router off. I restarted the router by moving the “Internet Via” switch to the wireless position. After a device reboot, the PR2000 automatically scanned for available wireless networks. I selected the Buffalo WMR-300 to use as my “WISP” and entered in its network key. After a reboot and ~ 2 minutes, the PR2000 was connected to the Internet through the WMR-300.
To give you a feel for the user interfaces of the two routers, I’ve included galleries for the Buffalo…
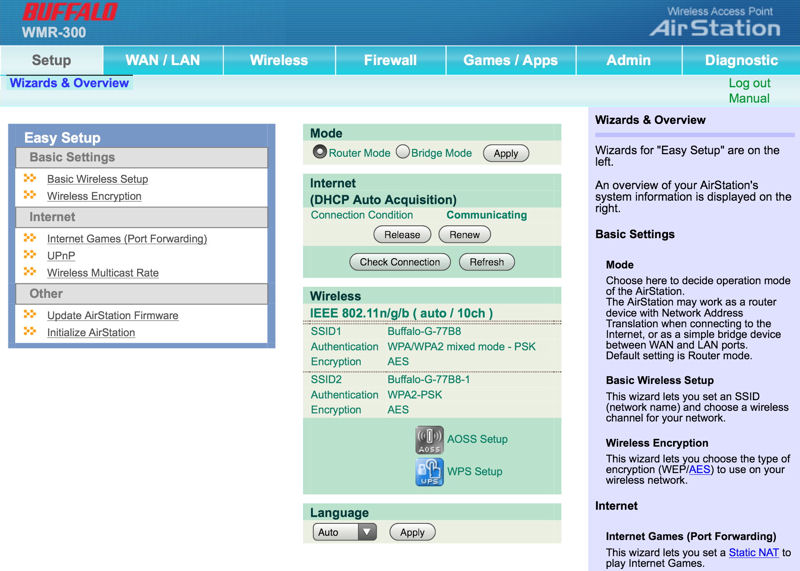
The Home page has Easy Setup wizards, a few basic settings and context sensitive help on the right side of the screen.
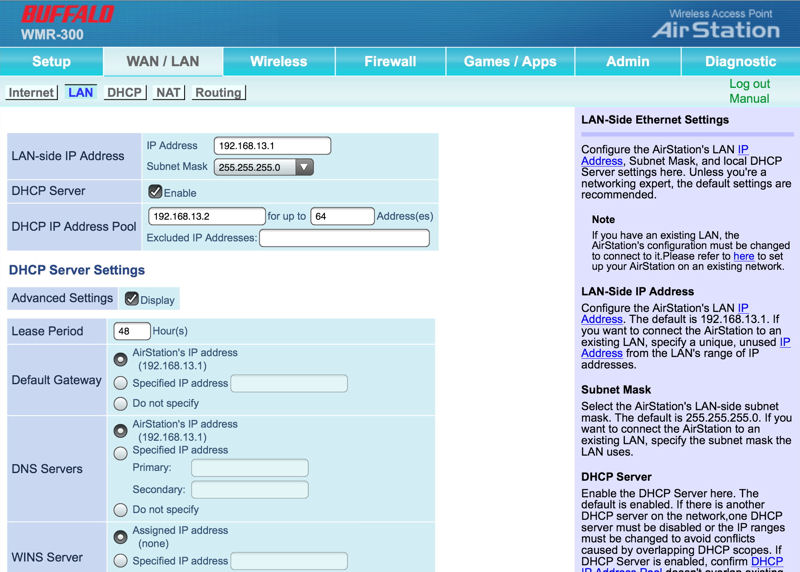
Setup LAN and DHCP server settings
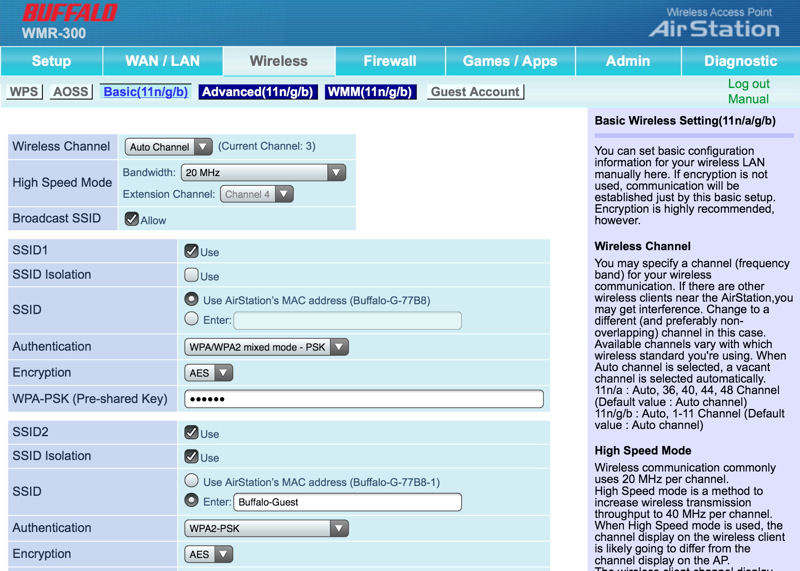
Setup basic settings for up to 3 SSIDs

SSID 3 is reserved for WEP.
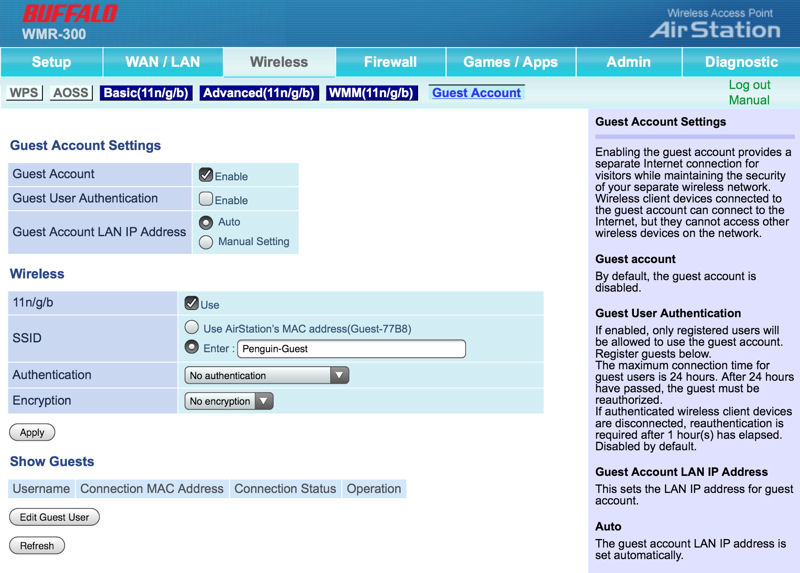
Optionally, you can require guest authentication and create user IDs.
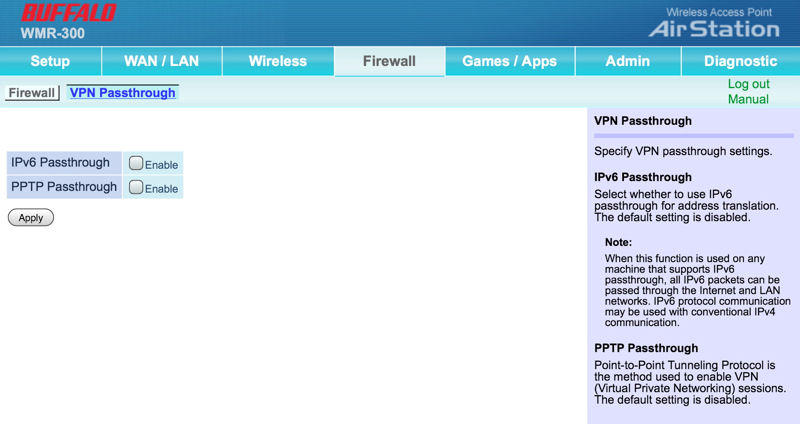
Enable VPN/IPv6 Passthrough.
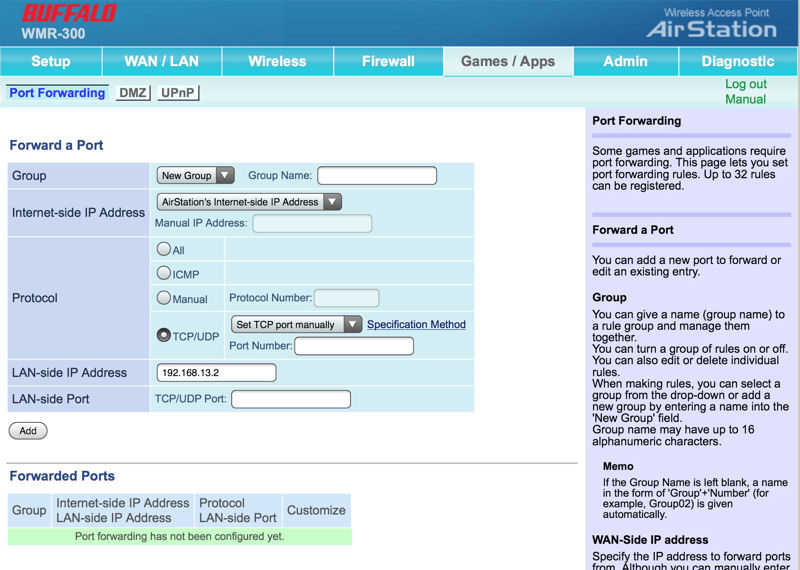
Set up port forwarding for games or applications.
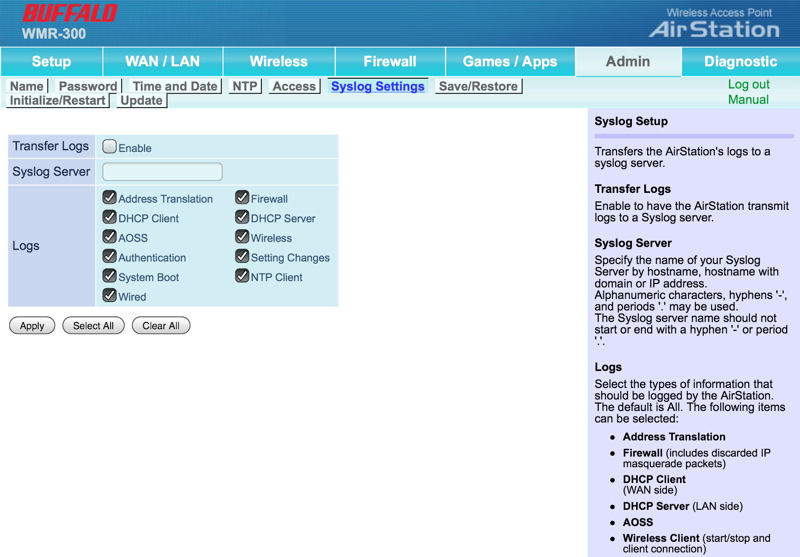
You can choose what you want to log to a syslog server.
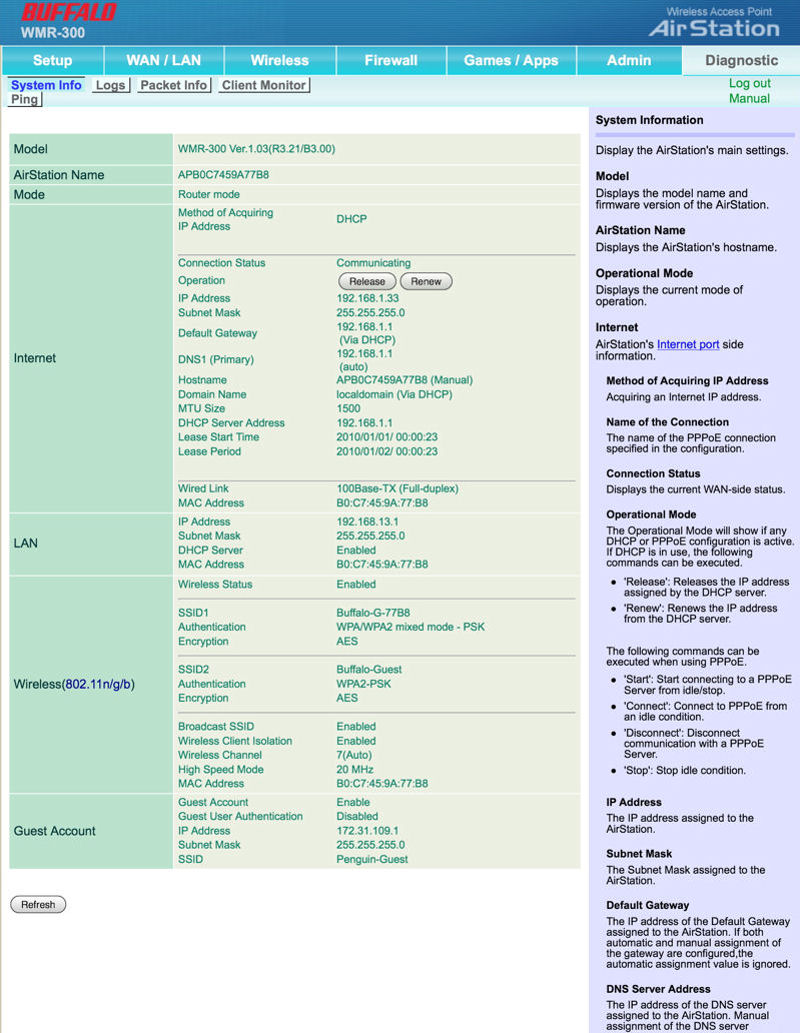
This is an overall status of all of you router’s settings.
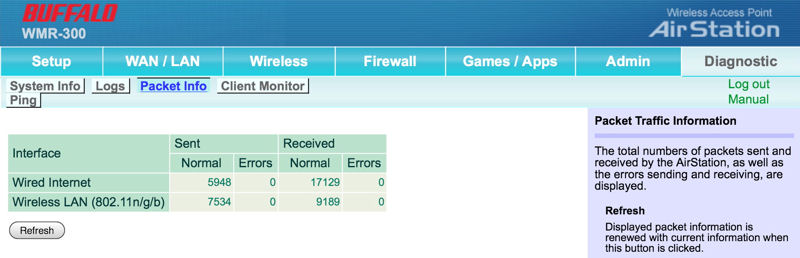
This shows total sent/received traffic on both wired and wireless networks.
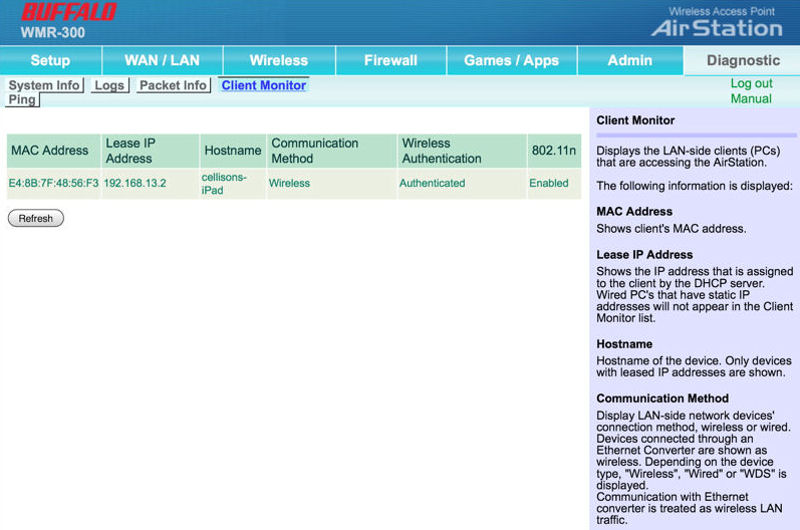
This shows information about attached clients.
and NETGEAR.
The Home page has Easy Setup wizards, a few basic settings and context sensitive help on the right side of the screen.
Setup LAN and DHCP server settings
Setup basic settings for up to 3 SSIDs
SSID 3 is reserved for WEP.
Optionally, you can require guest authentication and create user IDs.
Enable VPN/IPv6 Passthrough.
Set up port forwarding for games or applications.
You can choose what you want to log to a syslog server.
This is an overall status of all of you router’s settings.
This shows total sent/received traffic on both wired and wireless networks.
This shows information about attached clients.
Performance
As noted in our most recent review of the D-Link DIR-510L AC750 class router, testing travel routers creates a unique and challenging test scenario. Normally, the tests we run on wireless routers involve the use of a Wired LAN port as well as a DMZ feature. Those are used for testing both wireless performance as well as routing performance. Unfortunately travel routers don’t have LAN ports and some lack a DMZ feature, so we can’t provide our normal Chariot-based benchmarks.
To address these problems, we created a new test process. It’s worth a read, because the performance numbers in the charts won’t directly correlate to conventional routers. In addition, to make it easier to cull out travel routers from the many other routers in our Router Charts, Ranker and Finder, we created a new filter category for Travel Routers.
Though normally our charts can be filtered by class of routers, the travel router “class” includes N150 and N300 routers as well as an AC750 class router.
In the WAN to LAN Throughput comparison below, you can see that the DIR-501L as well as the WMR300 and the PR2000 clearly outperform the all of the N150 class of routers. Of course, you would expect them to have better performance since they are all linking at 130 Mbps, and the N150 routers link at 65 Mbps. Due to our testing methods, WAN to LAN routing performance is limited to wireless performance speeds.

Travel Router Wan to LAN routing performance comparison
Similarly, the composite image of the 2.4 GHz Downlink and 2.4 GHz Uplink tests show that N300 routers, as well as the AC750 router that uses N300 technology on the 2.4 GHz band, have a clear performance over the N150 class of travel routers, but all of them perform better than the fastest hotel links I’ve seen in the US.
The Buffalo WMR-300 was the clear performance winner in both the downlink and uplink tests. Arguably, NETGEAR’s rotatable antenna didn’t really translate into better throughput performance as it came in third in both tests.

Travel Router 2.4 uplink and downlink performance
Closing Thoughts
It’s not often that we review products that have such a narrow spread in price. Right now, the NETGEAR is the cheaper of the two… by $3. Oddly, my favorite from the N150 Travel Router Roundup, D-Link’s DIR-506, is more expensive than both routers at $44. But keep in mind it has a built-in 1700 mAh battery that can power the device for up to 4 hours or charge other USB devices
Again, the final decision will come down to features and performance, not price. With the addition of N300 products to the mix, you can see that there is a significant jump in performance compared to the N150 class travel routers for not a whole lot of additional cost. Thus, the N300 routers, if the feature set matches your requirements, could be a better value.
For the N300 travel routers, the clear choice for me is the NETGEAR Trek PR2000. It supports all operating modes and has VPN passthrough that works with the VPN service that I use. The file sharing capabilities of ReadySHARE, not to mention the charging capabilities of the PR2000 are just icing on the cake.