| At a glance | |
|---|---|
| Product | NETGEAR Nighthawk X6S Tri-Band WiFi Range Extender (EX8000) [Website] |
| Summary | AC3000 class three-radio Wi-Fi range extender with 4 Gigabit Ethernet ports and USB 2.0 port supporting storage sharing. |
| Pros | – 4×4 5 GHz high-band radio can be used for back or fronthaul – Impressive extended throughput |
| Cons | – Pricey – Aesthetics |
Typical Price: $165 Buy From Amazon
Introduction
When NETGEAR announced its EX8000 Nighthawk X6S Tri-Band WiFi Range Extender at the end of August, I dubbed it the "DIY Orbi Extender. Little did I know how accurate that description was for reasons I’ll reveal shortly.
The EX8000 is the first three-radio/"tri-band" Wi-Fi extender to hit the market. Like the original RBK50 Orbi, the EX8000 combines a two-stream dual-band 802.11ac AC1300 class radio with a third, four-stream 5 GHz radio. Also like Orbi, the two-stream 5 GHz radio only operates in the 5 GHz low-band channels (36-48) and the four-stream only in the high-band channels (149-161).

NETGEAR EX8000 architecture
But unlike Orbi, any of the three radios can be used to link back to the wireless router you’re extending. Orbi always uses its 5 GHz high-band radio for backhaul, falling back to sharing the 2.4 GHz client-facing radio also for backhaul in the unlikely event it can’t get a 5 GHz link.
However, the biggest difference between Orbi and the EX8000 is that Orbi will link only to other Orbis, while the EX8000 will connect to any router. Since the EX8000 also can be set to function as "tri-band" access point, you can even use a pair of them as a wireless bridge. A pair of EX8000’s won’t replace an Orbi, however, since it has no routing features.
The LED callouts show Link Status and "Maximum Throughput" indicators meant to communicate backhaul condition. It doesn’t look like the two lights can tell you which 5 GHz radio is being used for backhaul. Of course, since that depends on the 5 GHz channel you set your main router to, you’d already know that.

NETGEAR EX8000 LED callouts
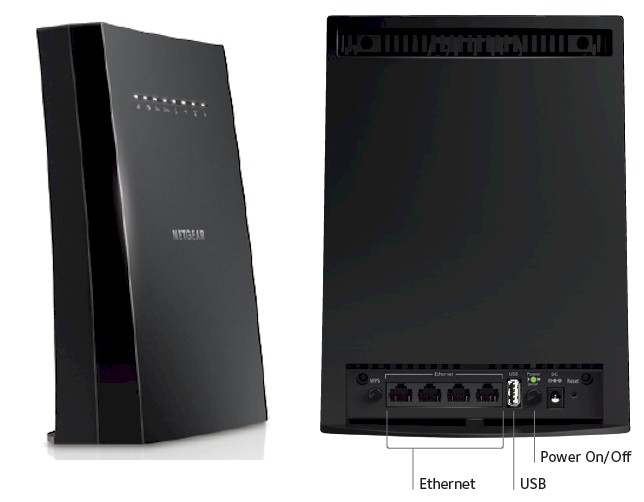
The rear panel callouts show the four gigabit Ethernet ports and other ports and buttons. The USB 2.0 port supports Readyshare storage and printer sharing

NETGEAR EX8000 rear callouts
The EX8000 is meant to sit on a shelf or table; it has no wall/ceiling mount screw slots.
Inside
NETGEAR requested short-term confidentiality on the EX8000’s FCC internal photos, so I opened it up after testing was completed. I didn’t have to go very far with disassembly because the innards looked very familiar.

NETGEAR EX8000 main board
If you compare the EX8000 photo above with the RBK50 Orbi photo below, it’s obvious the two use the same main board. The differences I could detect are highlighted in the photo; 32 MB of flash replacing the 4 GB in Orbi and no Bluetooth radio. The top of the two products is also different, with different plastic brackets supporting the antennas and light-guides for the EX8000’s onboard LEDs.
 main board")
NETGEAR Orbi (RBK50) main board
The table shows the key components of both.
| NETGEAR EX8000 | NETGEAR Orbi RBK50 | |
|---|---|---|
| CPU | Qualcomm IPQ4019 | Qualcomm IPQ4019 |
| Switch | QCA8075 | QCA8075 |
| RAM | 512 MB | 512 MB |
| Flash | 32 MB | 4 GB |
| 2.4 GHz Radio | – In IPQ4019 – Skyworks SKY2623L 2.4 GHz Power Amp (x2) |
– In IPQ4019 – Skyworks SKY2623L 2.4 GHz Power Amp (x2) |
| 5 GHz radio | – In IPQ4019 – RFMD RFPA5542 5 GHz power amp (x2) |
– In IPQ4019 – RFMD RFPA5542 5 GHz power amp (x2) |
| 5 GHz backhaul | – QCA9984 – RFMD RFPA5542 5 GHz power amp (x4) |
– QCA9984 – RFMD RFPA5542 5 GHz power amp (x4) |
| Bluetooth | None | CSR8811 Bluetooth 4.1 SoC |
Table 1: NETGEAR EX8000 and RBK50 Orbi key components
Setup
Installation, setup and ongoing management of the EX8000 is via its web interface that lives at 192.168.1.250 by default. But you’re also supposed to be able to hit http://mywifiext with your favorite web browser if you’re running Windows. This is a departure from the http://www.mywifiext.net NETGEAR usually employs to ensure easy access to router web administration. (If have to use http://mywifiext.local on MacOS and ioS and the extender’s IP address if you’re running Android.)
I didn’t have much luck using mywifiext and had to resort to using the IP address on initial setup. The extender will automatically switch over to using DHCP, try to grab an IP address at the end of the setup process and auto-redirect your browser to the EX8000’s new IP address. But that didn’t always work reliably. I was also frustrated by the extender’s tendency to lease a new IP address on subsequent runs of the setup wizard.
The bottom line was that the setup process got the job done, but was not as smooth as I’ve come to expect from NETGEAR extenders. The gallery below has screen captures from the process.
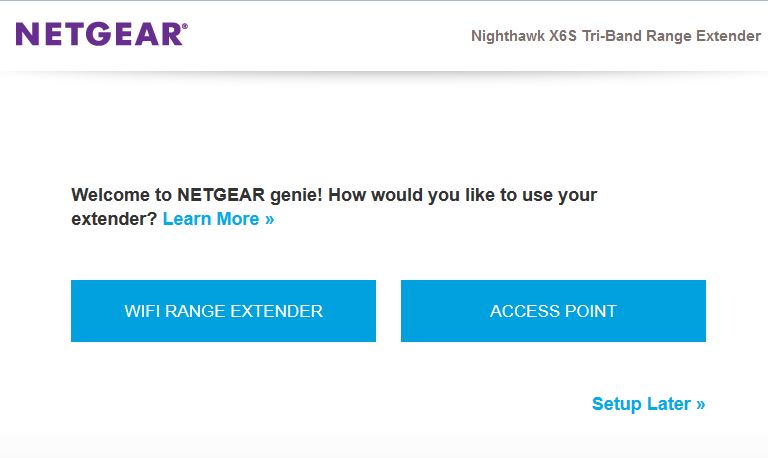
Start setup by selecting the mode.We’ll select Extender.
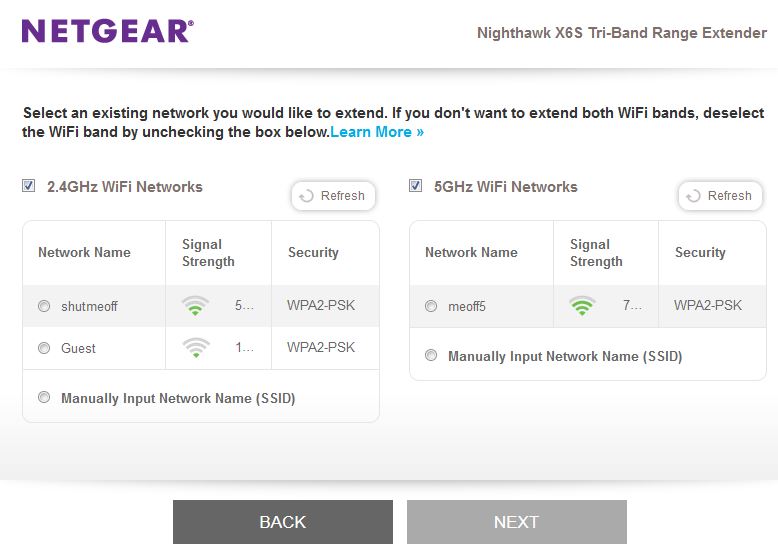
The site survey presents target networks for your selection.
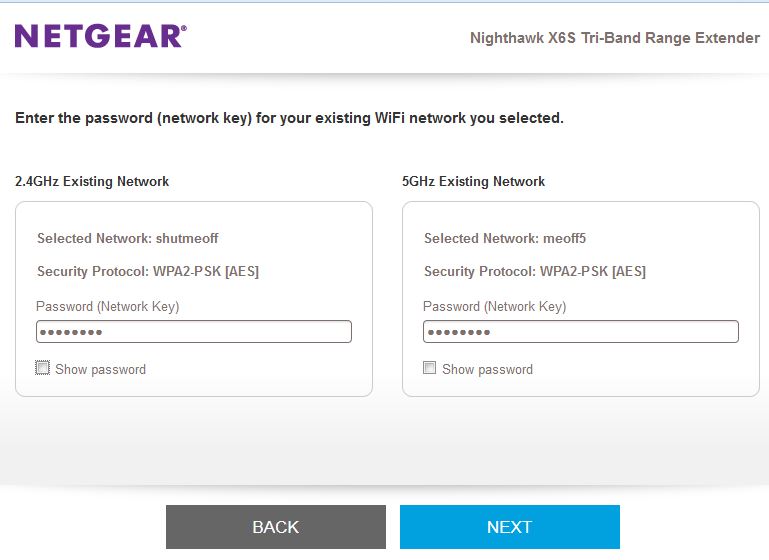
Enter the Wi-Fi network keys here.
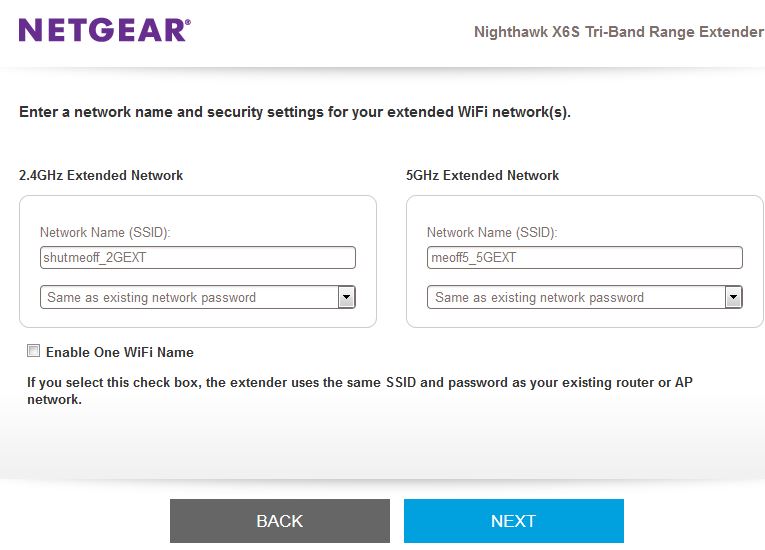
You can use different or same SSIDs for the extended connections
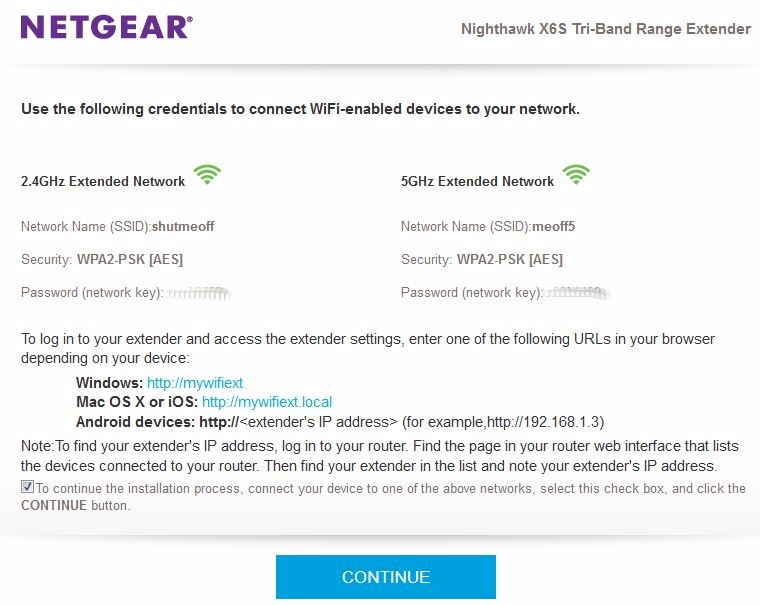
Summary presented after setup is complete.

You’ll see this if your browser properly auto-redirects to the EX8000’s new IP address.
Features
The EX8000’s Home screen presents a nice clear summary of signal strength, channel and link rates (thank you, NETGEAR!) for both backhaul and fronthaul (client facing) connections.

EX8000 Home screen – upper half
The lower half of the screen has a few more details.

EX8000 Home screen – lower half
As noted in the EX6150 review back in 2015, NETGEAR requires creating an account using your email address as your username. There is no way to get past this to run the wizard or access the normal admin screens. NETGEAR said the reason for the new requirement is that "many… security threats take advantage of the fact that people rarely change the default user name and password" for admin access. "By forcing people to create an account, it helps to minimize the exposure to security threats."
NETGEAR says the email stays local to the product until the user registers the product via the screen below, which appears after the wizard is complete. You have the option to skip registration, via the highlighted link. However, if you don’t register, you’ll get this screen each time you run the setup wizard.

Opt-in registration
The EX8000’s feature set is minimal, although there are a few niceties included like the ability to schedule wireless access and USB storage and printer sharing. The wireless schedule feature is odd, however, since it applies to the extender only. The scheduler would be more useful when the EX8000 is used in access point mode as the only AP.

Extender mode wireless settings
Changing to AP mode exposes the controls shown below. There is no advanced wireless settings screen. So there are no enables for MU-MIMO, beamforming, airtime fairness etc. 5 GHz channel selection on this screen doesn’t include DFS channels. But the equivalent AP mode setup screen does. I think this is a bug, however, since I tried using DFS channels with a NETGEAR R7800 and could not get the EX8000 to connect.

AP mode wireless settings
The gallery has more admin screenshots with commentary.
Start setup by selecting the mode.We’ll select Extender.
The site survey presents target networks for your selection.
Enter the Wi-Fi network keys here.
You can use different or same SSIDs for the extended connections
Summary presented after setup is complete.
You’ll see this if your browser properly auto-redirects to the EX8000’s new IP address.
Performance
I did not use the old extender test procedure, but instead created a new test suite using the Revision 10 wireless testbed. The new set of tests presents a much more comprehensive view of extender performance. Version V1.0.0.98 firmware was used for all the following tests.
First, let’s get storage performance out of the way. I used the router storage performance test setup, but ran only NTFS tests. I measured a respectable 15.7 MB/s write and 30 MB/s read with the testbed computer connected directly to an EX8000 gigabit Ethernet port.
Throughput vs. Attenuation
Since the EX8000 can function as a tri-band AP, I first tested throughput vs. attenuation performance (or rate vs. range, aka rvr), using the Revision 10 Throughput vs. Attenuation test with the EX8000 in the large octoScope test chamber with turntable.
The EX8000’s 2.4 GHz radio was set to channel 6 and "Up to 400 Mbps" (40 MHz) bandwidth. Keep in mind the octoScope Pal test client is limited to 20 MHz link rate, however. The EX8000’s low band 5 GHz radio (Ch 36-48) was set to Channel 40 and "Up to 866.7 Mbps" (80 MHz) bandwidth. The 5 GHz high-band radio (Ch 149-161) was set to Channel 149.

NETGEAR EX8000 in chamber
I’m not including the results in the Wireless Charts because that’s not the EX8000’s primary function. But I grabbed the results from the current top-ranked Ubiquiti AC Pro 3×3 AC1750 class access point for comparison, which is valid because it used the same Revision 10 process. Remember, all the following tests were done with a 2×2 802.11ac client.
2.4 GHz downlink shows the difference between the 2×2 NETGEAR and 3×3 Ubiquiti. The EX8000 has both higher average throughput and maintains connection longer. Both point to superior range/coverage for the NETGEAR.

NETGEAR EX8000 throughput vs. attenuation – 2.4 GHz down
2.4 GHz uplink shows mixed results with the Ubiquiti having a slight lead with stronger signals (lower attenuation), but the NETGEAR taking the high road as signal levels drop.

NETGEAR EX8000 throughput vs. attenuation – 2.4 GHz up
5 GHz downlink again shows the two-stream EX8000 with a distinct advantage over the three-stream Ubiquiti. Also included are the results from a run with the same octoScope 2×2 client associated with the EX8000’s 4×4 5 GHz high-band radio. The extra two streams really make a difference, even though the client link rate is the same.
The additional link gain provided by the extra two streams makes the difference. This is why you see four-stream products at the top of the Router Ranker. The low 0 dB attenuation result is likely a glitch; I ran the Channel 149 test only once.

NETGEAR EX8000 throughput vs. attenuation – 5 GHz down
5 GHz uplink results are surprisingly low. I’ve seen this effect in a few recent reviews and found it’s due to my use of only a single connection in the Revision 10 process. I ran a quick experiment and found if I increased the number of iperf3 connections, throughput would increase to look more like downlink. (The iperf3 command line sets a 32 KByte buffer size with 2 MByte TCP window.) The four-stream Channel 149 connection still produces the best result in the group.

NETGEAR EX8000 throughput vs. attenuation – 5 GHz up
Extender
So it looks like the EX8000’s radios make it a pretty good AP. For extender performance, I paired the EX8000 with a NETGEAR R7800 Nighthawk X4S, a Qualcomm-based AC2600 class 4 stream MU-MIMO enabled router. Since the R7800 is both top-ranked and Qualcomm-based, it should provide "best evidence" of the EX8000’s capabilities.
A Wi-Fi extender is only as good as its wireless backhaul, so that’s what this portion of our test focused on. The basic approach was to place the R7800 in one octoScope RF chamber and the EX8000 in another. The two are connected via a programmable attenuator that was used to ramp down the signal between the two, simulating performance at different "distances".
The octoScope Pal test client was also connected to the EX8000 RF chamber’s antennas via a splitter and attenuator. But the test did not change the Pal attenuator, leaving it at 0 dB attenuation. The setup is shown below.

Extender test configuration
Here’s the R7800 parked in one of the octoBox 18 chambers…

NETGEAR R7800 in chamber
…and the EX8000 in a second 18" chamber.

NETGEAR EX8000 in chamber
Throughput between router and extender was measured with different connections to the EX8000: 2.4 GHz wireless—5 GHz wireless and gigabit Ethernet—with uplink and downlink traffic run in each case. One set of tests was run with the R7800’s 5 GHz radio set to Channel 40, causing a two-stream backhaul connection; the other was with the R7800 set to Channel 149, resulting in a four-stream link. Each connection type was tested separately.
The first composite plot compares how downlink throughput with a 5 GHz two-stream connection changed for each connection type, as the "distance" between R7800 and EX8000 increased, i.e. as attenuation increased. (Downlink is R7800 to EX8000; uplink is vice-versa.). The difference between the Ethernet and 5 GHz backhaul lines is fairly small, meaning that the EX8000 is pretty efficient in passing backhaul throughput along. 2.4 GHz throughput is obviously limited by the bandwidth of the client connection.

NETGEAR EX8000 backhaul vs. attenuation – downlink – Ch 40
The next plot compares throughput with the same setup, but now uplink traffic changed for each connection type. 2.4 GHz throughput is again limited by the lower bandwidth of that connection. Ethernet and 5 GHz throughput again track pretty closely.

NETGEAR EX8000 backhaul vs. attenuation – uplink – Ch 40
Next, the backhaul link switched to four-stream using Channel 149 and downlink throughput measured. Note the Ethernet-connected bandwidth increases even more at low attenuation values (higher signal levels), but the 5 GHz wireless connection can’t follow because it’s only a two-stream connection. 2.4 GHz is again limited.

NETGEAR EX8000 backhaul vs. attenuation – downlink – Ch 149
Finally uplink with four-stream backhaul shows Ethernet bandwith staying about the same as with two-stream backhaul and both 5 GHz and 2.4 GHz throughput about the same as downlink.

NETGEAR EX8000 backhaul vs. attenuation – uplink – Ch 149
During testing, the attenuation range eventually caused the R7800 and EX8000 to disconnect. When that happened, I never saw the connection quickly switch over to using 2.4 GHz backhaul. I was able to force the EX8000 to use a 2.4 GHz backhaul link by setting 51 dB of attenuation between it and the R7800 and waiting a minute or so for backhaul to come back up on 2.4 GHz. When that happened, the EX8000 GUI showed a 120 Mbps 2.4 GHz link rate and I measured around 35 Mbps throughput via a 5 GHz wireless connection.
Performance – Over The Air
The last test placed the R7800 in my downstairs office and the EX8000 in the upstairs living room. This setup is basically the same used in my original over-the-air mesh test process. Like the mesh process, I used the same kitchen location, one floor up and at the opposite end of my home; my worst-case scenario.

Test locations
The photo below shows the EX8000’s location. (No, Chez SNB isn’t overrun with huge spiders. Ms. SmallNetBuilder just likes to decorate for Halloween.)

EX8000 vs. Orbi aesthetics
I should note the EX8000’s living room location earned an unprompted query from Ms. SmallNetBuilder, as in "What’s the black box in the living room?". When I explained that it did the same thing as the white box (Orbi) and asked if she liked it, the reply was a quick and emphatic "No!". I get that NETGEAR is trying to address a different market with the EX8000 and wants to protect the Orbi brand. But I think they should have gone with the higher WAF design. Just sayin’.
I used a Dell XPS13 running Windows 10 Home 64 bit with a Dell Wireless 1820A Wi-Fi adapter as the test client. This is a 2×2 802.11ac adapter using a Broadcom BCM4350 client device. iperf3 was used to run traffic between a Windows 7 machine running iperf3 server connected to an R7800 LAN port and the XPS13. The EX8000 was set up with different extender SSIDs so I could associate the Dell where I wanted.
Tests were run uplink and downlink on both bands with the R7800 and EX8000 using Channel 40 for (2×2) and Channel 149 (4×4) for backhaul. The key for the plots is:
-
Baseline – Measurement taken with XPS in same room, ~ 10 feet from R7800
- Remote No Ext – Measurement taken in Kitchen, associated with R7800
- Remote w/ Ext – Measurement takin in Kitchen, associated with EX8000
The 2.4 GHz downlink plot shows the EX8000 improves a 2.4 GHz client connection in the kitchen from basically unusable to about the same as you’d get with the client parked right next to the R7800. Actually with the 2×2 5 GHz low-band radio (Ch 40)used for backhaul, throughput in the kitchen actually came out better than you’d get next to the router.

EX8000 – OTA – 2.4 GHz downlink
2.4 GHz uplink results show similar throughput improvement vs. direct connection to the R7800 (Remote No Ext).

EX8000 – OTA – 2.4 GHz uplink
The 5 GHz client in the kitchen was unable to even see the R7800’s SSID, so there is no Remote No Ext value to compare. Even though downlink throughput via the EX8000 is lower than baseline, connecting the XPS13 to the EX8000 yields about 150 Mbps throughput where there would otherwise be none. There was little difference between using Channel 40 or 149 for backhaul.

EX8000 – OTA – 5 GHz downlink
For 5 GHz uplink, throughput using Channel 40 for backhaul is significantly higher than using Channel 149. In this case, since the 4×4 radio is used for client connection, it appears the extra streams improve the connection for the two-stream client.

EX8000 – OTA – 5 GHz uplink
Closing Thoughts
I’m sorry I haven’t anything to compare the EX8000’s performance with, since I’ve given away previous extenders tested and used a new test process. But I think it’s clear the EX8000’s 5 GHz radios can provide a high bandwidth extended connection over a surprisingly wide signal range. Given this is the same radio used in Orbi, we already knew that. But it’s good to see the benefits of Orbi’s excellent 4×4 5 GHz radio are now available to everyone.
Yes, $230 is a lot to pay for a Wi-Fi extender and it’s almost twice as much as NETGEAR’s previous top-of-line EX7000, which I haven’t reviewed. But the price might come down over time, especially if Linksys prices its similarly-designed, yet-to-be-released RE9000 more aggressively when it hits stores. Since the Linksys is based on Mediatek, not Qualcomm, silicon, Linksys should have the margin to do it.
In the meantime, if you like the router you have and just need to cover a pesky dead spot, the EX8000 can probably do the job better than anything else you can buy.