Introduction

| AirMagnet Handheld 3.0 and Laptop Trio | |
|---|---|
| Summary | Intuitive, easy to use portable wireless LAN analysis and management tools, priced for Enterprise buyers. |
| Update | None |
| Pros | • Best-in-class WLAN “integrity management” for 802.11a/b/g • Easy-to-navigate interface that successfully extracts information from a sea of data |
| Cons | • High price limits use to deep-pocketed customers • Documentation lacks technical depth |
I remember seeing AirMagnet for the first time at Networld+Interop in 2002 and being impressed as hell. Not only was it (and still is) the best example a of low-bulk, hi-content user interface on a PDA-sized screen, but the tricks it could do seemed just amazing. But somehow I never managed to get my hands on one to check it out…until now.
AirMagnet’s recent Version 3.0 release prompted the company to embark on a fresh push to get reviewers to help keep the product on prospective buyers’ radar screens. This time, I managed to make the reviewer list, and was glad I did.
What It Is
AirMagnet describes its products as “wireless integrity management systems”. Although packet sniffing and protocol anaylsis are among the tools in the AirMagnet kit, its strengths are more in the deployment and ongoing maintenance of wireless networks. In other words, if you’re a WLAN product developer trying to figure out why your new product won’t associate with an AP, you may be better served by a dedicated packet sniffer / protocol analyzer. But if you’re trying to find out which of your AP’s are the most used, or in charge of hunting down and removing rogue APs, AirMagnet is just the ticket.
The Trio is AirMagnet’s latest version of its laptop-based product adding 802.11g support , plus 22 new alarms to its 11b-only and 11a/b products. The new features include this list stolen shamelessly from AirMagnet’s promo material:
-
Six 802.11g-specific alarms including the ability to identify pre-standard 802.11g devices and competition between 802.11b and 802.11g clients that negatively affects connectivity and lowers available throughput.
-
A new coverage feature that allows network managers to monitor service levels and ensure that they are in compliance with service level agreement components, including voice-over-IP (VoIP) requirements, minimum and maximum user support, throughput rates and other parameters.
-
A new signal quality tool that detects signal fluctuations and correctly identifies their sources as malfunctioning access points (APs), multi-path interference or a range of other possible problems.
-
The ability to identify multiple SSIDs within a single AP. This allows WLANs to recognize different classes of users, or set up multiple functions on a single AP by designating one SSID for VoIP and one for WLAN data.
-
The ability to identify the latest developments from hardware vendors, including multiple radios within a single device.
Running Laptop Trio requires a laptop running WinXP or 2000 and a wireless adapter. AirMagnet has expanded its list of supported cards to include adapters from Cisco, NETGEAR, Nortel, Proxim and its own two CardBus adapters. AirMagnet shipped me its dual-band, tri-mode NL-5354CB, which is sourced from Senao (PDF) and also available rebranded from EnGenius and other vendors.
The PocketPC-based Handheld product has also been bumped to Version 3, but only gets 16 new features. Because the PocketPC platform does not support the 32bit CardBus slot required by 802.11a adapters, it can’t detect 802.11a WLANs.
However, the CompactFlash card that AirMagnet supplied for my Handheld evaluation detected both 11b and 11g APs and clients (STAs) just fine, although it could only associate with 11b APs. The Handheld product also supports Cisco AIR-LMC352 or AIR-PCM352 PC cards.
AirMagnet uses a licensing scheme that requires entering both the serial number from the install CD and MAC address of the wireless adapter used. This info is sent via Internet to AirMagnet, which then issues a license file that’s downloaded to your laptop or handheld to activate the product. (There are also “alternate ways” to get a license file if you don’t have an Internet connection handy.) The process worked without a hitch for both Handheld and Laptop installs.
The Magnet in Action
AirMagnet really has way too many features to cover and just looking at feature lists doesn’t do the product justice. Instead, I’ll walk through a couple of examples of the way that I used it. Although these scenarios just scratch the surface of what AirMagnet can do, they’ll illustrate the high degree of usability and power designed into the product.
Tip: If you like what you see, or are just curious as to what spending $3000 or so will get you in the way of “wireless integrity management systems”, you can download demos of AirMagnet Laptop and Handheld – after giving up a little info at AirMagnet’s website – and see them in action for yourself.
But first a note on usability. Because the form-factor is so handy, and I tended to use AirMagnet in mobile situations, I used AirMagnet Handheld much more than Laptop. It was pretty easy to reach into my shoulder bag, pull out my PocketPC and fire up AirMagnet in under 30 seconds. You also are somewhat less conspicuous wandering around an airport staring at a handheld, than doing the same thing with a notebook.
Although I found I still needed two hands when using the PocketPC (the interface doesn’t interact in any really useful manner with PocketPC navigation pads), balancing a notebook on one arm and scratching at its touchpad is much harder.
Fortunately, even in these days of Level Orange alerts, I wasn’t deemed enough of a threat to attract airport security and was left alone in my wonkiness. (I have to confess that I felt a little like one of the Star Trek crew wandering around with a TriCorder…)
Rogue Hunting
One of my favorite games was find the AP. Doing this provided a great example of using AirMagnet’s “drill down” capability and also provided some insight into how effective AirMagnet could be in physically tracking down an unauthorized AP.
The Start screen (Figure 1) shows two Access Points (AP). Tapping on the AP icon switches you to the AP List screen (Figure 2). I’m interested in the AP that has a client associated (indicated by the “+”), so just Tap-and-hold on that AP to bring up a selection of Tools that I can use.
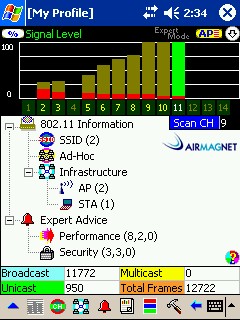
Figure 1: Handheld Start screen
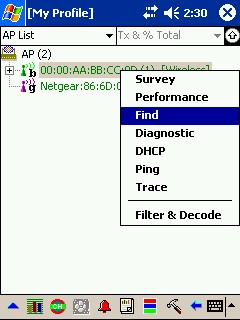
Figure 2: AP List screen
Selecting Find brings up that tool (Figure 3) and takes AirMagnet out of the all-channel scan and selects only Channel 11 – where my AP of interest is located.
All I then have to do is wander around watching the signal trend graph and real-time Signal and Noise meters. You can see in Figure 3 that I approached the AP of interest from a distance (from the Trend graph) and was pretty much right on top of it when I snapped the screenshot (from both the Trend and Signal and Noise meters). You can even enable a Geiger-counter like sound, to give an audible indicator of colder / warmer – handy for walking-into-walls-avoidance!
The main problem I found during my hunts was the omni-directional nature of the Compact Flash radio card that I was using. This limited my ability to exactly pinpoint the AP or STA that I was seeking. (In one particular hunt, I swore that the AP was inside a wall…)
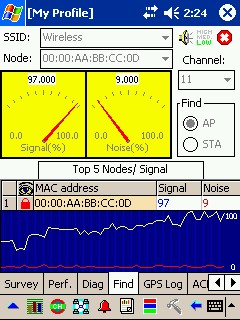
Figure 3: Find tool
For serious rogue AP-hunting, you’d need to either rig up some sort of directional reflector, or spring for the Cisco card that takes external antennas. The latter solution requires a PocketPC that accepts a PC card, however, which are a vanishing breed. It could also put a crimp in your ability to be inconspicuous, unless maybe you mounted a high-gain directional panel antenna under your jacket! Another solution might be to somehow reduce the sensitivity of the wireless adapter’s receiver, so that antenna orientation would be more effective.
Just to give you a flavor for what the AirMagnet Laptop Start screen looks like, Figure 4 shows the same two-AP network.
Figure 4: Laptop Start screen
(click the image for a larger view)
This little network doesn’t make good use of Laptop’s larger screen, but you can get a feel for the different display approaches. Since most items in Handheld are clickable, I was disappointed to find that the pie chart wasn’t. (The chart changes according to what’s selected in the pane above it.) This wouldn’t have been helpful for some items – like the Frame Address Type shown – but could be for Security or Performance alarms.
I also found that although data in the table in the right-hand pane could be sorted by any of the table columns, I couldn’t move or hide columns in order to avoid the horizontal scrolling required even with the window expanded to the full size of my notebook’s 1026 X 768 display. I couldn’t change the size of any of the panes in the window, either.
By the way, right-clicking on the desired AP in the table and selecting Find using AirMagnet Laptop opens a separate smaller, tabbed, fixed-size window.
WLANs, WLANs everywhere and not a Byte to grab
The other activity I found myself engaging in was using AirMagnet to try to connect to one of the many networks that I’d find while traveling. I wanted to see if $3000 bought you any features that would make AirMagnet better than NetStumbler, Kismet, or even WinXP’s Zero Config for Wardriving.
I’m not trying to suggest that AirMagnet should be compared to any of the many wardriving and/or WLAN exploit tools that are readily available at no cost. It’s obviously in a different class entirely!
Since I didn’t plan ahead properly, I didn’t make all the screen shots for this review while I was around large WLANs. So please forgive the lack of continuity in some of the screen shots that follow.
Large, busy wireless LANs and AirMagnet were made for each other and where the power of the product really shines. I was amazed at how even Handheld kept up with the dozens of APs and STAs that it ran into at the trade shows I attended and constantly reorganized them into not just one, but many different views.
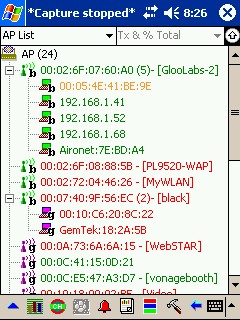
Figure 5: APs at CES2004
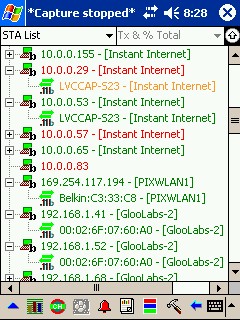
Figure 6: STAs at CES2004
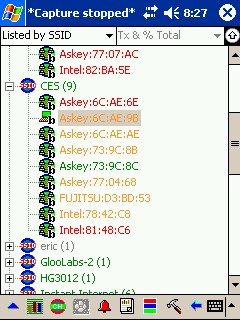
Figure 7: SSIDs at CES2004
Figures 5 – 7 show three different views of a snapshot of the WLAN activity in the LVCC South Hall during CES 2004. There’s a lot going on, but AirMagnet’s use of heirarchical lists, icons and color coding makes it easy to quickly separate busy and idle APs and STAs. The level of activity in a WLAN is something you don’t get when using WinXP’s Zero Configuration utility, but can be determined (with more effort) with NetStumbler and Kismet. However, AirMagnet’s selection of data views and sorting ability stands far above its no-cost competition.
WLANs, WLANs everywhere… (cont’d)
Once I found a busy WLAN, I’d switch to the alternative Start page AP view to see whether WEP (the red lock icon) or WPA (TK/Mic) was enabled. If the AP were unprotected, a tap-and-hold on its list entry brought up the Tool pick list (Figure 8) where I selected the DHCP tool (Figure 9).
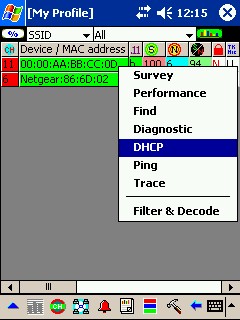
Figure 8: Selecting an AP to join
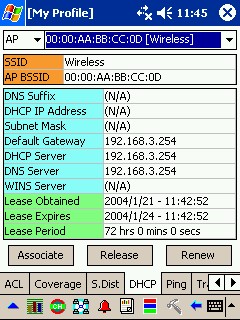
Figure 9: Successfully associated
A tap on the Associate button would quickly tell me whether my knock on the WLAN’s door would be answered and I’d be allowed in (Figure 9), or whether I’d get the dreaded “Rejected by AP” popup.
Folks more skilled than I might be able to use AirMagnet’s Decode feature to crack a WEP key, but that’s not really its intended use.
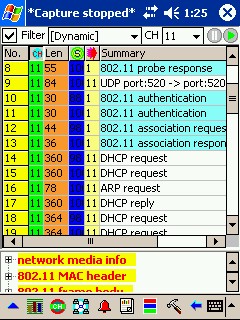
Figure 10: Filter and Decode Real-Time display
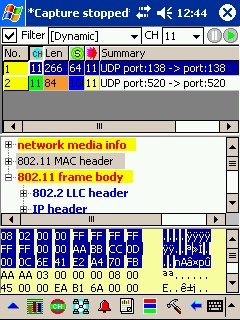
Figure 11: Detailed Packet Decode
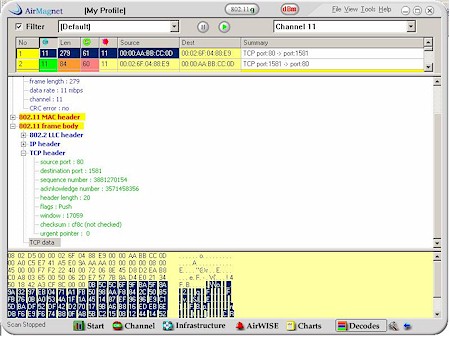
AirMagnet says the feature is aimed more for finding protocol problems, and the tool provides an array of features that make for an impressive wireless protocol analyzer. Selecting the Decode tool while AirMagnet is running in its usual Live Capture mode shows the real-time display (Figure 10). This mode shows you the frames as they whiz by, but only their high-level descriptions. (I actually had to stop the tool so that an interesting looking packet sequence would be captured. The real live mode doesn’t display the decoded frame information pane.)
You can pause the display, but taking a close look at the bits requires that you stop capture entirely. The display then changes to show the decoded data pane (Figure 11), where all of each frame’s bits are translated and organized into human-readable form. Each of the frame parts can be expanded for closer inspection, and I also enabled the Hex decode (located in the Configure > General menu) feature for the lowest-level drill down.
But a PocketPC’s display really starts to feel cramped when rummaging through lots of decoded data. Anyone using AirMagnet this way on a regular basis would be better served by the more spacious display served up by the Laptop version (Figure 12).
Figure 12: Detailed Packet Decode – AirMagnet Laptop
(click the image for a larger view)
My example uses this powerful feature in a pretty simple way. Rest assured that AirMagnet can filter and capture data in pretty much any way that you want. You can also save captured data in native, Ethereal and Sniffer formats for offline analysis, and load files saved in AirMagnet format for replay.
AirMagnet points out that because of frequent use of some sort of security / encryption in wireless LANs, i.e. WEP, 802.1x, etc., its packet decode capability covers only Layers 1 through 3 of the OSI model. Analysis beyond this level must be done by exporting the captured data and using other tools.
Closing thoughts

As I said at the top of the review, reviewing any product like this is a difficult task, and AirMagnet makes it even harder. You can probably tell that I was more impressed with AirMagnet Handheld, but don’t take that as a negative against AirMagnet Laptop. It’s more a reflection of spending more time with Handheld because I found it much more convenient to use in my grab-and-go fashion.
But it’s also a little bit of being in awe of the extra level of design and geek craftsmanship the folks at AirMagnet obviously possess in order to overcome the limitations of the PocketPC’s tiny display and stylus-based interface.
So yes, folks, AirMagnet deserves all the accolades it garners and just keeps getting better. It’s a pity that the company doesn’t see fit to offer a lower-cost version. Folks with large IT budgets shouldn’t have all the fun!


