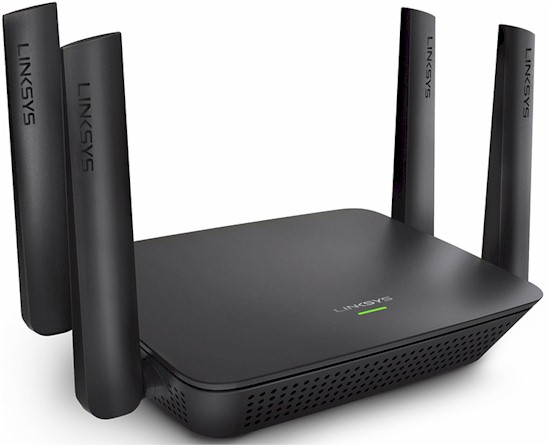
| At a glance | |
|---|---|
| Product | Linksys MU-MIMO Range Extender (RE9000) [Website] |
| Summary | Tri-band Wi-Fi Range Extender based on MediaTek chipset. |
| Pros | • Less expensive than NETGEAR EX8000 with similar performance • Small footprint that can be wall/ceiling mounted • Four port Gigabit switch |
| Cons | • Doesn’t use 2.4 GHz as backhaul |
Typical Price: $102 Buy From Amazon
Introduction
Linksys’ RE9000 MU-MIMO Range Extender follows NETGEAR’s EX8000 Nighthawk X6S Tri-Band WiFi Range Extender as the second "tri-band"/three-radio Wi-Fi extender to hit the streets. Linksys has decided to use price as its primary means of knocking the EX8000 down a peg or two in sales, given its current $170 price vs. the RE9000’s $230. I’ll be comparing the two throughout the review.
The RE9000 combines a two-stream dual-band 802.11ac AC1300 class radio with a third, four-stream 5 GHz radio. Maximum link rates of 400 Mbps (2.4 GHz), 867 Mbps (5 GHz) and 1733 Mbps (5 GHz) add exactly up to the 3000 Linksys uses as the RE9000’s class rating. So far, this puts the RE9000 and EX8000 on equal footing.
Both products always prefer to use the highest-bandwidth four-stream 5 GHz radio to connect back to the base router being extended, i.e. for backhaul. However, where the EX8000 uses the 5 GHz U-NII-3 high band (Channels 149-165) for its four-stream backhaul radio, the RE9000 uses the U-NII-1 low band (Channels 36-48). Since maximum allowed transmit power is now the same for both channel groups, this should have no effect on performance.

Linksys RE9000 architecture
But you’ll want to make sure you change the base router 5 GHz channel to allow the RE9000 to take full advantage of its maximum bandwidth if you have a three or four-stream router. In the old days before Wi-Fi classification became the mess it now is, it was much easier to tell how many streams a router used. The simple approach for the RE9000 is, if in doubt, just set your base router’s 5 GHz radio to 36, 40, 44 or 48.
The more significant difference between the Linksys and NETGEAR, however, is that the RE9000 does not use the 2.4 GHz radio for backhaul. The EX8000 prefers to use its four or two-stream 5 GHz radios for backhaul, but will fall back to using 2.4 GHz if it can’t connect on 5 GHz. I suspect this is a software limitiation and could be changed in a future firmware release. But when I confirmed the no-2.4 GHz-for-backhaul "feature" with Linksys, they didn’t say they would be changing this limitation.
In any event, the RE9000 is like most other of today’s extenders and doesn’t require your router to support WDS. The RE9000’s connection wizard has a built-in site survey to make setup easy.
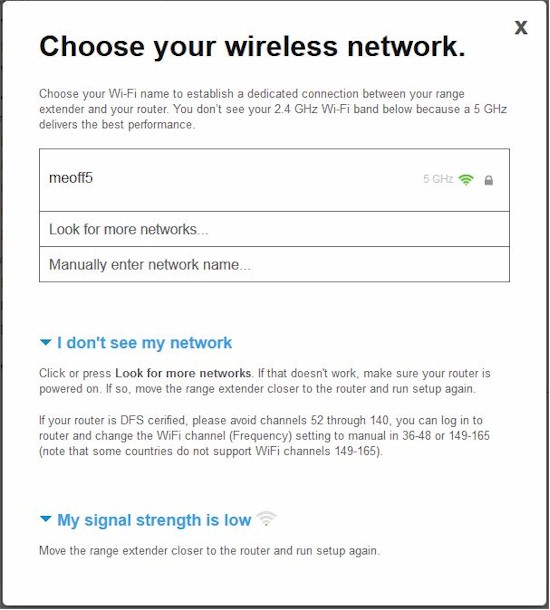
Linksys RE9000 site survey
The RE9000 is a compact little guy and could be mistaken for one of Linksys’ remaining E1200 or E2500 N-class routers were it not for the four external dual-band antennas (not upgradeable). The LED callouts shows the single LED used to communicate status. I’m red/green color blind, so the choice of green and orange colors were not good for me.
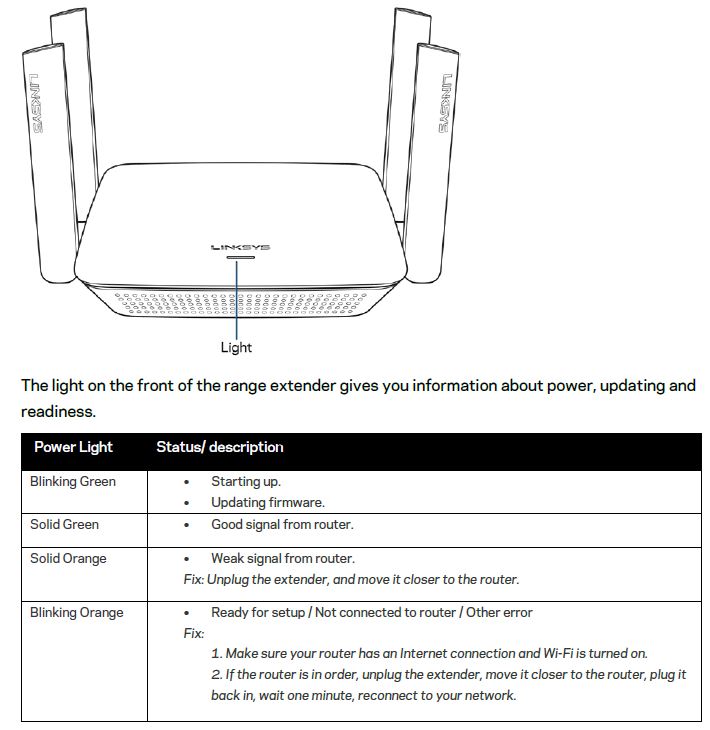
Linksys RE9000 LED callouts
The rear panel callouts show the four Gigabit Ethernet ports, power port and reset button. There’s also a WPS button on the right side. Each Ethernet port has a link/activity LED. One of the things you don’t get with the RE9000’s lower price is the ability to serve/share files from USB storage.
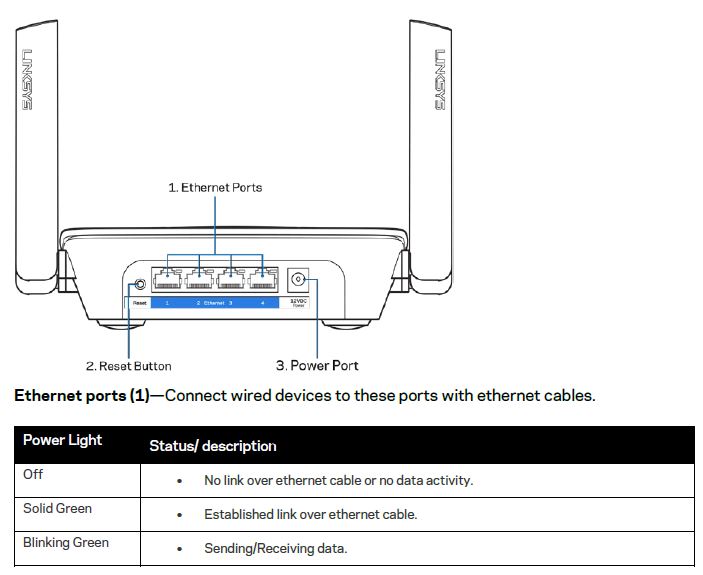
Linksys RE9000 rear callouts
The RE9000 can sit on a shelf or table but also has screw mounting slots on its bottom that allow pointing the rear connectors up or down.
Inside
The RE9000’s short term confidentiality period expired, so I was able to use the FCC internal photos. It’s a little difficult to see in the photo below, but the two black cables connect the 2×2 2.4/5 GHz radio to the rear two antennas. The four gray cables connect the 4×4 5 GHz radio to all four antenna positions.
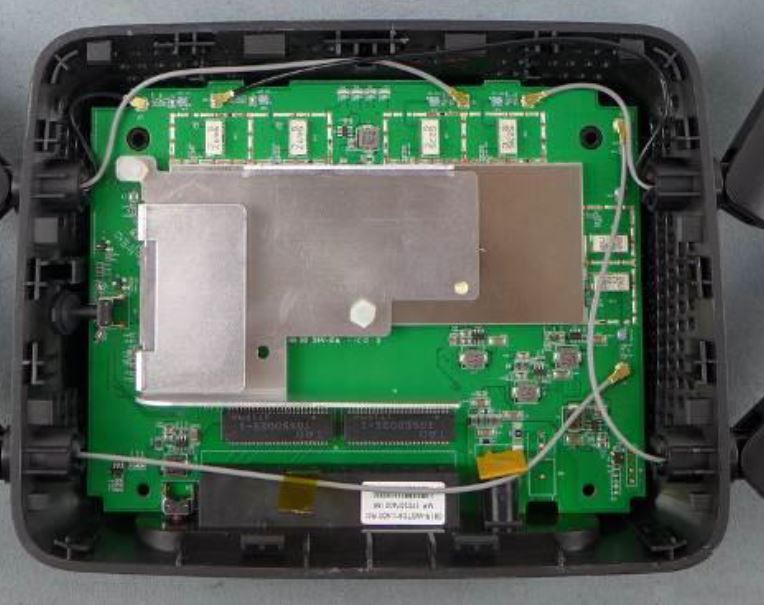
Linksys RE9000 inside
Another FCC photo makes the RE9000’s MediaTek platform pretty plain. Not called out here, but shown in a close-up photo is the MediaTek MT7621AT dual-core network processor powering the whole shebang. The white 5 GHz band filters are labeled with frequency values that make it easy to tell which radios are which.
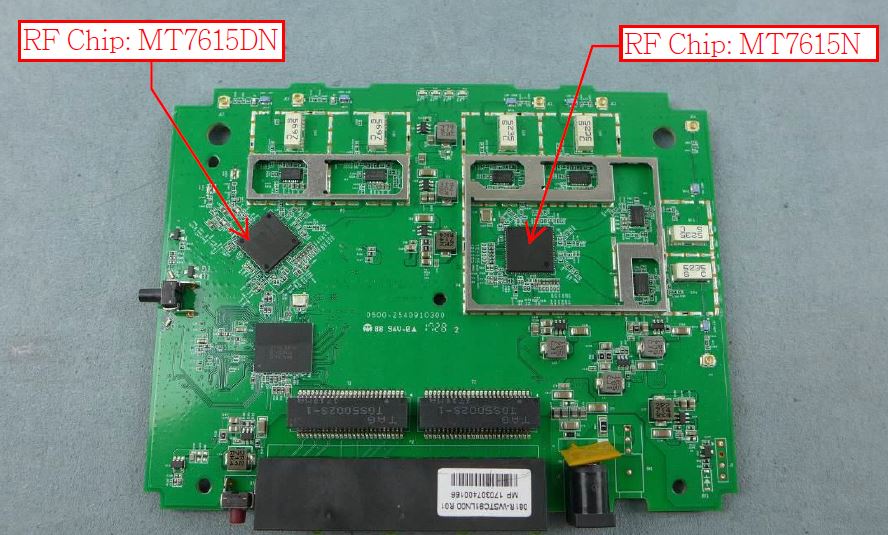
Linksys RE9000 board top
The table shows the key components of the RE9000 and NETGEAR EX8000 for comparison. The FCC photos didn’t clearly show the RE9000’s RAM and flash, so I used WikiDevi’s guess. I could find no sign of any 2.4 GHz power amplifiers or front ends, by the way.
| Linksys RE9000 | NETGEAR RE9000 | |
|---|---|---|
| CPU | MT7621AT Dual-core Network Processor | Qualcomm IPQ4019 |
| Switch | In MT7621AT | QCA8075 |
| RAM | 128 MB (?) | 512 MB |
| Flash | 16 MB (?) | 32 MB |
| 2.4 GHz Radio (2×2) | – Mediatek MT7615DN – No power amp |
– In IPQ4019 – Skyworks SKY2623L 2.4 GHz Power Amp (x2) |
| 5 GHz radio (2×2) | – Mediatek MT7615DN – SKY85728-11 5 GHz WLAN Front-End Module (x2) |
– In IPQ4019 – RFMD RFPA5542 5 GHz power amp (x2) |
| 5 GHz backhaul (4×4) | – MediaTek MT7615N – SKY85728-11 5 GHz WLAN Front-End Module (x4) |
– QCA9984 – RFMD RFPA5542 5 GHz power amp (x4) |
Table 1: Linksys RE9000 key components
Setup
The RE9000 is simple to set up. As noted earlier, if you want the RE9000 to use its four-stream radio as backhaul, set your router’s 5 GHz channel to 36 – 48 before you start the RE9000 setup.
You can try flying blind and using the RE9000’s WPS pushbutton to link to your WPS-enabled router and watching to see if the RE9000’s front panel LED eventually turns solid green. This method will set the RE9000 to clone your router’s SSID, with _Ext added, and WPA2 password on all radios.
If you’d rather see what’s going on during setup or make some changes, you can connect to the RE9000 from an Ethernet-connected computer or you connect via Wi-Fi to the default Linksys Extender Setup SSID. Either way, set your device’s IP address to the 192.168.1.X subnet first. Once connected, launch your browser and enter http://extender.linksys.com (or http://192.168.1.1 if that doesn’t work) to launch the setup wizard.
Make sure you have not connected the RE9000 to your LAN via Ethernet, or you’ll you’ll get an online version of the extender.linksys.com site, which hasn’t been updated to handle the RE9000 yet.
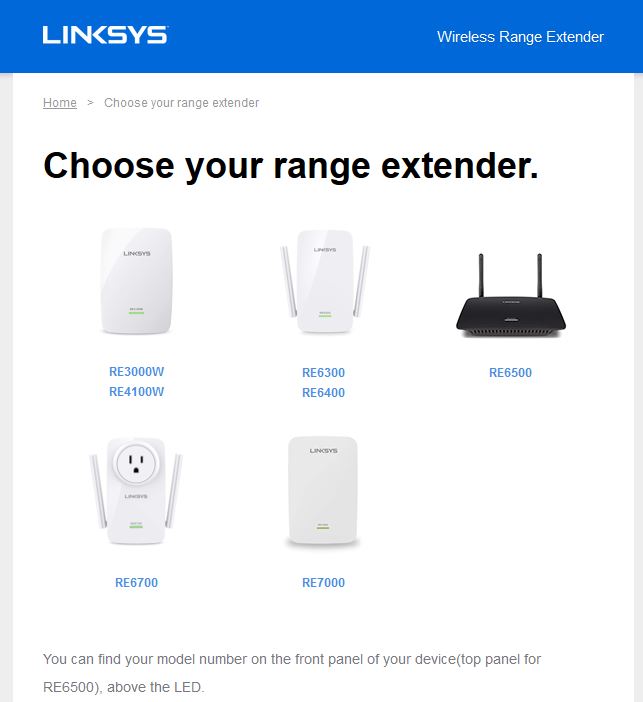
Unhelpful nline extender.linksys.com page
If you’re properly connected to the RE9000, you’ll see the setup wizard, the first two pages of which are below.
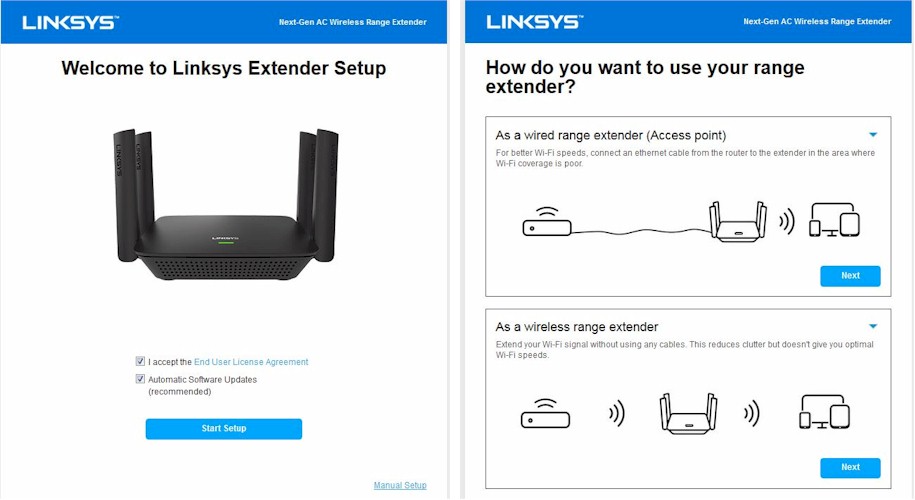
Linksys RE9000 setup wizard start
Do yourself a favor and assign a static IP address to the RE9000 before you finish setup. It will make things a lot easier should you need to make settings changes later. Make sure you choose an IP address outside your main router’s DHCP server range to avoid an IP address collision.
Features
The RE9000’s feature set has what you need to configure it for either access point or wireless extender duties. It provides two tools that will be more helpful than trying to use the front panel LED to determine optimum placement.
The SpotFinder provides a simple placement tool for folks who don’t want to mess with interpreting signal strength and link rate to find the right place to park their extender.
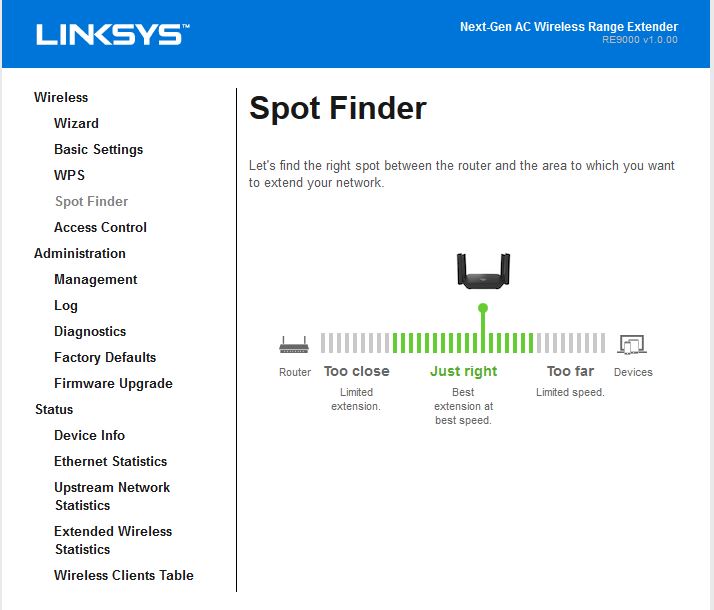
Linksys RE9000 SpotFinder
If you are someone who wants to know what’s happening in the backhaul link, the Upstream Network Statistics page is for you. It contains channel, bandwidth, link rate, signal strength and signal quality information. Very helpful.
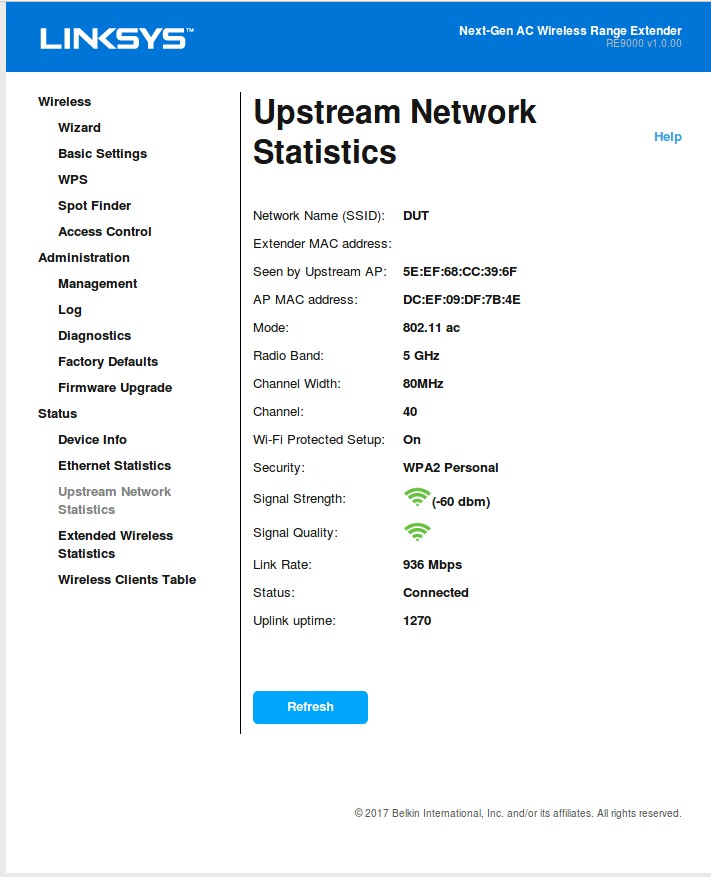
Upstream/backhaul info
You can see how the fronthaul/client connect radios are set from the Extended Wireless Statistics page.
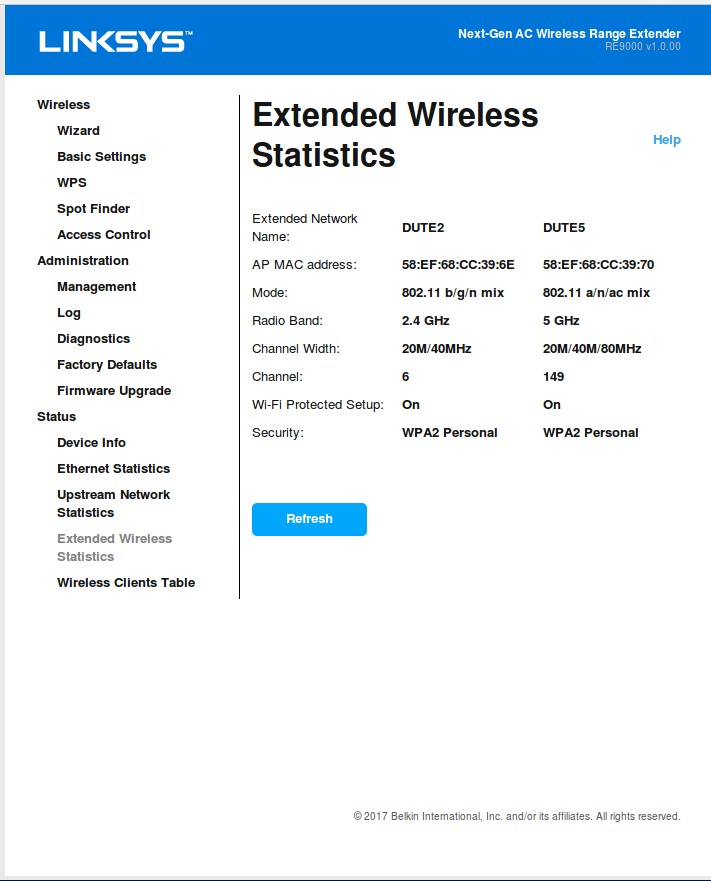
Fronthaul/client connect info
Most settings are found on the Basic Settings page. The top half of the page holds controls for LAN address and backhaul radio…
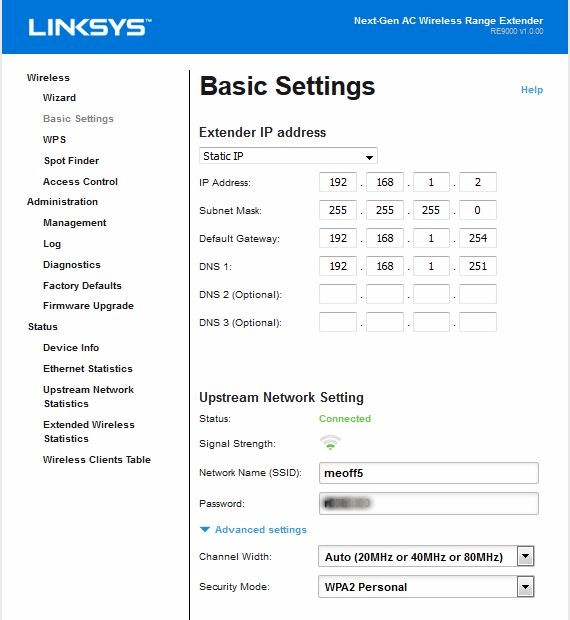
Basic settings – LAN and backhaul radio
…and the lower half contains fronthaul/client connect radio, host name and clock settings and a Reboot button. When the Band Steering box is checked, the same SSID and WPA/WPA2 password is set on both radios and the channel and channel width settings are greyed-out.
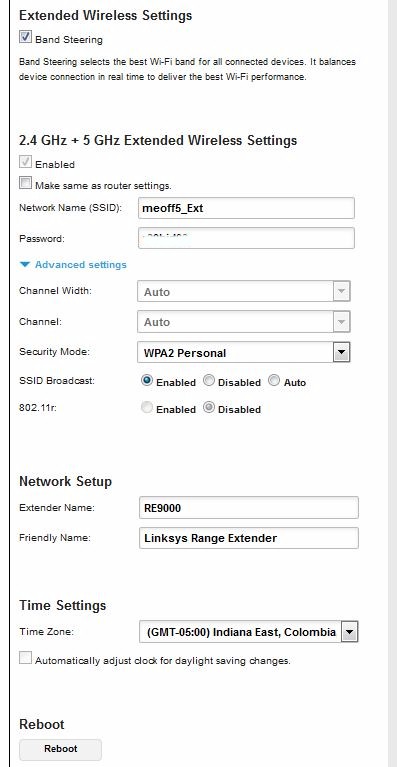
Basic settings – fronthaul radio and other
Unchecking the Band Steering box, exposes controls for each radio.
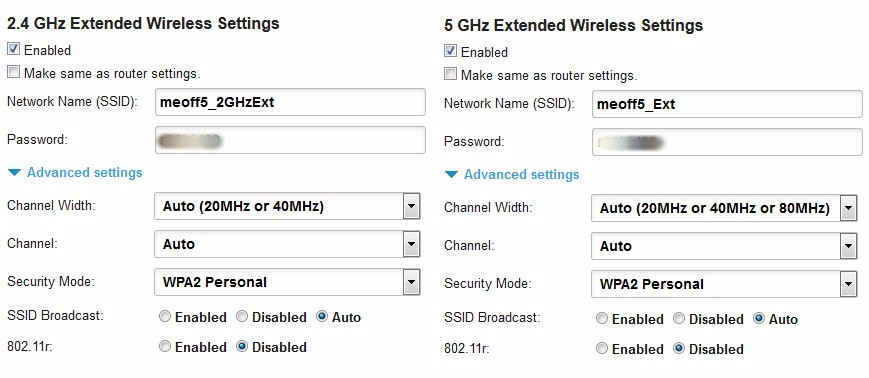
Fronthaul/client connect radio settings
I checked for a hidden advanced wireless settings page and found one. But you’d best leave most of these settings alone. The only ones I’d mess with are the Turn on/off wireless, but I don’t know why you would.
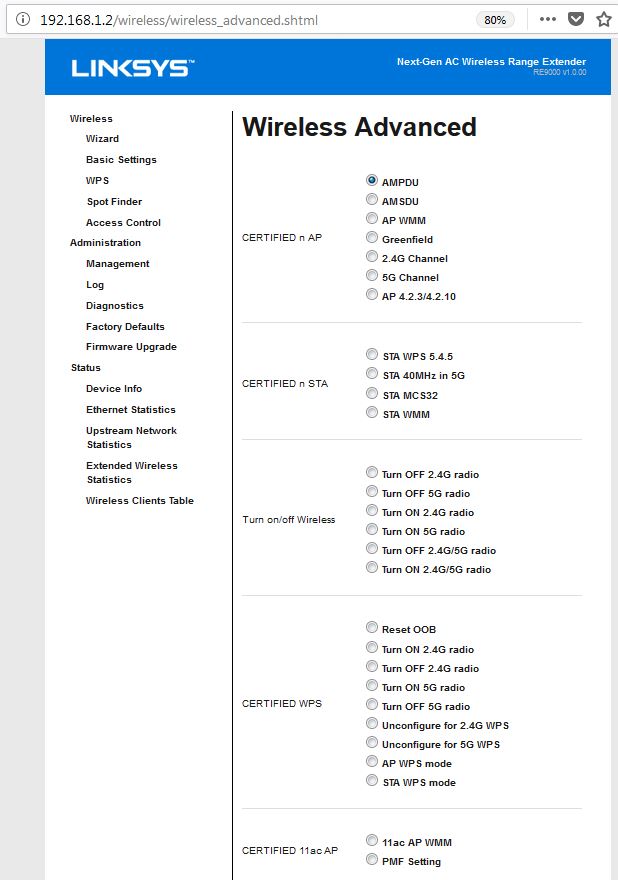
Hidden advanced wireless settings
Two other RE9000 features of note include access control and 802.11r support. MAC address based access control can be set to either allow or deny devices. Enabling this feature disables WPS, which is enabled by default. 802.11r (fast transition) support is disabled by default, but can be enabled on each fronthaul radio. Unless all your devices support 11r, however, leave this disabled or devices that do not support 11r won’t be able to connect.
Unlike NETGEAR, Linksys doesn’t force you to register their products. And if you do register, you don’t have to use your email address as your username.
Performance
I did not use the old extender test procedure, but instead created a new test suite using the Revision 10 wireless testbed. The new set of tests presents a much more comprehensive view of extender performance. Version 1.0.00.040 firmware was used for testing, following the same special process used to test NETGEAR’s EX8000. If more of these tri-band extender beasties appear, I suspect I’ll formalize the process and move the data to the Charts
The process summary is:
- Throughput vs. attenuation for all three radios (using Revision 10 process) in AP mode
- Extender backhaul throughput vs. range with Ethernet, 2.4 GHz and 5 GHz wireless extender connections
- OTA (Over The Air) test in worst case Kitchen location
Throughput vs. Attenuation
Since the RE9000 can function as a tri-band AP, I first tested throughput vs. attenuation performance (or rate vs. range, aka rvr), using the Revision 10 Throughput vs. Attenuation test with the RE9000 in the large octoScope test chamber with turntable.
The RE9000’s 2.4 GHz radio was set to channel 6 and Auto (20/ 40 MHz) bandwidth. Keep in mind the octoScope Pal test client is limited to 20 MHz link rate, however. The RE9000’s low band four-stream 5 GHz radio (Ch 36-48) was set to Channel 40 and Auto (20/40/80 MHz) bandwidth. The 5 GHz high-band two-stream radio (Ch 149-161) was set to Channel 149 and Auto (20/40/80 MHz) bandwidth.
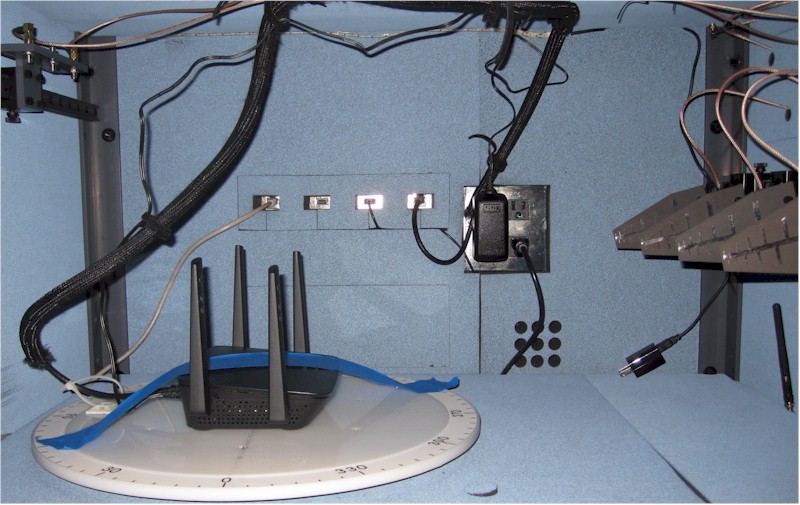
Linksys RE9000 in chamber
2.4 GHz downlink shows the RE9000 and EX8000 are fairly evenly matched, with the Linksys having a slight advantage with the strongest signals, then falling below the NETGEAR as signal level reduces.
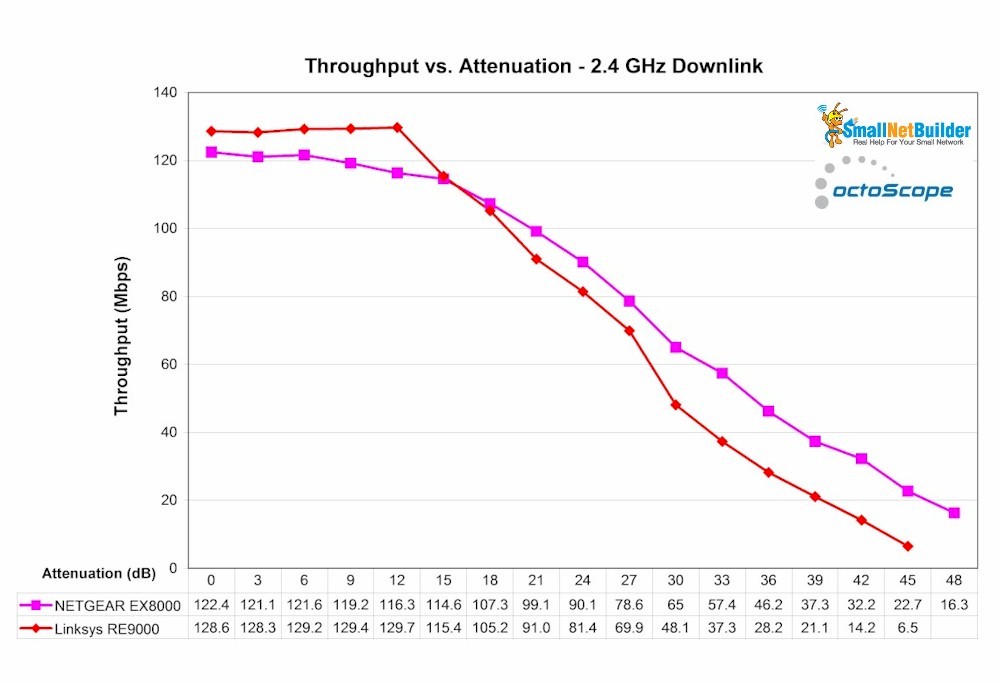
Linksys RE9000 throughput vs. attenuation – 2.4 GHz down
2.4 GHz uplink shows the RE9000 with a more sustained advantage over the EX8000.
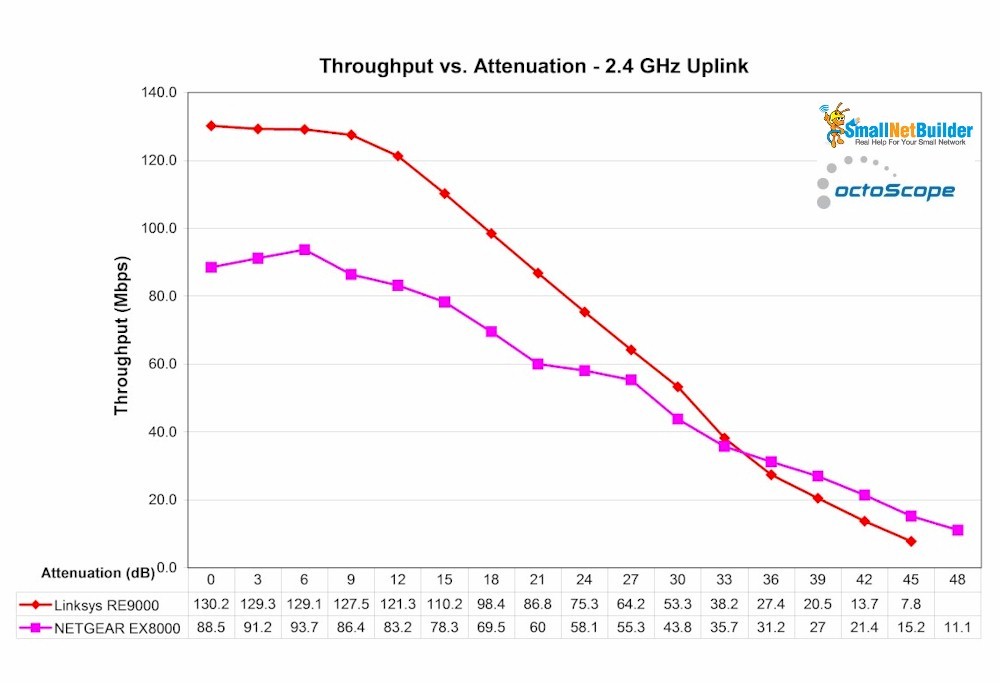
Linksys RE9000 throughput vs. attenuation – 2.4 GHz up
To keep the plots uncluttered, I’ve separated 5 GHz results into two-stream and four-stream plots. 5 GHz downlink – 4 stream shows the NETGEAR beating the Linksys, except for the 0 dB measurement outlier.
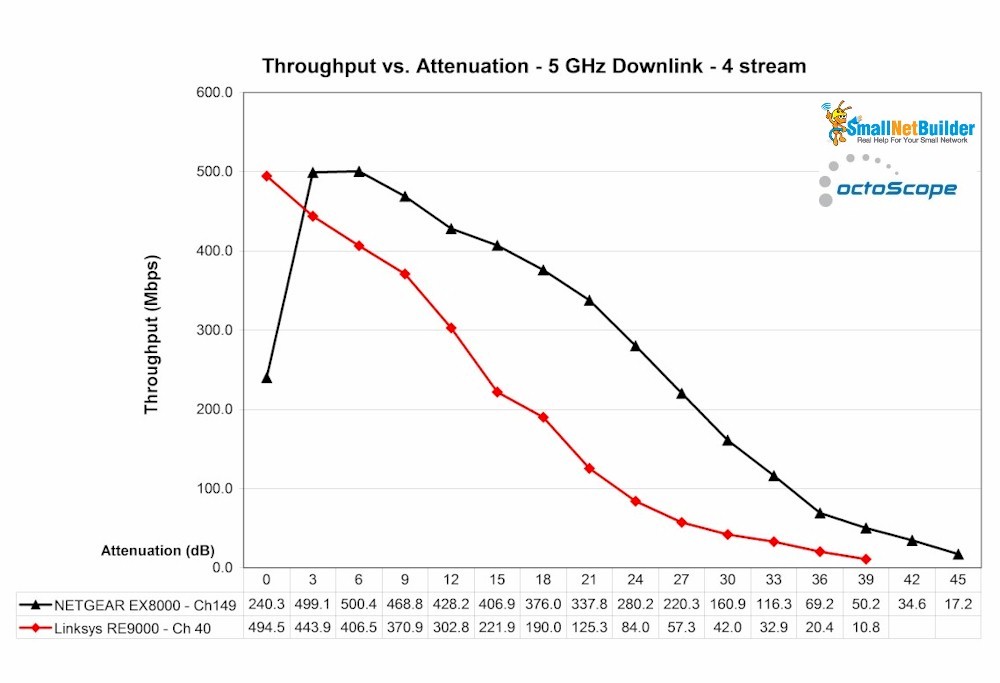
Linksys RE9000 throughput vs. attenuation – 5 GHz down – 4 stream
5 GHz uplink- 4 stream results show the MediaTek-based RE9000 doesn’t suffer from the Qualcomm-based EX8000’s disadvantage caused by our test method. As noted in the EX8000 review, increasing the number of iperf3 connections from the single connection used in the benchmark, increases uplink throughput to look more like downlink. (The iperf3 command line sets a 32 KByte buffer size with 2 MByte TCP window.)
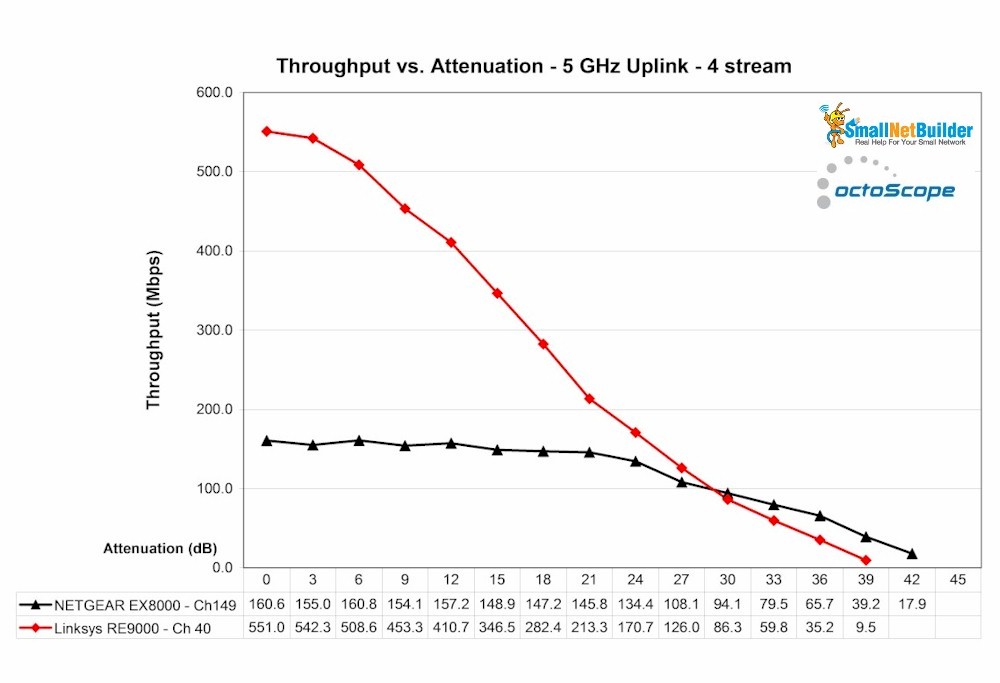
Linksys RE9000 throughput vs. attenuation – 5 GHz up – 4 stream
5 GHz downlink – 2 stream shows lower throughput for both products due to the lower link gain from 2 streams vs. 4. The EX8000 outperforms the RE9000, but disconnects 12 dB sooner.
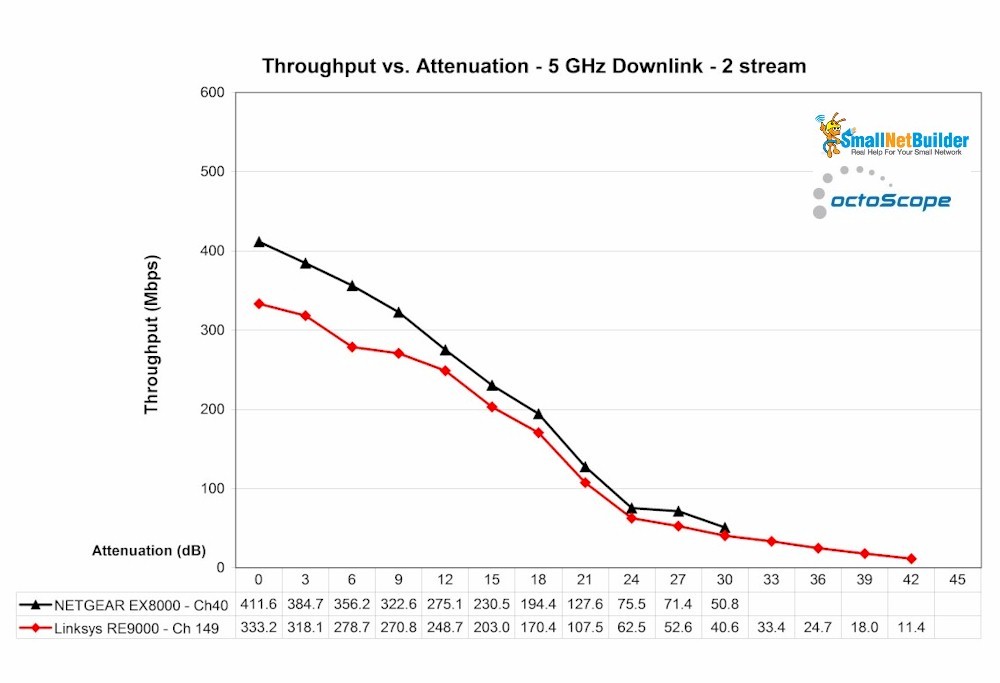
Linksys RE9000 throughput vs. attenuation – 5 GHz down – 2 stream
5 GHz uplink – 2 stream results shows the same throughput disadvantage for the NETGEAR as the 4 stream results.
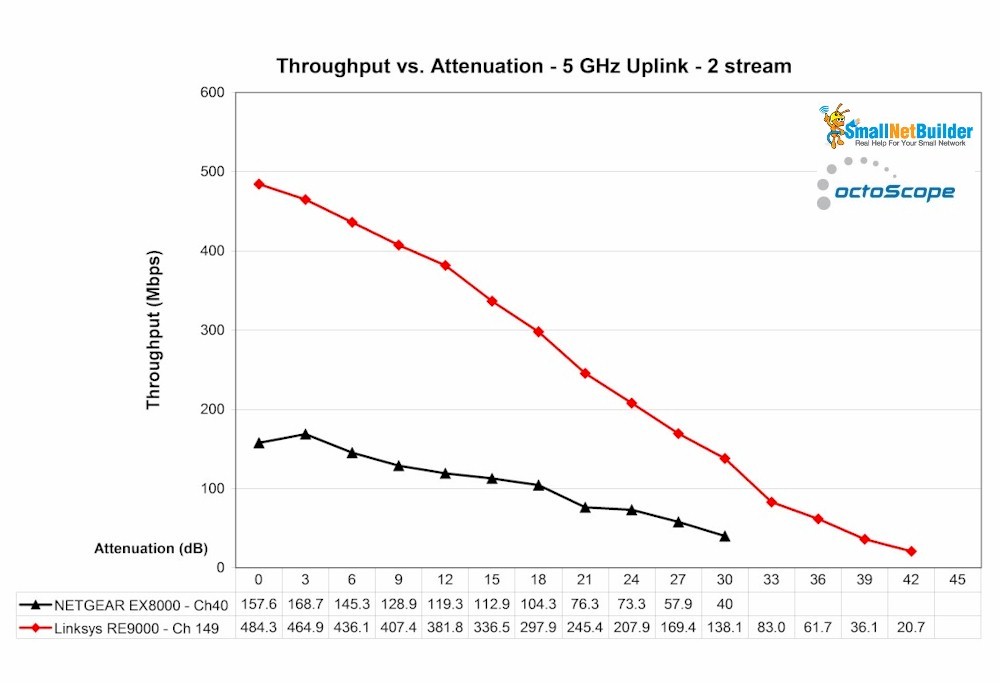
Linksys RE9000 throughput vs. attenuation – 5 GHz up – 2 stream
Extender
Now that we know how good the RE9000 is as an AP, let’s look at how it performs as an extender. As in the EX8000 review, the RE9000 was paired with a NETGEAR R7800 Nighthawk X4S, our top-ranked Qualcomm-based AC2600 class 4 stream MU-MIMO enabled router.
The basic approach was to place the R7800 in one octoScope RF chamber and the RE9000 in another. The two are connected via a programmable attenuator used to ramp down the signal between the two, simulating performance at different "distances". The EX8000 review has more test setup details if you’re curious.
Here’s the the RE9000 parked in an octoScope 18" chamber.
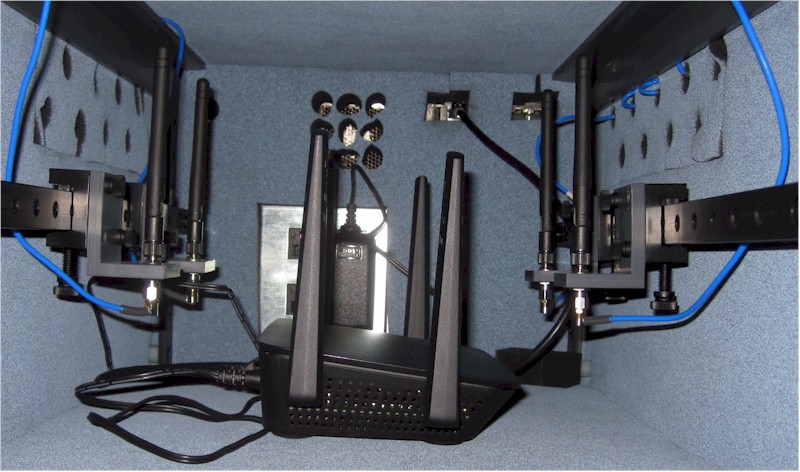
Linksys RE9000 in small octoScope chamber
Throughput between router and extender was measured with different connections to the RE9000: 2.4 GHz wireless, 5 GHz wireless and Gigabit Ethernet—with uplink and downlink traffic run in each case. One set of tests was run with the R7800’s 5 GHz radio set to Channel 40, causing a four-stream backhaul connection; the other was with the R7800 set to Channel 149, resulting in a two-stream link. Each connection type was tested separately.
Keep in mind that the backhaul connection is never used for client traffic. So if Channel 40 (four stream) is used for backhaul, Channel 149 is used for client connection and vice-versa. In both cases, the octoScope Pal test client is configured as a 2×2 AC STA.
The first composite plot compares how client downlink throughput with a 5 GHz two-stream backhaul connection changed for each connection type, as the "distance" between R7800 and RE9000 increased, i.e. as attenuation increased. (Downlink is R7800 to RE9000; uplink is vice-versa.). The difference between the Ethernet and 5 GHz backhaul lines is fairly small, meaning that the RE9000 is pretty efficient in passing backhaul throughput along. 2.4 GHz throughput is obviously limited by the bandwidth of the client connection.
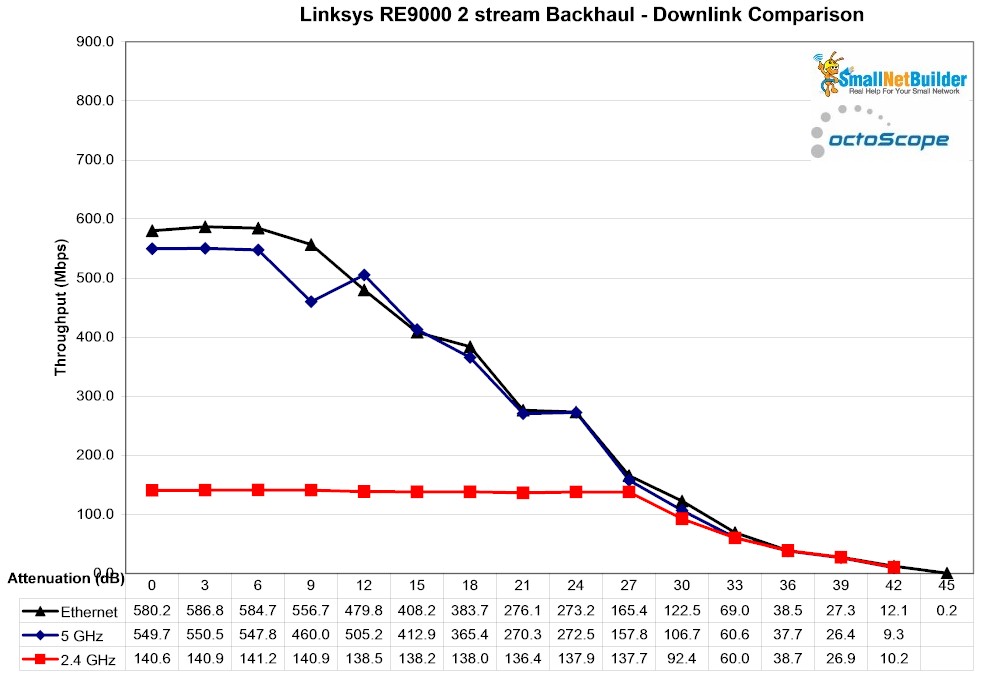
Linksys RE9000 backhaul vs. attenuation – downlink – 2 stream
The next plot compares throughput with the same setup, but with uplink traffic for each connection type. 2.4 GHz throughput is again limited by the lower bandwidth of that connection. Ethernet and 5 GHz throughput again track very closely.
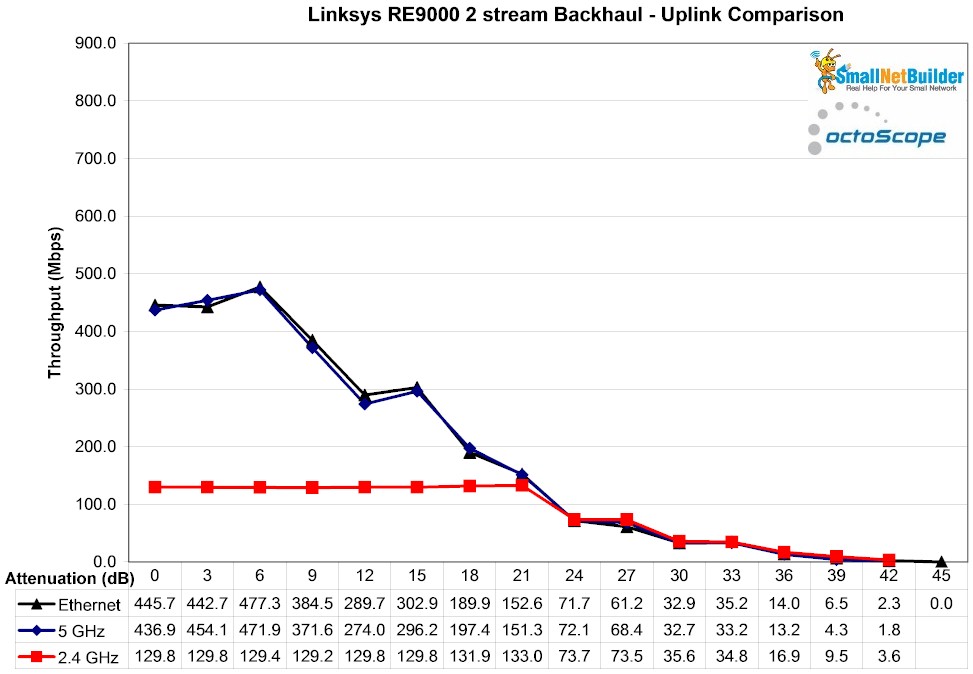
Linksys RE9000 backhaul vs. attenuation – uplink – 2 stream
Next, the backhaul link switched to four-stream using Channel 40 and downlink throughput measured. Note the Ethernet-connected bandwidth increases even more at low attenuation values (higher signal levels), but the 5 GHz wireless connection can’t follow because it’s only a two-stream connection. 2.4 GHz is again limited to just below 140 Mbps maximum by the client connection bandwidth.
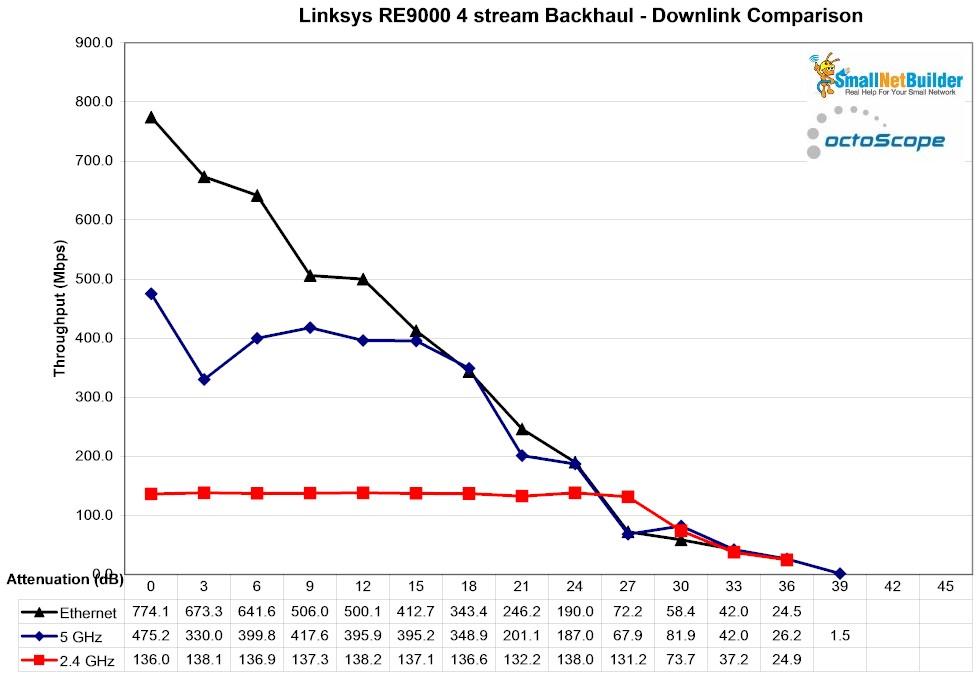
Linksys RE9000 backhaul vs. attenuation – downlink – 4 stream
Finally uplink with four-stream backhaul shows Ethernet bandwith maxing out around 600 Mbps, about 175 Mbps lower than downlink. However, it’s still fast enough to not limit our two-stream 5 GHz test client and, again, much more than the 2.4 GHz client connection needs.
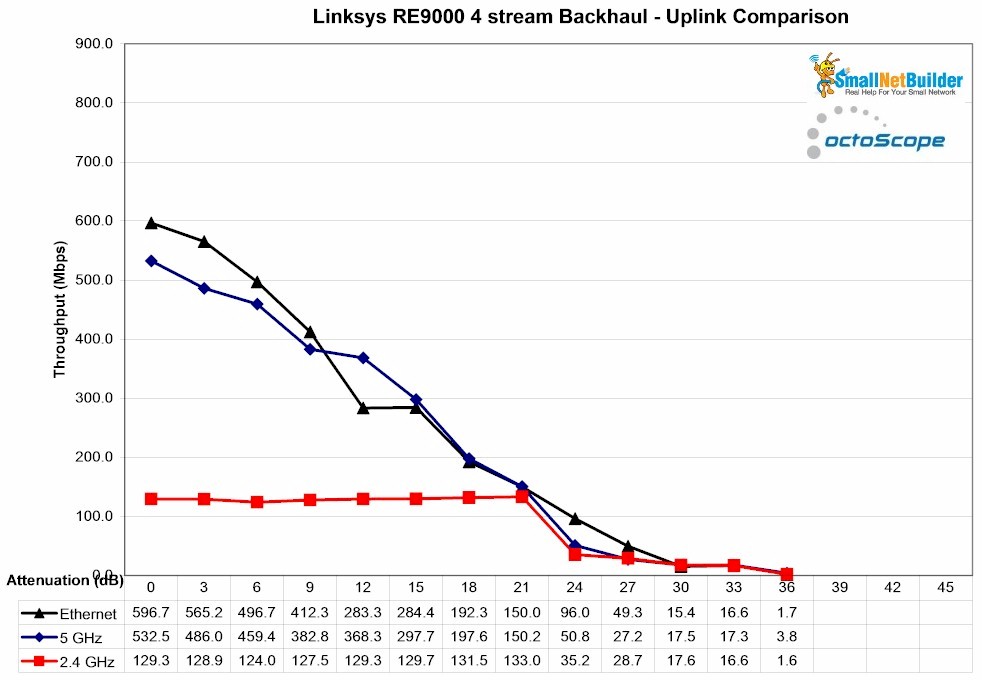
Linksys RE9000 backhaul vs. attenuation – uplink – 4 stream
The bottom line here is it appears the RE9000 has enough backhaul performance to handle two stream AC devices without choking off bandwidth. Keep in mind, however, that, unlike the EX8000, the RE9000 won’t use the 2.4 GHz band for backhaul. This means you will have to place it closer to your base router.
Performance – Over The Air
The last test placed the R7800 in my downstairs office and the RE9000 in the upstairs living room. This setup is basically the same used in my original over-the-air mesh test process. Like the mesh process, I used the same kitchen location, one floor up and at the opposite end of my home; my worst-case scenario.
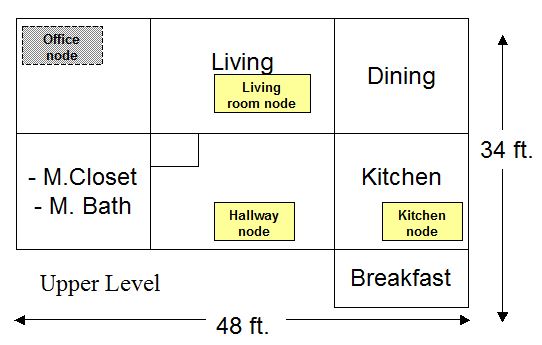
Test locations
I used a Dell XPS13 running Windows 10 Home 64 bit with a Dell Wireless 1820A Wi-Fi adapter as the test client. This is a 2×2 802.11ac adapter using a Broadcom BCM4350 client device. iperf3 was used to run traffic between a Windows 7 machine running iperf3 server connected to an R7800 LAN port and the XPS13. The RE9000 was set up with different extender SSIDs so I could associate the Dell where I wanted.
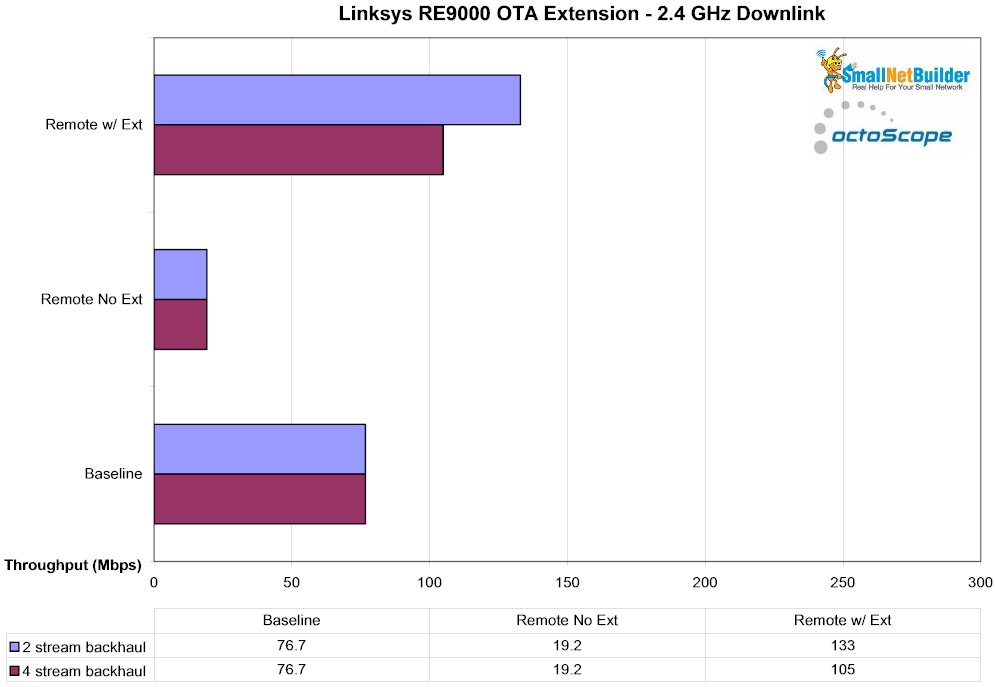
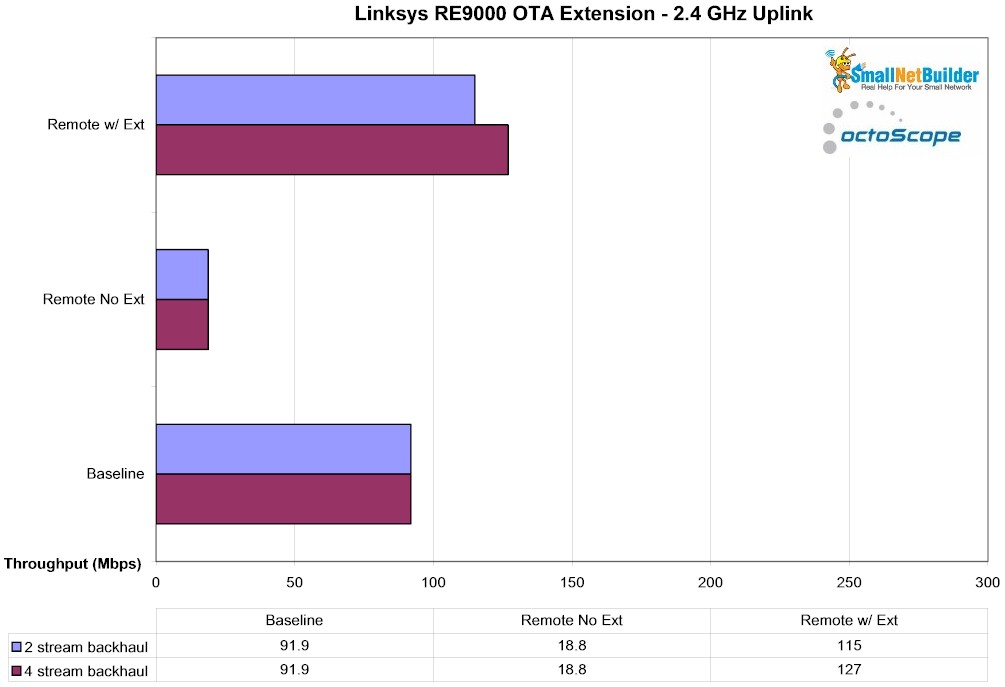
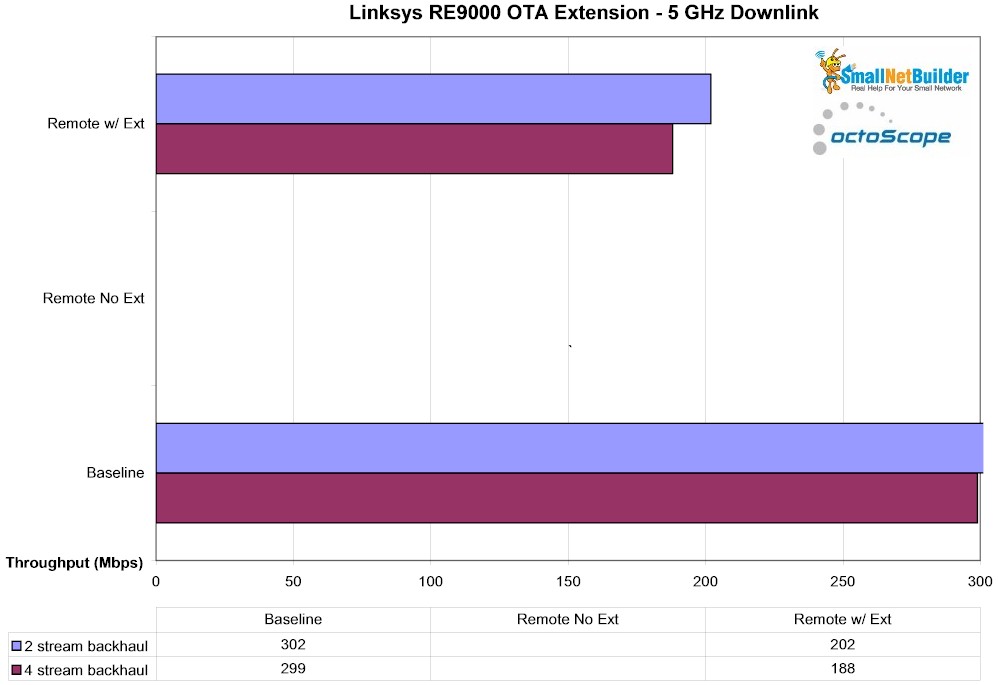
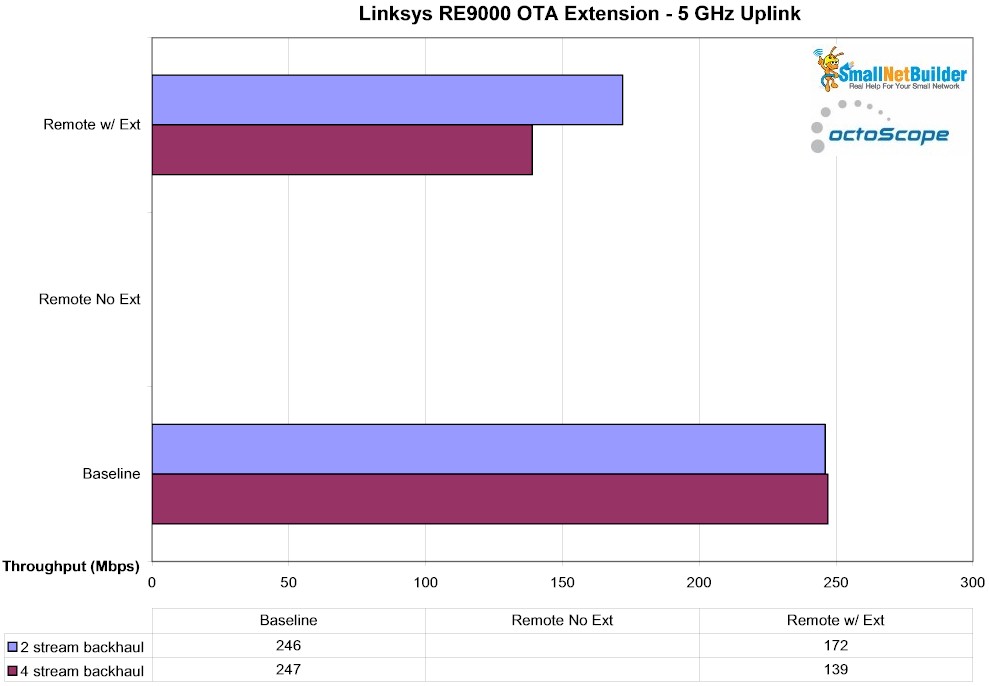
Tests were run uplink and downlink on both bands with the R7800 and RE9000 using Channel 149 for (2×2) and Channel 40 (4×4) for backhaul. The key for the plots is:
-
Baseline – Measurement taken with XPS in same room, ~ 10 feet from R7800
- Remote No Ext – Measurement taken in Kitchen, associated with R7800
- Remote w/ Ext – Measurement takin in Kitchen, associated with RE9000
The 2.4 GHz downlink plot shows the RE9000 improves a 2.4 GHz client connection in the kitchen from a pretty slow 19 Mbps to better than you would get with the client parked right next to the R7800. As we saw above, the RE9000’s 5 GHz backhaul link has more than enough bandwidth to support the 2.4 GHz connection.
RE9000 – OTA – 2.4 GHz downlink
2.4 GHz uplink results show similar throughput improvement vs. direct connection to the R7800 (Remote No Ext). Up and downlink Baseline and Remote No Ext. results were reused since the RE9000 was not involved in those measurements.
RE9000 – OTA – 2.4 GHz uplink
The 5 GHz client in the kitchen was able see the R7800’s SSID, but could not connect. So there is no Remote No Ext value to compare. So with the RE9000 extending, the Kitchen 5 GHz downlink connection goes from 0 to 180 – 200 Mbps, which is enough to support multiple 4K HD streams.
RE9000 – OTA – 5 GHz downlink
Extended 5 GHz uplink throughput is slightly lower, but still respectable. The results show how you might not necessarily want to use the four-stream radio for backhaul. Since every environment and collection of clients is different, you may need to experiment to find what’s right for you.
RE9000 – OTA – 5 GHz uplink
Closing Thoughts
So is the RE9000 a better tri-band extender for less money than NETGEAR’s EX8000? Let’s start by comparing the average AP mode throughput of the three radios.
The 2.4 GHz results are averaged over a 48 dB range and 5 GHz results over 45 dB with missing measurements zero-filled to ensure a fair comparison. The downlink plot shows 2.4 GHz pretty much a wash, with the advantage going to the NETGEAR for both two and four-stream measurements.
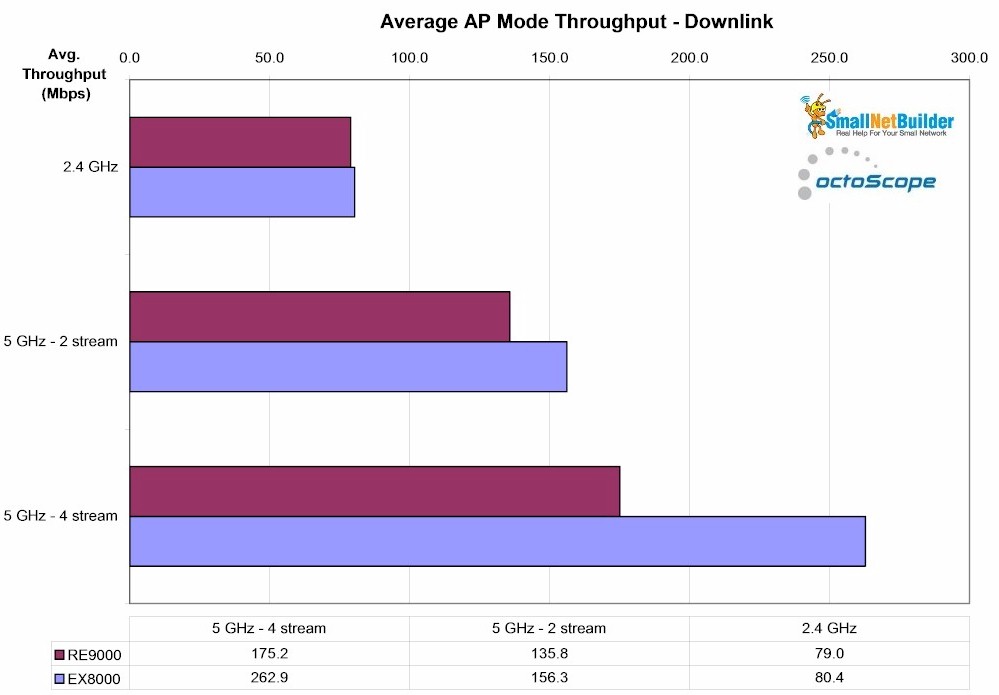
Average AP mode downlink throughput comparison – RE9000 & EX8000
The EX8000’s advantage disappears, however, for uplink, due to its inability to reach higher throughput when tested with only a single stream. The RE9000 also does slightly better for 2.4 GHz. So this comparison is a draw.
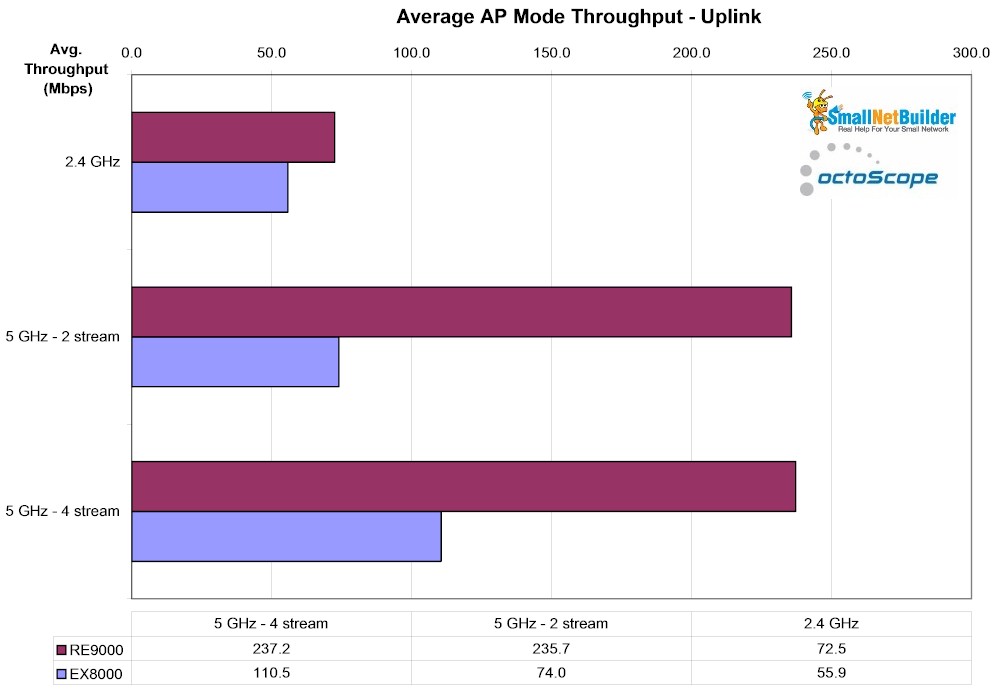
Average AP mode uplink throughput comparison – RE9000 & EX8000
Next comes backhaul performance, measured using a four-stream 5 GHz connection via Ethernet. Both results are averaged over a 48 dB range, with missing measurements zero-filled. It’s clear the NETGEAR EX8000 holds the advantage here, as I’d expect given its Orbi heritage. Note the EX8000 doesn’t suffer the 5 GHz uplink throughput drop we had when testing the client connection. Advantage, NETGEAR.
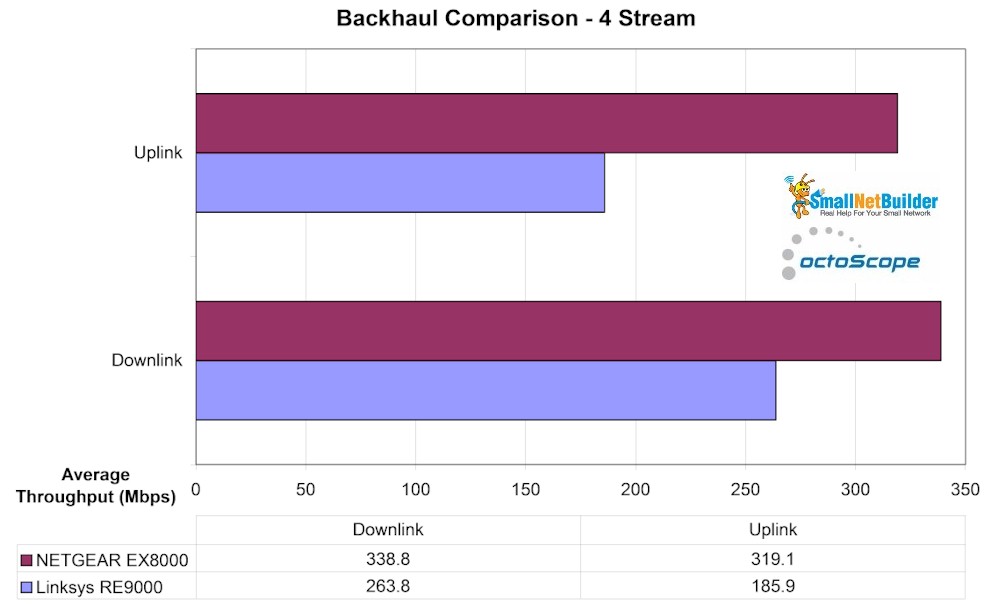
Backhaul comparison – RE9000 & EX8000
Finally, comparing the best case results from the over-the-air tests, we find the RE9000 with an advantage on downlink, but about equal on uplink for 2.4 GHz extension. Note these comparisons use the best results from the 2 and 4 stream backhaul runs for each product.
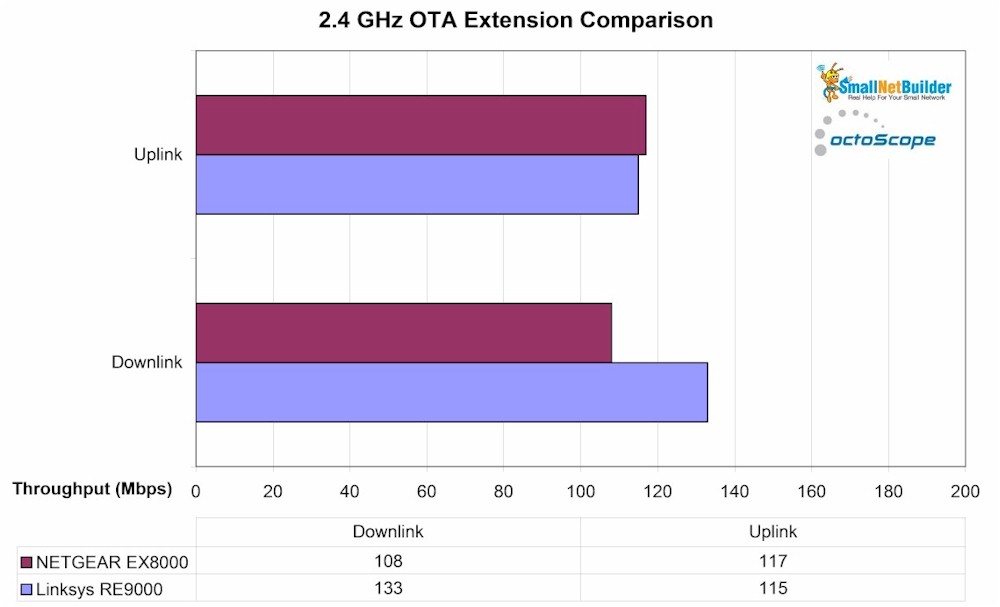
2.4 GHz OTA comparison – RE9000 & EX8000
5 GHz results are mixed; the RE9000 again has the advantage on downlink, but the EX8000 pulls ahead on uplink. So again, I call this comparison even.
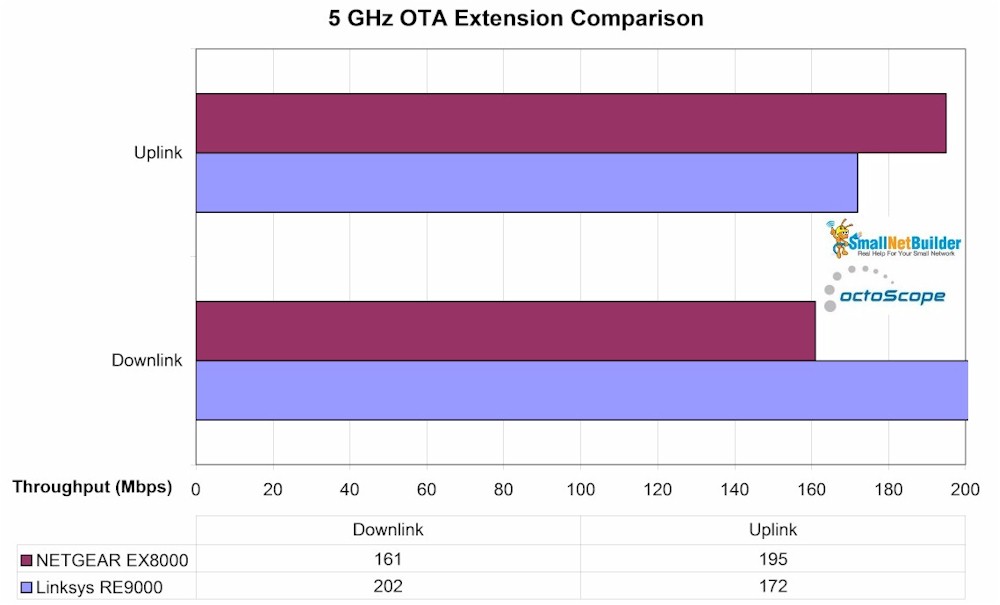
5 GHz OTA comparison – RE9000 & EX8000
The RE9000’s main weakness is that it won’t work if it can’t make a connection to the router being extended on 5 GHz. The EX8000 will. But if you’re depending on 2.4 GHz to extend your network, you’ll be limited to much lower bandwidth. In the end, you’ll want to position any extender so it can take advantage of the higher bandwidth available from 802.11ac, which operates only in the 5 GHz band.
The bottom line is that Linksys has suceeded in producing a strong competitor to NETGEAR’s EX8000, for $60 less. If you’ve been eyeing an EX8000, you should also consider the Linksys RE9000 and pocket the significant difference.
