Introduction

| At a Glance | |
|---|---|
| Product | NETGEAR RangeMax Wireless Router (WPN824) |
| Summary | 802.11b/g enhanced-wireless router based on Atheros Super-G radio with Video54 MIMO antenna technology. |
| Pros | • Indoor performance comparable to other MIMO products • Client can provide improved performance when mixed with normal 11g products • Priced below True MIMO-based products |
| Cons | • Different settings required to optimize different performance aspects • No wireless bridging or repeating • No QoS controls • Limited wireless monitoring • Twice as expensive as 11g products |
Even though the high-rate wireless 802.11n standard still does not have a working draft, wireless networking product vendors are proceeding with the deployment of gear that provides higher speeds and longer range than standard 802.11g products. Since the Wi-Fi Alliance announced it would bring its ruler down across the knuckles of any company daring to use “802.11n” in any form, most vendors have chosen to use the “MIMO” moniker to hawk their offerings.
Most of the noise to date in the MIMO (Multiple Input Multiple Output) wireless networking space has been made by products using Airgo Networks’ True MIMO proprietary technology. But MIMO products using other proprietary technology have recently started to hit the shelves.
In this review, I’ll look at NETGEAR’s WPN824, the first product to use startup Video54‘s BeamFlex smart-antenna technology to add MIMO capability. NETGEAR has dubbed its implementation of Video54’s RF magic RangeMax and is so far the only vendor to offer product with Video54 inside.
I’ll be making plenty of comparisons to the results I obtained in my recent review of the True MIMO-based Linksys WRT54GX. But if you’re looking for info on how the WPN824 stacks up against D-Link’s Super-G w/ MIMO gear, you won’t find any. Despite repeated requests to both Atheros – which supplies the VLocity chipset upon which the products are based – and D-Link, product has not been forthcoming.
|
Basic Features
The 824 comes in the slim plastic case characteristic of NETGEAR’s consumer router line. But instead of “platinum” grey, the router is a pristine iMac white rimmed by a band highly-polished clear plastic running across the front and sides. Because of its unusual internal antenna configuration (more below) the footprint is larger than the VHS cassette size of NETGEAR’s other consumer routers. The 824 takes up about as much desk space as a hardcover novel, but it’s still pretty slim at slightly over one inch (2.54 cm) thick.
All indicator lights are on the front of the box and are reasonably bright and viewable from a wide angle. All network connection indicators are single Link / Activity types for the four 10/100 LAN ports, WLAN (wireless LAN) and 10/100 Internet (WAN) ports. The LAN ports also change color to indicate 10 or 100Mbps connections. Power and Test round out the light complement.
Four 10/100 LAN ports, one 10/100 WAN port and power jack are on the rear panel (facing the front of the GX) panel. All ports are auto MDI / MDI-X (though NETGEAR doesn’t spec or mention this) which means they’ll figure out how to connect to whatever you plug into them, including switches if you decide to expand the number of ports. The reset-to-factory-defaults switch is also on the rear of the router.
The most striking feature is the frosted plastic dome on top of the router, though which you can see a circle of seven blue LEDs – one for each antenna. This display lets you see the BeamFlex software in action as it selects among the seven antennas when sending and receiving data. Though the Video54 folks told me back at CES that this originated as a debugging feature, its value in the 824 is mostly as eye-candy and marketing flash.
Be warned, however, that if this router will be located in a bedroom, you’ll want to unplug it when you retire for the night since the light it produces is surprisingly bright! I think it would be a good thing if the option to shut off the light show is included in the next firmware update.
NETGEAR includes a two-piece plastic stand and confirmed that the 824 operates just fine if you want to stand it up. But wall-mounting won’t be easy, since there are no screw-head slots in the bottom cover.
Also included in the box are a printed one page Setup Guide poster, Resource CD, normal UTP Ethernet cable and wall-wart 120VAC-only power supply that will take up a few positions on your average outlet strip. The CD that came with my 824 has PDF versions of the Setup poster and a longer Setup Guide, but did not include a reference manual. Fortunately, you can download one from NETGEAR’s website by using the Documentation link in the 824’s admin screens. NETGEAR said the downloaded User Manual method is now standard on all its “home” routers since “this ensures that consumers will always access the most current documentation”.
Internal details
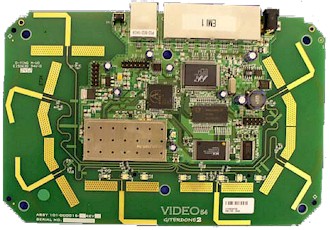
Unlike the completely shielded module used in the True-MIMO based Belkin Pre-N and Linksys SRX routers, the inside of the 824 uses more conventional construction (Figure 1).
Figure 1: The WPN824 board
(click on image to enlarge)
The only shield is a small one covering the RF section of the Atheros-based Super-G radio in the center left of Figure 1. The photo clearly shows the seven antennas that are part of Video54’s BeamFlex secret sauce. The other part is the processing software, which is embedded in the 824’s firmware.
Figure 2: The WPN824 board bottom
(click on image to enlarge)
The bottom view of the board in Figure 2 shows a pattern of seven more antenna elements that are part of the same array seen on top of the board.
At the heart of the design is an Atheros AR2313 Wireless System on a Chip that includes a 32-bit MIPS R4000-class processor and multi-protocol MAC/baseband processing engine. There’s not much else to it besides Flash, RAM and a Marvell Link Street 88E6060/88E6060-I 6-Port Fast Ethernet Switch handling the 10/100 WAN and LAN ports.
While I was looking up FCC documents, I checked the ones for the WPN511 RangeMax card. What I found is that the card is a relabel of an Atheros Super-G CardBus card reference design (FCC ID: PPD-AR5BCB-00051), which is also relabeled as the D-Link DWL-G630.
This means the RangeMax client doesn’t use a fancy antenna array and depends primarily on Video54’s BeamFlex algorithms for performance-enhancement.
Figure 2a: The WPN511 board
(click on image to enlarge)
Figure 2a shows that the card has only the typical printed circuit dipole antennas found in most wireless CardBus cards. NETGEAR’s explanation was that given the small space available, the optimum number of antennas is two.
Setup and Administration
NETGEAR tries to make it easy to set up the 824 by having it act as a captive portal – a trick familiar to anyone who has used a pay-for Internet service. In its fresh-from-the-factory default state, the 824 sends any user starting up a web browser to the start of its built-in configuration “smardWizard”. Note that this trick doesn’t work from a wireless client, since the 824’s radio is shut off by default – which I give NETGEAR extra points for.
If you don’t want the wizard’s help, though, you might get a bit frustrated trying to bypass it. Trying to go anywhere else, even to its default address of 192.168.1.1 will keep sending you back to http://www.routerlogin.com/welcome.htm. I managed to escape from the endless loop I was trapped in by unplugging the WAN port connection, but later discovered the key in the PDF Setup Guide on the CD (point your browser to http://www.routerlogin.net/basicsetting.htm and you’ll be freed).
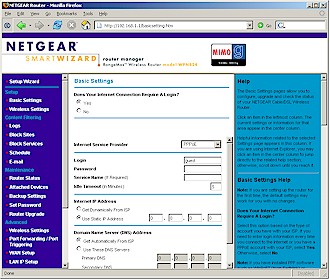
Once I finally got to the Basic Settings page, I found all the usual suspects for WAN connection types are supported, along with BigPond cable and PPTP. A pleasant surprise was that static IPs are supported for PPTP and PPPoE (Figure 3).
Figure 3: Basic Settings screen
(click on image to enlarge)
During bootup the 824 automatically checks a NTP server for the correct time once it gets connected to the Internet. The only thing you have to do is set your Time Zone and whether your location observes Daylight Savings time, once you find them hidden on the E-mail page.
The overall interface responsiveness was good with screens coming up quickly, but some changes require a 30 second or so reboot cycle.
Remote Management can be enabled (it’s off by default), and you can set the port used and restrict access to a single IP address or range of addresses if you like, but not a remote machine’s MAC address. Secure connection (HTTPS) to the admin server isn’t supported for either local or remote admin.
The 824 does not allow multiple administrator logins at a time and tells the second would-be administrator the IP address and computer name of the current admin. NETGEAR has provided an admin log-out function but I couldn’t find a control to change the time for auto-logout of an inactive admin session from its default of 5 minutes.
A nice feature would be that the router can check for new firmware on demand or when you log into the admin interface. But I say “would be” because the “check on log-in” feature failed to alert me to new firmware that I found when I manually checked. And the download and install feature also failed when I tried it.
Firewall
The 824 handles static port forwarding for single ports and port ranges chosen from a list of pre-defined services, or for custom user-defined services (Figure 4). Triggered ports are also supported for gaming and messaging applications, but a pick-list of applications isn’t supplied to simplify setup. And, of course, a single DMZ machine is supported.
Note that NETGEAR said there is “no hard number” for the number of port forwarding or triggering rules or number of custom services that can be defined because of the way user entries are treated internal to the router. So I guess if you use a lot of forwarded ports, you could find yourself up against a limit.
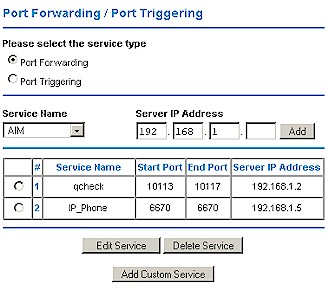
Figure 4: Port Forwarding
UPnP is also supported and enabled by default. Although you can change the Advertisement Period and Time To Live, you can’t disable NAT Traversal, which is used by UPnP-aware applications to automatically open ports in the 824’s firewall. In a nod to security, NETGEAR has included a UPnP Portmap table, which is supposed to show connections opened by UPnP applications. But even when I launched Windows Messenger on a LAN-side machine, I couldn’t get anything to appear in the table.
To control the services (ports) that LAN users can access, the 824 provides a Block Services function. Figure 5 shows you can schedule when services are blocked or have them always blocked and each service can be blocked for all, individual or a range of IP addresses.
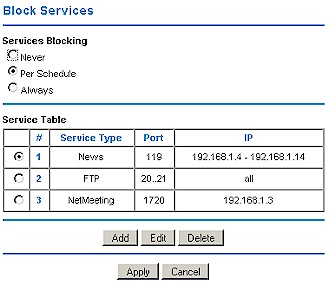
Figure 5: Blocked Services summary
But if you choose scheduled blocking, you get only one schedule, which has only one time period that can be enabled for each day of the week. Figure 6 shows the screen for defining a custom service to block. You can choose UDP and TCP/UDP in addition to the TCP protocol shown.
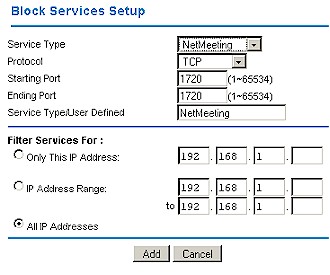
Figure 6: Blocked service setup
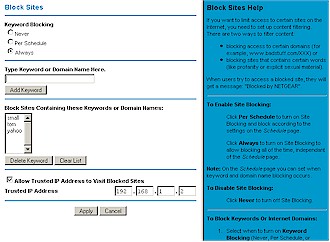
You can exert finer control (than blocking all access with Block Services) over the websites and newsgroups that your users visit via the Block Sites feature. You can enter up to 255 keywords (these don’t have to be complete domain names or even complete words) that will cause a “Web Site Blocked by NETGEAR Firewall” page
Figure 7: Block sites screen
(click on image to enlarge)
It’s nice that this feature is schedulable, and you also can enter one “Trusted” IP address that will get unfiltered Internet access. But, unfortunately, Block Sites isn’t very smart, since it can be easily bypassed by entering the IP address of the desired site or news server.
Other Features
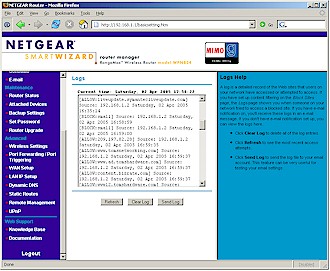
Logging features aren’t fancy, and only record web sites visited and blocked. But as you can see from Figure 8, log entries for blocked sites indicate only the keyword triggered and not the URL that was attempted.
You can view, clear, refresh, and immediately send the log to one designated email address, or schedule the emailing of the log on an hourly, daily, weekly, or “when full” basis. Immediate email alerts can also be sent when a visit is attempted to a blocked site. Unfortunately, I didn’t receive a single email from either the alert feature or when I trigged a log send manually.
Figure 8: Logging
(click on image to enlarge)
The 824 has a few other features that I haven’t mentioned, such as:
- you can set the router’s MTU (Maximum Transmission Unit) value (useful in getting some PPPoE-based connections to work)
- you can set and view 8 static routes (useful in networks that have more than one subnet)
- dynamic routing protocols RIP1, and RIP 2B, and RIP 2M are supported
- you can enable the router to respond to WAN ping requests (this is disabled by default, which is good security practice)
- dynamic DNS support is built-in for using dyndns.org
- you can save and restore router configuration settings
Routing Performance
Testing Notes:
• All tests were run with LAN endpoint in DMZ
The 824’s routing throughput in both directions is about 47Mbps. While this is not on par with the almost 100Mbps speed of Linksys’ MIMO router – the WRT54GX – it should be plenty speedy for any consumer broadband connection, either in the U.S. or elsewhere.
Since networking gear manufacturers are hot in pursuit of IPTV (Internet Protocol TV) business, I’m starting to look more critically at UDP streaming performance. Any product that wants to support Internet-based video streaming will need to support at least 1Mbps streams and more like 2Mbps.
The results show that the 824 can handle 500 kbps streaming ok, but started to show packet loss when I pushed Qcheck‘s UDP streaming test to its 1Mbps rate limit.
Routing Performance Test Results
| Test Description | Transfer Rate (Mbps) | Response Time (msec) | UDP stream | |
|---|---|---|---|---|
| Throughput (kbps) | Lost data (%) | |||
| WAN – LAN | 47.1 | 1 (avg) 1 (max) |
904 | 0.5 |
| LAN – WAN | 47.2 | 1 (avg) 1 (max) |
907 | 0.2 |
| Firmware Version | V1.0.4_1.0.4 | |||
See details of how we test.
Wireless Features
Since the base radio technology used by the 824 is Atheros Super-G plus XR, the wireless settings will look familiar to anyone who has used any other NETGEAR product based on that technology. Figure 9 shows the basic wireless settings in the default state (except for the Region, which I set as shown, and enabling WEP, which I did to expose the settings for the screenshot).
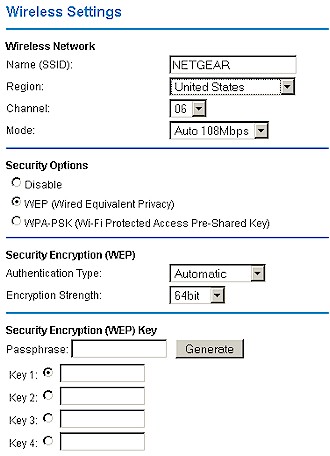
Figure 9: Wireless settings
Figure 10 shows the Advanced Wireless controls, which show typical NETGEAR Super-G controls (under 108Mbps Settings) but no sign of anything you can use to control Video54’s BeamFlex antenna technology.
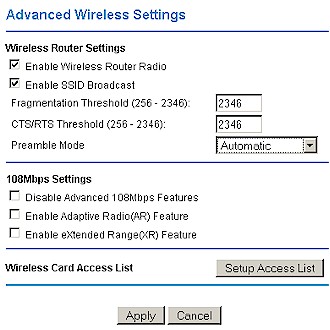
Figure 10: Advanced Wireless screen
The Setup Access List button provides access to the 824’s MAC Address association control (Wireless Card Access List), which operates only in Grant mode (only clients listed will be allowed access). I was pleased to see, however, that a pick list of currently-associated clients was available to ease the creation of the list (Figure 11). Unfortunately, there is no file-based ability to create or save the Access list.
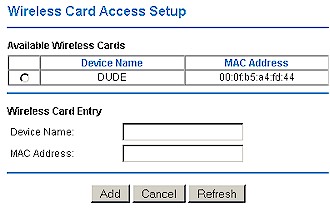
Figure 11: Adding a client to the Wireless Access list
WEP and WPA-PSK support is provided to round out wireless security. Figure 9 above shows that WEP key entry can be done directly in hexadecimal, or with an alphanumeric passphrase that is used to generate the hex keys. Clicking the WPA-PSK radio button changes the screen so that a single 8 to 63 character passphrase can be entered.
WPA-PSK is the strongest security option currently offered and I was disappointed to see that you’ll need to wait for future firmware releases if you need support for 802.1x authentication, WPA “Enterprise” or preferably WPA2 support.
The 824’s wireless monitoring features are a little better than provided by most consumer wireless gear – which, unfortunately, isn’t saying much. The Attached Devices screen will show the IP and MAC address and host name of active clients that have received DHCP leases, but doesn’t differentiate between wired and wireless. And clicking the Show Statistics button on the Router Status page opens a small window that automatically refreshes periodically (you can set the rate) showing WAN, LAN and WLAN packet statistics.
Missing features include no ability to set transmit power level, force the transmit rate, or set the advertised base rate. And, finally, as with other current MIMO products, the 824 does not support wireless bridging or repeating.
Wireless Tests – RangeMax a la mode
Before I get into the results of my RangeMax testing, I have a few general observations about the test process and RangeMax technology in general. It’s common practice for manufacturers to supply “guides” to reviewers that suggest how to test their products. After all, manufacturers want their products to be seen in the best light and reviewers don’t always have the time to read product documentation.
802.11g products present a particular challenge, because of the many proprietary throughput and range enhancements they include. Testing using all combinations of the various settings provided isn’t practical – it would just take too much time. So it has been my general practice to test wireless products in their default settings.
The thinking here is that manufacturers know their products best and will set their defaults to provide the best user experience – including throughput vs. range performance and compatibility with “legacy” products. I also figure that since most users just plug these products in and futz with settings only to the extent required to get them running, testing with the defaults will provide results reflective of what the majority of users will see.
The reviewers guide that NETGEAR provided was very specific in its recommended settings for optimizing different aspects of performance. And while I can’t share the details of the recommended settings (NETGEAR asked me not to), I can show you the results of some experiments that I ran to see the effects of the various Super-G controls on the 824’s throughput performance.
I used my standard wireless test setup with the 824 as the wireless router under test and the WPN511 RangeMax CardBus card as the test client. The IxChariot wired LAN client was a 2.4GHz Pentium 4 machine running WinXP Home SP2 and I had the WPN511 loaded into my trusty Dell Inspiron 4100 notebook with a 1GHz Celeron CPU and WinXP Home SP2.
I then performed multiple test runs at my four indoor test locations, changing settings on the 824 between runs. I ran the WPN511 Client Utility on the notebook and left all settings at their defaults. Because Super-G cycles between single and bonded-channel modes in the Auto108 mode that I used as the base for all my runs, I extended my normal one minute test period to three minutes, which is time enough to allow a complete cycle in and out of channel bonding.
I used the standard throughput.scr IxChariot script, changing only the file_size parameter (the number of Bytes in the transferred file) from its default of 100,000 to 200,000 Bytes. Got all that? Good. On to the results.
Wireless Tests – RangeMax mode test results
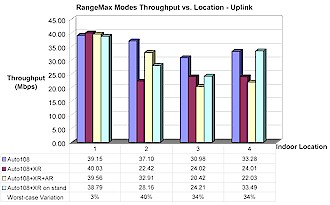
The results are shown in bar chart form in Figures 12 and 13 and provide some interesting insights. You can see that the 824’s Advanced wireless settings have a significant impact on throughput. I was most surprised to see that under my indoor test conditions, that enabling the eXtended Range (XR) option generally lowered throughput significantly in the uplink (STA [client] to AP) direction. The worst-case decrease in uplink throughput – 40% – was experienced in Location 2 with Auto108 and just XR enabled.
Figure 12: RangeMax mode Throughput vs. Location – Uplink
(click on image to enlarge)
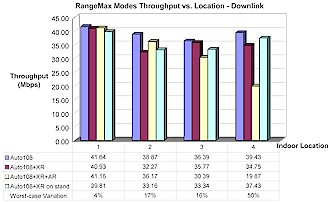
Figure 13 shows that downlink variation was generally less, except for the Location 4 test, which had the highest throughput decrease – 50% – with both XR and AR (Adaptive Radio) options enabled.
Figure 13: RangeMax mode Throughput vs. Location – Downlink
(click on image to enlarge)
You might be wondering what the “Auto108+XR on stand” settings were. These tests were done in Auto108 mode with XR enabled and the 824 elevated approximately 3 inches above an MDF desktop using a cardboard box. This tip is actually found on Netgear’s How NETGEAR’s RangeMax Improves on Existing 802.11 Technology page, i.e.
“The WPN824 router is easier to set up than a standard wireless router: There are no antennas to deploy or screw, no need to orientate antennas, no need to orientate the device, and no risk of breaking the antenna or antenna cable. Just put it in a open space, elevate 3 inches, and it’s ready to go! NETGEAR finds there are fewer driver and other conflicts than with other MIMO technology, and that installation is much easier.”
When I queried NETGEAR about this recommendation, they said while it was not necessary, they had seen a performance improvement when doing this with “legacy routers”. The test results seem to indicate that this recommendation helped counteract XR’s negative effects in the uplink direction, but no consistent effect on downlink performance.
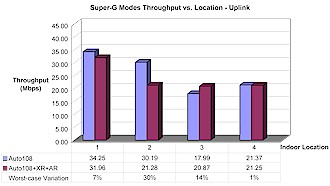
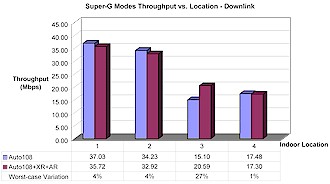
Since I never had run this series of tests on “normal” Super-G gear, i.e. without Video54’s BeamFlex enhancement, I decided to do just that. So I repeated a subset of the tests using a NETGEAR WGU624 Double 108 router and WG511U Double 108 PC card. I shut off the 802.11a radio in the WGU624 and disabled the 11a options in the WG511U card, but otherwise left settings at their defaults.
Figure 14: Super-G mode Throughput vs. Location – Uplink
(click on image to enlarge)
About the only thing I can definitely say from Figures 14 and 15 is that RangeMax throughput is generally higher than normal Super-G for both uplink and downlink tests. It also seems like the combination of Auto108, XR and AR hurts throughput less in normal Super-G and in some cases even improves throughput, which is what one might reasonably expect.
I suspect that NETGEAR and Video54 are aware of some or all of what I’ve seen, since as this review neared completion, NETGEAR said they were testing new firmware that includes performance enhancements.
Figure 15: Super-G mode Throughput vs. Location – Downlink
(click on image to enlarge)
Wireless Tests – MIMO comparisons
So what we’ve learned so far is that settings matter for RangeMax gear, and that RangeMax can provide a throughput boost throughput over normal Super-G products. Now, it’s time to take a look at indoor and outdoor throughput vs. range performance.
First, here are the usual four location downlink (Figure 16) and uplink (Figure 17) IxChariot plots for the combination of WPN824 and WPN511 CardBus card so that you can see throughput variation. As per what we learned above, these plots were done in Auto108 mode and XR and AR disabled, i.e. the default settings.
Figure 16: Indoor RangeMax Throughput vs. Location – Downlink
(click on image to enlarge)
Figure 17: Indoor RangeMax Throughput vs. Location – Uplink
(click on image to enlarge)
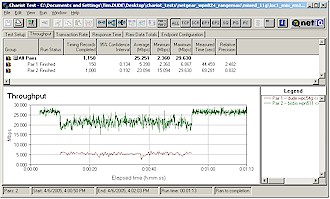
What kind of surprised me here was how “fuzzy” the plots were, i.e. the amount of short term throughput variation. As a point of comparison, here’s the uplink plot (Figure 18) from my review of the Linksys SRX products, which use Airgo’s True MIMO chipset.
Figure 18: Linksys SRX Four Location Throughput test – Uplink
(click on image to enlarge)
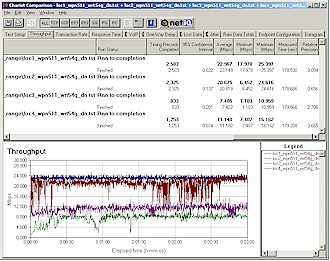
If you open the large version of Figures 17 and 18, note the Relative Precision numbers (rightmost column in the table above the plots), which are a measure of the statistical variation of the measured data. The best True MIMO values are an order of magnitute better (lower) than the RangeMax readings. But on the other hand, the RangeMax values, while higher, are more consistent from location to location.
By the way, as is usual with 802.11g gear, response (ping) times taken with Qcheck were a solid 1msec (the smallest that Qcheck can measure).
Wireless Tests – More MIMO comparisons
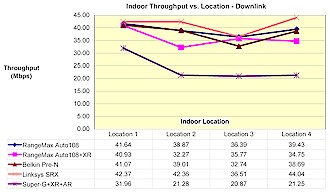
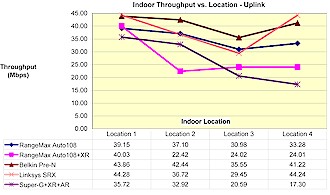
But the real question on the minds of many readers is how RangeMax stacks up against other current MIMO offerings. To probe this, I gathered data from my previous tests of Belkin’s Pre-N and Linksys’ SRX products (True MIMO based), plotted it along with data from two different RangeMax runs and threw in a Super-G+XR+AR run done with NETGEAR’s Double 108 products for good measure. Figures 19 and 20 tell the tale.
Figure 19: Indoor MIMO throughput comparison – Downlink
(click on image to enlarge)
The downlink graph (Figure 19) shows that all MIMO methods handily beat out normal Super-G, even with XR and AR enabled. But I find it hard to declare a definite winner of the MIMO pack, with all the criss-crossing going on. If you stare long enough at the enlarged plot, though, you might say that the Linksys SRX had a slight edge.
Figure 20: Indoor MIMO throughput comparison – Uplink
(click on image to enlarge)
Figure 20 is a bit more interesting in that it doesn’t show as clear an advantage of MIMO over regular old Super-G under best-case conditions (Location 1). And it again shows RangeMax (in plain Auto108 mode) holding its own among the True MIMO competition.
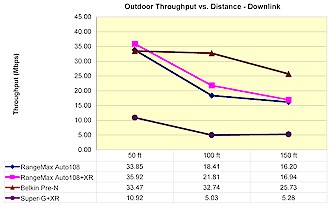
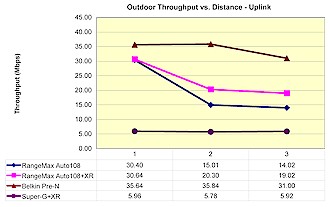
I didn’t do as much outdoor testing of RangeMax as I did for True MIMO products and didn’t test to see which ultimately went farther. But Figures 21 and 22 show a definite pattern of results for the testing that I did perform.
Figure 21: Outdoor MIMO throughput comparison – Downlink
(click on image to enlarge)
You don’t see any Linksys SRX results because I didn’t do any outdoor testing on it. But the conclusions I draw from this data are:
- RangeMax provides a definite improvement over normal Super-G as distance increases (signal levels drop)
- XR helps vs. hurts performance as distance increases
- True MIMO maintained throughput over the distance tested better than RangeMax
Figure 22: Outdoor MIMO throughput comparison – Uplink
(click on image to enlarge)
Mixed Mode – 11g
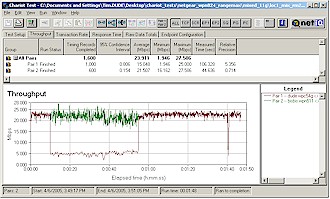
My next check was for how the 824 would perform with both RangeMax and other flavors of wireless clients were simultaneously active. I set up an IxChariot test using two wireless clients (Figure 23). Each client ran a Throughput.scr script using TCP/IP, sending 200,000 Bytes of data at a time and looping for approximately 1 minute in real-time mode. One version of the script started the NETGEAR RangeMax client first, then the other client 10 seconds later, while a second script reversed this delay. For each client type, I ran four tests:
- RangeMAX starts first, both pair Uplink (client – also refered to as STA – to AP)
- RangeMAX starts second, both pair Uplink
- RangeMAX starts first, both pair Downlink (AP to STA)
- RangeMAX starts second, both pair Downlink
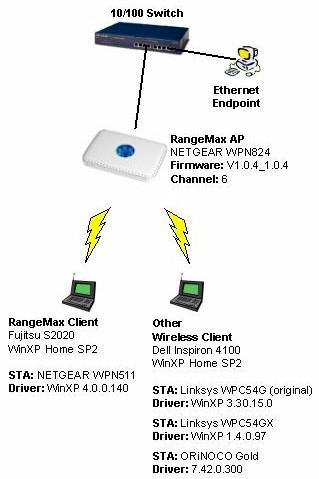
Figure 23: Mixed WLAN Test Setup
A little birdie told me that mixed mode testing might go better with the AR (Adaptive Radio) feature enabled in the 824. But I ran tests with a RangeMax and standard 11g client both with AR enabled and disabled and didn’t see any significant difference. So I used the default settings for the tested clients and also left the 824 in its default Auto108 mode with XR and AR disabled. Both clients were located within 10 feet (3 meters) of the router for all tests.
My first test used a Broadcom-based Linksys WPC54G original version card to see how the 824 handled mixed RangeMax and 11g clients.
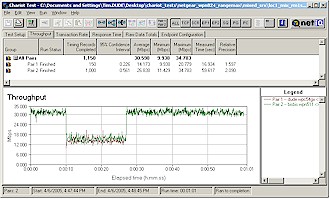
Figure 24: Mixed RangeMax and 11g uplink – RangeMax first
(click on image to enlarge)
Figure 25: Mixed RangeMax and 11g uplink – 11g first
(click on image to enlarge)
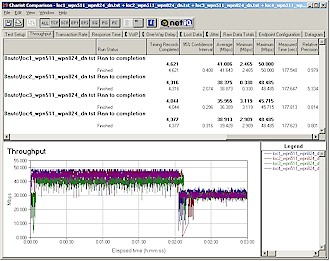
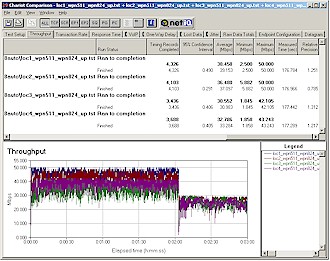
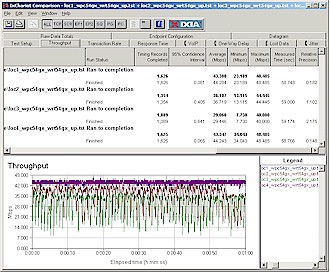
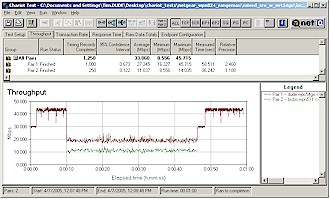
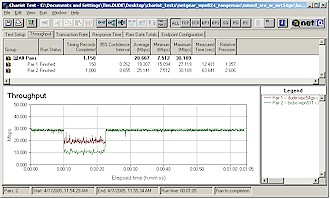
Figures 24 and 25 show results similar to those I observed in my TrueMIMO / 11g mixed tests – that the 11g client definitely gets the short end of the throughput stick, even though the Rangemax pair properly drops out of channel bonding to accomodate the non Super-G STA. I didn’t observe significantly different behavior with both clients running downlink (AP to client), so I’m not bothering to post those plots.
Mixed Mode – 11b
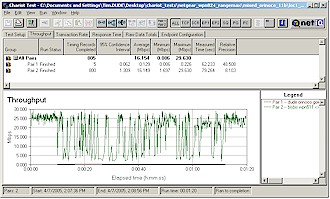
Although WLAN vendors would have you believe that no one uses 802.11b anymore, interoperability with it is still important. I used an ORiNOCO Gold card to see how 11b and RangeMax mixed. The general effect is the same as I found for 11b and True MIMO – the 11b client suffers the most when both it and RangeMax client are running uplink.
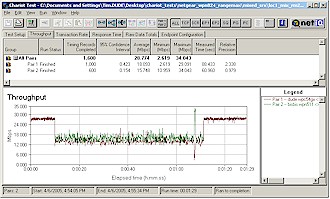
Figure 26: Mixed RangeMax and 11b uplink – RangeMax first
(click on image to enlarge)
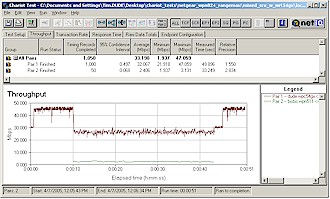
Figure 26 shows an uplink run with the RangeMax client starting first. The 824 obviously knows the 11b client is active, with the wildly bouncing throughput of the RangeMax pair showing that it’s trying hard – but without much success – to give the 11b STA its share of air time. A test run with the 11b STA starting first also shows the same RangeMax throughput variation.
Figure 27: Mixed RangeMax and 11b downlink – 11b first
(click on image to enlarge)
Figure 27 shows the same RangeMax pair throughput variation while the 11b STA is active when both are running downlink. But this time the 11b STA manages to eke out a little more bandwidth.
Mixed Mode – True MIMO
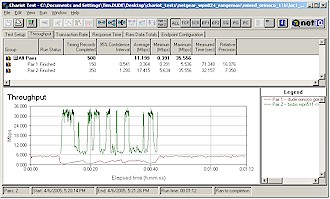
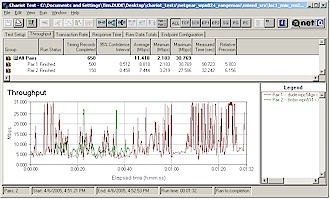
My mix of a Linksys WPC54GX True MIMO card with the RangeMax produced the most interesting results. Figure 28 shows very low and erratic throughput for both the RangeMax and True MIMO clients when the True MIMO client is on the air and both are running uplink.
Figure 28: Mixed RangeMax and True MIMO uplink – RangeMax first
(click on image to enlarge)
Although it’s hard to see, Figure 29 – which is also an uplink test but with the True MIMO card starting first – shows that the True MIMO client’s throughput is very erratic, even when it runs by itself at the beginning and end of the tests. This erratic behavior was also observed when I completely shut off the RangeMax client and ran only the Linksys SRX client by itself.
Figure 29: Mixed RangeMax and True MIMO uplink – True MIMO first
(click on image to enlarge)
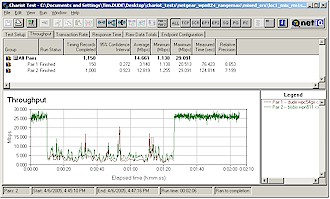
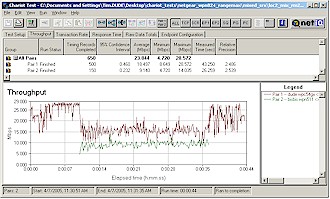
Things definitely improved, however, when I ran my downlink tests. The results in Figure 30 are so different, it looks like I’m testing an entirely different product! This combination produces a very equitable sharing of bandwidth between two “MIMO” products, which is how it should be!
Figure 30: Mixed RangeMax and True MIMO downlink – RangeMax first
(click on image to enlarge)
Figure 31 shows that the equitable bandwidth-sharing also occurs when the True MIMO client starts first. Comparing both plots also shows noticeably lower throughput variation from the True MIMO client – even when running off a RangeMax AP!
Figure 31: Mixed RangeMax and True MIMO downlink – True MIMO first
(click on image to enlarge)
I remembered a comment in one of the recent MIMO print reviews about poor True MIMO close-range performance being caused by signal overloading. So I moved the notebook with True MIMO client to my Location 2 (approximately 30 feet away and two sheetrock walls between AP and client) and re-ran the tests.
Figure 32: Mixed RangeMax and True MIMO uplink – True MIMO first & in Location 2
(click on image to enlarge)
Figure 32 shows that while the True MIMO client’s throughput variation isn’t as low as in the downlink case, variation is much better, and more importantly, throughput sharing is much more equitable.
More MIMO mixing
I figured while I had all this stuff set up, I could haul out one more piece of gear and check out how a RangeMax client fares when it ventures onto a True MIMO AP’s turf. So I substituted a Linksys WRT54GX router for the 824 and ran a mixed test with RangeMax and True MIMO (Linksys WPC54GX clients). I’ll show the plots for all four combinations I tested.
Figure 33: Mixed RangeMax and True MIMO downlink from True MIMO AP – True MIMO first
(click on image to enlarge)
Figures 33 and 34 show a reasonable sharing of bandwidth when both STAs are running downlink. But the True MIMO AP seems to favor its own, giving the WPC54GX client more bandwidth than the NETGEAR WPN511. Even when running alone at the beginning and end of the test in Figure 34, the RangeMax client doesn’t attain the peak bandwidth of the True MIMO client shown in Figure 33. This is because True MIMO uses a spatial multiplexing approach to achieve its high throughput, while RangeMax relies on Super-G’s channel bonding.
Figure 34: Mixed RangeMax and True MIMO downlink from True MIMO AP – RangeMax first
(click on image to enlarge)
Figure 35: Mixed RangeMax and True MIMO uplink to True MIMO AP – True MIMO first
(click on image to enlarge)
The uplink results shown in Figures 35 and 36 show that once again the True MIMO STA gets more bandwidth. But this time the throughput of the RangeMax client is really beaten down to around 3Mbps!
Figure 36: Mixed RangeMax and True MIMO uplink to True MIMO AP – RangeMax first
(click on image to enlarge)
The bad uplink and better downlink True MIMO / RangeMax mixed behavior is basically the same as I observed when mixing True MIMO and Super-G STAs. So I suspect it more an interaction between True MIMO and Super-G than with the Video54 BeamFlex part of RangeMax.
The take-away from this is that RangeMax appears to do a better job of sharing bandwidth with True MIMO than vice-versa – as long as you don’t get a uplinking True MIMO client too close to a RangeMax AP!
Performance Improvement – 11g and RangeMax
My final series of tests aimed to test NETGEAR’s claim “RangeMax is 100% compatible with your existing 802.11b/g products and will boost their range and speed by up to 50%” (from the product’s web page under “Range Matters”) As I did with the similar True MIMO testing, I didn’t get into calculating percentages but instead used the same comparative approach.
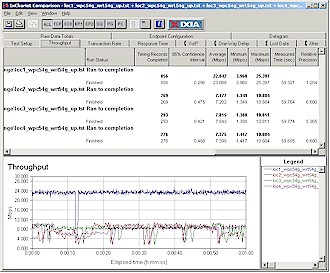
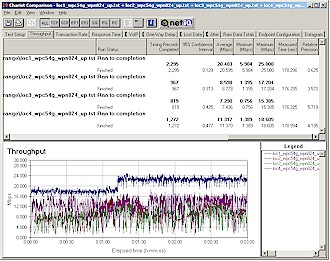
The basis of comparison is my standard four location test done with a Linksys WRT54G (original version) router (upgraded to 2.04.4 firmware) and WPC54G original version card (with WinXP 3.30.15.0 driver) in my Dell Inspiron 4100 WinXP Home SP2 notebook. The results for the uplink direction are in Figure 37 and show a significant drop in performance (under 8Mbps) for any location that had a wall or two between client and router.
Figure 37: Four Location uplink throughput – 11g STA and AP
(click on image to enlarge)
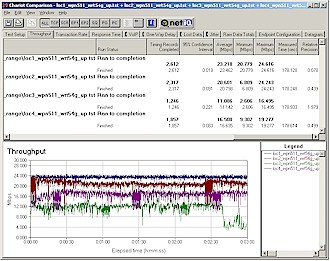
Figure 38 shows what happened when I substituted the NETGEAR WPN824 RangeMax router for the WRT54G. I wouldn’t really call the results an improvement, especially considering the high throughput variation.
Figure 38: Four Location uplink throughput – 11g STA, RangeMax AP
(click on image to enlarge)
Figure 39 shows what happens when RangeMax is used on the client end, with the WRT54G put back into place and the NETGEAR WPN511 client substituted for the WPC54G. Average throughputs for Locations 2 through 4 are definitely improved and throughput variation considerably reduced.
Figure 39: Four Location uplink throughput – RangeMax STA, 11g AP
(click on image to enlarge)
But unlike my experience mixing True MIMO and 11g clients, running the same experiments in the downlink direction produced much different results.
Performance Improvement – 11g and RangeMax, Continued
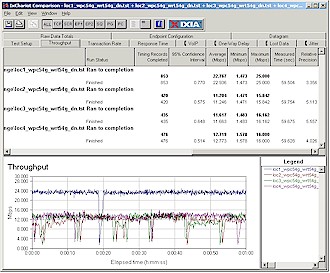
Here’s the 11g-11g downlink reference – Linksys WPC54G client to Linksys WRT54G router.
Figure 40: Four Location downlink throughput – 11g STA and AP
(click on image to enlarge)
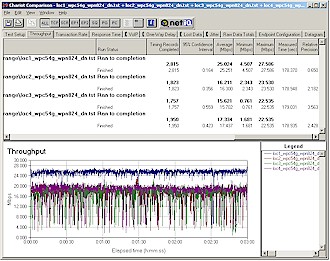
And what happens with an 11g STA and RangeMax router (Figure 41). Average throughput improves for Locations 2 – 4, but there’s that wonky throughput variation again…
Figure 41: Four Location downlink throughput – 11g STA, RangeMax AP
(click on image to enlarge)
And finally, the result from mixing a RangeMax client with the 11g AP (Figure 42). The only improvement is in Location 2 and Location 3 actually gets worse!
Figure 42: Four Location downlink throughput – RangeMax STA, 11g AP
(click on image to enlarge)
My conclusion from this experiment is that you may be able to see some improvement by using a RangeMax client with your normal 11g AP. But since RangeMax uses a Super-G radio, you may not see an improvement if you’re currently using Super-G products.
In general, the Linksys True MIMO gear provided more consistent performance improvement than the RangeMax products when mixed with the same Linksys 11g products (based on Broadcom’s 54g chipset).
Summary of Test Results
If you’ve made it this far, you deserve a summary to pull the essential information from all those charts and graphs! Here’s a table similar to the one I created for the Linksys SRX review.
| Summary of RangeMax Test Results | ||
| The Test | The Result | Comment |
| Speed vs. Range compared to standard 11g | Performed better than Broadcom-based standard 11g | |
| Speed vs. Range compared to True MIMO | About the same in indoor tests. Not as good as True MIMO on outdoor tests | |
| Performance with mixed RangeMax / 11g STAs | 11g STAs suffer significantly reduced throughput for Broadcom-based STA tested. | |
| Performance with mixed RangeMax / True MIMO STAs | Very even bandwidth sharing in both uplink and downlink. But close-range True MIMO STAs can cause high throughput variation in both STAs. | |
| Performance with mixed RangeMax / 11b STAs | Significantly reduced 11b throughput for uplink, better for downlink. But active 11b STA causes high throughput variation for active RangeMax STA | |
| Performance improvement when RangeMax client used with 11g APs | If you’re using standard 11g gear, you may see some improvement, but little if upgrading from Super-G stuff. | |
| Performance improvement when RangeMax AP used with 11g STAs | Some improvement for downlink, but with high throughput variation | |
| Key: |
||
Closing Thoughts
Sharp-eyed readers might notice that I changed the ![]() key in the Summary table from “Excellent” in the Linksys SRX review to “Good” in this one. And that sort of sums up my general impression of NETGEAR’s RangeMax. When I look back over all my data and reflect on my testing of the WPN825 and WPN511, what I think is missing is the “wow” that I feel when testing a product that I know is going to shake things up.
key in the Summary table from “Excellent” in the Linksys SRX review to “Good” in this one. And that sort of sums up my general impression of NETGEAR’s RangeMax. When I look back over all my data and reflect on my testing of the WPN825 and WPN511, what I think is missing is the “wow” that I feel when testing a product that I know is going to shake things up.
I felt that “wow” when I first put Super-G + XR through its paces. Up until then, all the 11g products I tested would drop throughput significantly in my tougher indoor test locations and not go much farther than 10 feet or so beyond my front door. Super-G+XR was the first technology that evened out indoor performance and could provide a usable wireless connection for hundreds of feet beyond my home’s walls.
I was wowed again when I tested Airgo’s True MIMO, since it not only maintained higher throughput for longer distances than Super-G+XR, but did it without Super-G’s controversial channel-bonding, or need to experiment with multiple optional modes.
In the interest of full disclosure, you should know that I was contracted by Airgo Networks last year to perform a private evaluation of engineering samples of pre-release products. However, all testing and data related to True MIMO-based products presented in my published reviews has been performed on released products, with no compensation from or consultation with Airgo.
But the funny thing about “wow”s is that they reset expectations and make it tougher to be impressed the next time. And that’s where RangeMax comes in. When you separate out the marketing hype, RangeMax is Super-G+XR+AR with some pretty nifty antenna technology added to improve signal gain. The good news is that Video54’s BeamFlex technology does help raise and flatten Super-Gs throughput vs. range curve. But the bad news is that the improvement is mostly for downlink (AP to client), with less clear performance advantages for indoor uplink use.
Fortunately, these problems are probably largely software-based, which means that NETGEAR may get them straightened out with upgraded firmware. But since two different companies (Atheros and Video54) provide the core technologies for RangeMax, fear of losing trade secrets to each other could keep RangeMax from being all that it could be.
The bigger disadvantage for RangeMax vs. True MIMO, however, is that it relies on three Atheros technologies – Super-G, XR and AR – each of which can be enabled and disabled independently. This might not be so bad if NETGEAR provided clear descriptions of what each of these features really do, and guidance to RangeMax purchasers on how to use them to achieve the desired performance. But even if they did, RangeMax is up against a technology that doesn’t require tweaking or shutting off communication with standard 11b and 11g products to achieve its highest throughput.
The main competition that products based on True MIMO have faced is much cheaper non-MIMO 11g products. NETGEAR knows this and so is pricing RangeMax gear lower than True MIMO products in hopes of enticing more folks to spend the extra bucks for the “Up to 1000% more coverage and speed” hyped on the front of RangeMax product boxes (and asterisked on the rear by “Actual results may vary depending upon operating environment” – have these companies no shame?). But even at lowest online prices (April 2005) of $118 for the WPN824 and $73 for the WPN511, we’re still talking a 2X the cost of a NETGEAR WGR614 11g router ($49) and 3X a WG511 Cardbus card ($23).
I always like to see competition, because dominant players in any business eventually get lazy and tend to mistreat the very customers who helped get them to the top of the heap. But at least at this point, RangeMax has aways to go before it can seriously challenge Airgo’s True MIMO for best-of-breed enhanced 802.11g throughput and range technology.

