Introduction
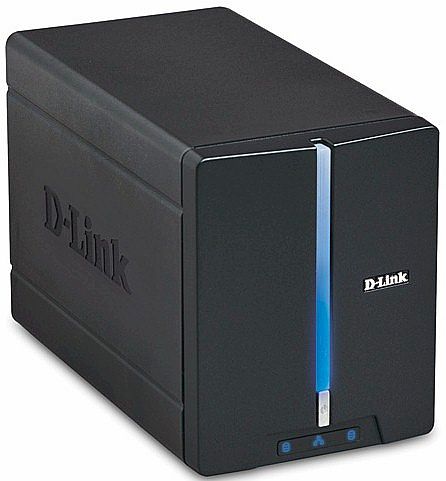
| At a Glance | |
|---|---|
| Product | D-Link 2 Bay Network Storage Enclosure (DNS-321) |
| Summary | Slightly lower-cost version of popular dual-drive RAID 1 NAS |
| Pros | • Decent performance for the money • Automatic up to 9k jumbo frame support • Supports separate drives, JBOD, RAID 0, RAID 1 • FTP, iTunes, UPnP AV servers • Quiet |
| Cons | • No USB print server • No logging • Tricky RAID 1 fail recovery |
Our DNS-323 review has always been among our top five most-read NAS reviews, pretty much from the day it was published in late 2006. So I think it’s safe to assume that D-Link has sold a pile of them. But D-Link has decided to put buyers who have been eyeing the 323 in a bit of a pickle with the addition of the DNS-321.
The 321 is a dual-drive NAS that matches the 323 on a feature-for-feature basis with two exceptions. Its download manager doesn’t handle BitTorrent and it has no USB port to support USB print serving. In return for accepting these deleted features, D-Link will let your wallet be about $40 fatter if you opt for the 321. But will you also suffer a performance hit if you decide to go for the less expensive option? We’ll see shortly.
Internal Details
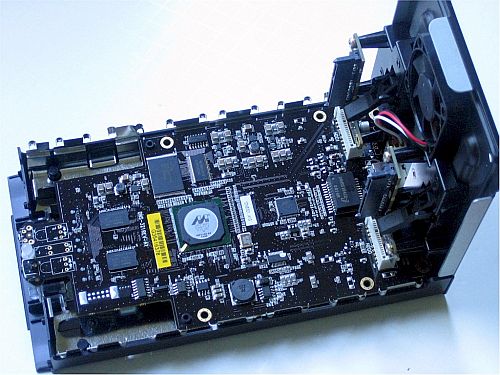
The Inside Story: D-Link DNS-321 vs. DNS-323 article has a comparison of the 323 and 321’s boards. Figure 1 shows the 321’s board, which is completely different than the 323’s.
Figure 1: DNS-321 Main board
The most significant difference is that the 321 uses a Marvell 88F5182-A2 C400 (clocked at 400 MHz), which has the SATA interface built in, while the 323 uses a Marvell 88F5181 (clocked at 500 MHz) combined with a Marvell 88X7042 PCIe to Serial ATA Controller chip.
Features and Functions
The physical designs of the two products are very similar. Both have you insert naked 3.5" SATA drives by sliding off the front cover and just pushing the drives into place—no tools or mounting trays required. Both front panels have activity LEDs for each drive along with a LAN Link / Activity light. Rear panels are very similar with the main difference being the missing USB connector on the 321.
The 323 originally did not support gigabit jumbo frames, but the recent 1.05 firmware release added support for up to 9k frames. Although there’s nary a mention to be found of jumbo frames in all of the 321’s documentation and marketing material, a check with D-Link revealed that up to 9K jumbo frames are supported on the 321. There are no jumbo frame enables or controls in the 321’s LAN settings, but my testing verified that they are, indeed, supported.
The 323 review does a good job of describing most of the 323 and 321’s features, so I won’t repeat that information here. With the exception of USB print serving and BitTorrent support in the Download manager, you’ll find all the 323’s features in the 321. Instead, I’ll cover two things that review didn’t cover: the Download feature and RAID 1 failure and recovery.
Download Scheduler
You won’t find the Download Scheduler in the main admin interface. Instead, you reach it via the Downloads button on the 321’s login screen (Figure 2).
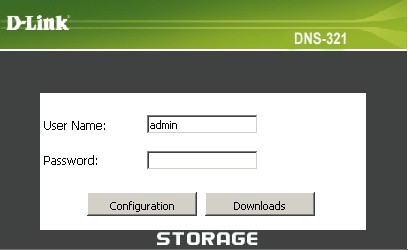
Figure 2: Login screen
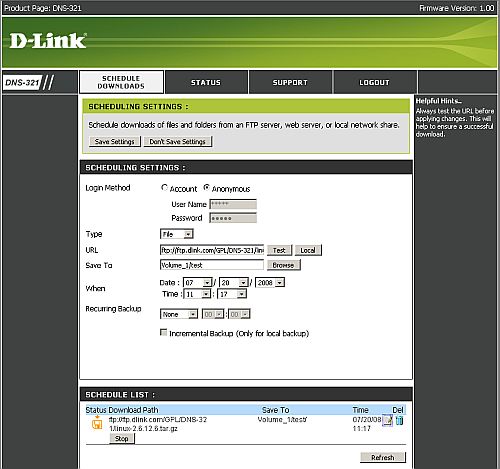
One you’re logged in, you’ll see the Schedule Downloads screen (Figure 3). You can enter FTP or HTTP URLs that point to either single files or folders, or local networked shares using UNC notation (ex. \\servername\dir\filename.txt)
Figure 3: Schedule Downloads screen
In Figure 3 I have entered the URL to the 321’s Linux file on D-Link’s FTP server, which I was able to test using the handy Test button. You then browse to select the 321’s folder where the file(s) will be stored (Figure 4).
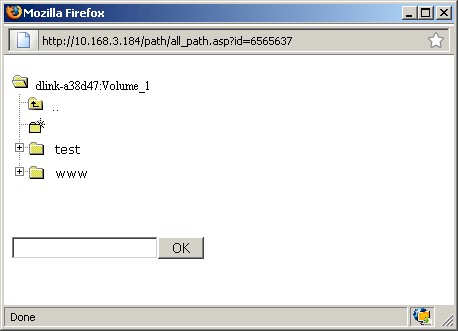
Figure 4: Download "Save To" browsing
Accustomed to clicking on the folder, not the filename in Windows, I clicked in circles for a few minutes, wondering why I couldn’t get the Save To destination to stick. I finally stumbled upon clicking on the filename and that did the trick. Note that you can also create a new folder, but that destination doesn’t automatically get saved as the desired destination.
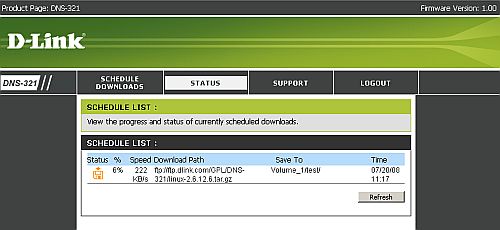
Before your scheduled download time, a Start button will appear on the Schedule List so that you can kick off a download on demand. When a download is running, the button changes to Stop as shown in Figure 3. Figure 5 shows the Status screen, which inconveniently doesn’t offer the same Stop buttons.
Figure 5: Download Status
The Schedule list uses icons to indicate download status. But the icons don’t have tooltip explanations and they are not described in the User Manual. The floppy disk icon with an "X" on it wasn’t hard to figure out, but the floppy with an "O" on it wasn’t crystal clear.
Recurring backups can be scheduled for Daily, Weekly or Monthly, but I would also have liked an hourly option. You can enable Incremental backups, but only if you are downloading locally. In all, once you get used to the interface quirks, the feature seems to work well.
RAID 1 Fail Test
Some commenters on the 323’s review complained about problems with RAID 1 recovery. So this time, I put a RAID 1 fail test on the review to-do list and I’m glad that I did because I found problems.
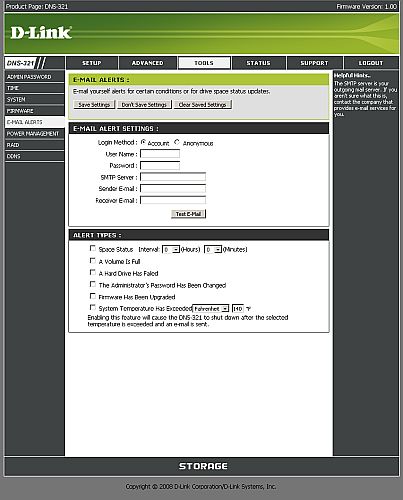
I first enabled and successfully tested the email alert feature (Figure 6) so that I could see if the 321 sent me any love notes. I then started a large folder copy to the 321, waited for it to get underway, then pulled the left-hand drive.
Figure 6: Email alert screen
It took about 30 seconds for the 321 to change the drive LED from off to red to flag the failed drive. I also got this email around the same time:
Hello Administrator,
Left Hard Drive Has Failed
Sincerely, Your DNS-321
The Status screen also changed to show degraded status (Figure 7)
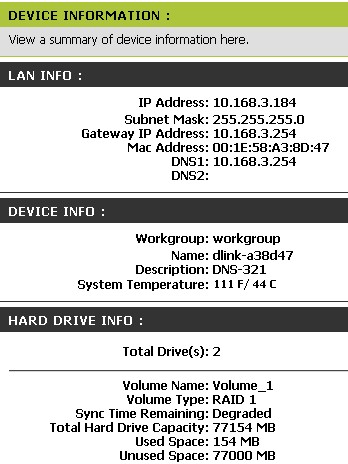
Figure 7: Status with failed drive
So I shut down the 321 (since hot-swap isn’t supported), plugged the "failed" drive back in and rebooted. During boot, I noticed the "failed" drive light initially blinking a lot and then turning a solid purple. It also took much longer than usual—2-3 minutes—for the login screen to come back.
When I logged in, there was no warning of drive failure and I found that the Status screen still showed as degraded. So I navigated to the Tools > RAID screen to start the rebuild, but found only the option shown in Figure 8.

Figure 8: No rebuild option
I refreshed the RAID and Status screens a few times and even tried Internet Explorer 6 (I was using Firefox 3). But I could not get the rebuild option that the User Manual told me that I should see. I even rebooted the NAS a few times, but got the same result each time. Not a good sign.
After I found no clues in the User Manual, I hit the D-Link support site, searched the FAQ and found a clue in this FAQ, i.e.
Note: The new drive Should be blank with no partition on the drive The drive may still be detected and prompt to format if formatted in NTFS
Fortunately, D-Link had sent four drives for the upcoming review of the DNS-343. So I powered down the 321, popped in a fresh drive, restarted and was rewarded with the screen in Figure 9 upon login.
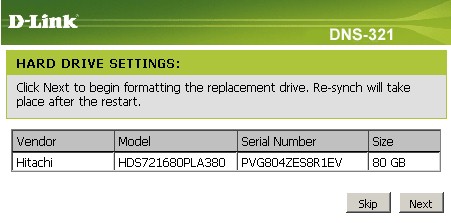
Figure 9: Replacement drive rebuild
I clicked the Skip button and navigated to the Tools > RAID screen to be sure that the rebuild option was there and found the screen in Figure 10. I should note that a complete resync took only about 15 minutes for a 78 GB RAID 1 array. Also note that I received no emails telling me that resync had either started or was completed.
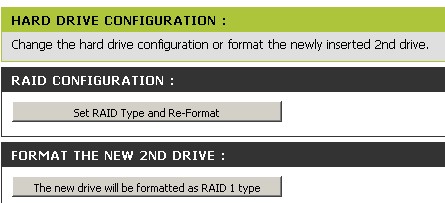
Figure 10: Replacement drive rebuild, RAID screen
After the rebuild was complete, I decided to fail the right-hand drive. After I pulled the drive, the Status screen wasn’t updated and showed no sign of the failure. There was also no indication of failure after I logged out and back in. It wasn’t until I rebooted the 321 that the Sync Time Remaining line in the Status page changed to "Degraded".
I then shut down the 321, reinserted the "failed" drive and powered back up. As the 321 booted, both drive lights blinked in tandem and it again took 2-3 minutes to get the login screen. But this time when I logged in and checked the status page, I found the 321 in the process of rebuilding the RAID 1 array on both the Status page and when I clicked over to the Tools > RAID page (Figure 11).

Figure 11: RAID screen during rebuild
Note that I could use the NAS while the resync was running, but I found the resync time started growing significantly as I started a large folder transfer.
While this test doesn’t simulate what happens in an actual failure (since you wouldn’t be reinserting the same drive), we run the same test on all RAID products. And the 321 is the only product we’ve encountered that requires a fresh drive in order to correctly resync the RAID 1 array (at least for one of the drives!). I’ll leave it up to you to decide whether this is a reasonable requirement.
My final two notes from this exercise are that there is no format option and no checkdisk function. Drives are formatted using the EXT2 filesystem.
Performance – Benchmark Comparison
The 321 was put through our standard NAS Chart tests in JBOD and RAID 1 modes with 100 Mbps, 1000 Mbps and 1000 Mbps w/ 4k jumbo frame LAN connections. To ensure connection at the intended speeds, the iozone test machine and the 321 were manually moved between a NETGEAR GS108 10/100/1000Mbps switch for gigabit-speed testing and a 10/100 switch for 100 Mbps testing.
NOTES:
- Firmware version tested was 1.00
- Drives used were two Hitachi Deskstar HDS721680PLA380 80GB 7200RPM 3.0 Gb/s SATA hard drives with 8MB of cache supplied by D-Link
- Keep in mind that the maximum raw data rate for 100Mbps Ethernet is 12500 Kbytes/sec and 125000 Kbytes/sec for gigabit
I first used the Compare Benchmark chart feature to plot throughput vs. file size for the various benchmark tests. Figure 12 shows a comparison of 100 Mbps benchmarks for the "large" filesizes from 32 MB to 1 GB. There is no sign of write caching, which is indicated by speeds in excess of the maximum LAN speed (12.5 MB/s for 100 Mbps Ethernet). The read plots are also unusual, with a noticeable rise in speed as file sizes increase.
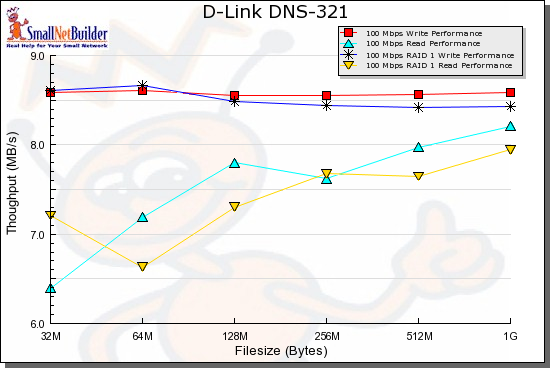
Figure 12: 100 Mbps Write and Read benchmark comparison
Figures 13 and 14 show the 1000 Mbps Write and Read results respectively. At least for write, it looks like jumbo frames really do boost performance.
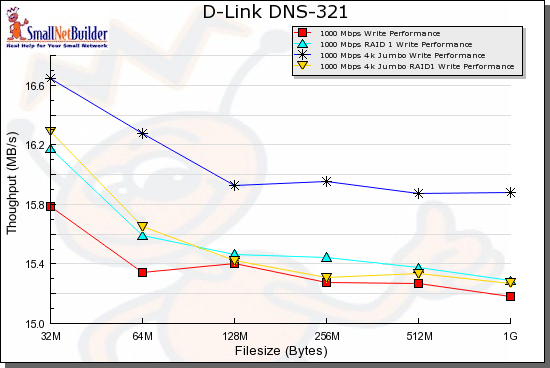
Figure 13: 1000 Mbps Write benchmark comparison
It also looks like RAID 1 significantly knocks down write speed. But all read modes seem to have about the same speed profile.
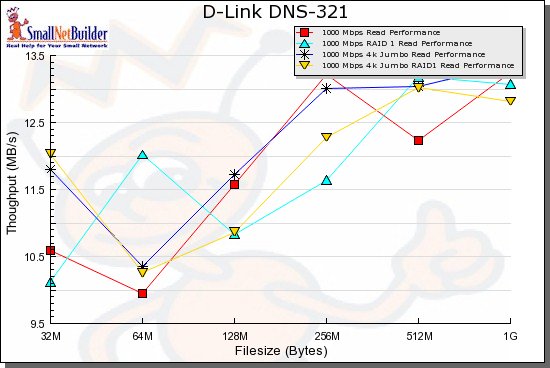
Figure 14: 1000 Mbps Read benchmark comparison
Performance – Product Comparison
The key question, of course, is whether you’ll suffer a performance penalty in exchange for keeping $40 in your pocket. So I used the NAS Chart tools to run a comparison of the DNS-323 and 321 and threw in the top-performing (and significantly more expensive) Netgear ReadyNAS Duo.
Figures 15 and 16 show a comparison of non-RAID Write and Read throughput with a gigabit LAN connection. I didn’t run jumbo frames plots because I don’t have DNS-323 data in that mode.
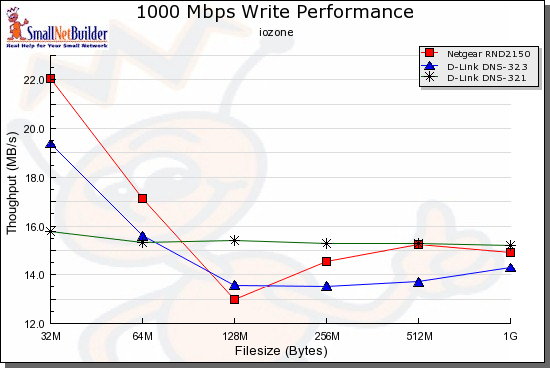
Figure 15: Product comparison – 1000 Mbps Write
Writing, both the 323 and ReadyNAS have higher throughput at 32 and 64 MB filesizes. But the 321 cruises steadily along between 15 and 16 MB/s and is equal to or better than the 323 from 64 MB on up.
Reading, the 321’s throughput is again relatively steady, but closer to the 323’s.
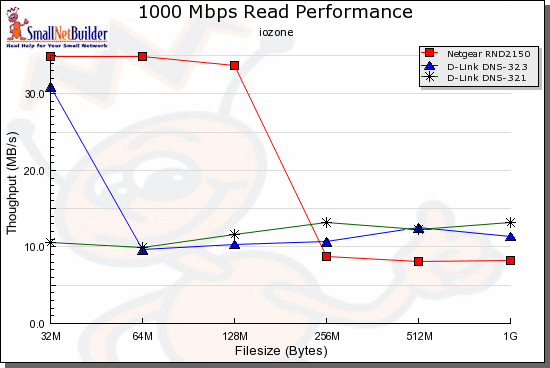
Figure 16: Product comparison – 1000 Mbps Read
The pattern is repeated for RAID 1, with the 321 producing steady write performance and outperforming the 323 from 64 MB on up (Figure 17).
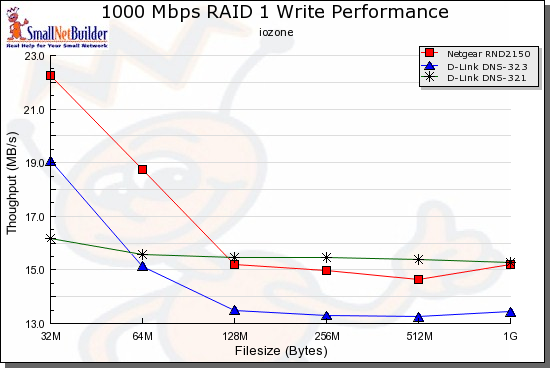
Figure 17: Product comparison – RAID 1 1000 Mbps Write
Read performance is slightly, but consistently better than the 323 for all file sizes except 32 MB (Figure 18).
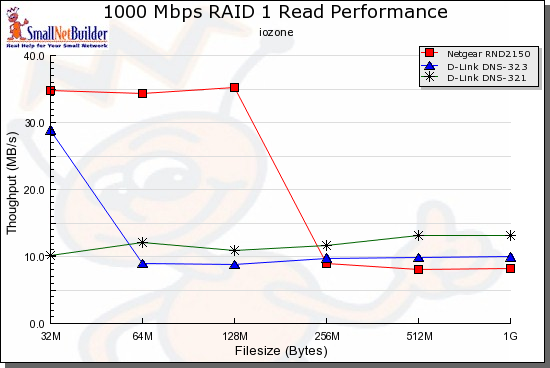
Figure 18: Product comparison – RAID 1 1000 Mbps Read
In all, the 321 is better or equal to the 323 in performance, particularly for large file sizes. Depending on your filesize mix, you probably wouldn’t be able to tell the difference between the two. Run your own comparisons using the NAS Charts.
Closing Thoughts
I understand the push to drive product prices down and D-Link is pretty good at it. But there is so little difference between the 323 and 321, that I’m not sure that it will be worth it to D-Link to keep the two SKUs going in the long term.
Maybe this is D-Link’s plan, since it isn’t going out of its way to differentiate the two products from a marketing point of view (both are called 2-Bay Network Storage Enclosure, for instance). I don’t have the 323’s box in front of me. But I would guess that if both products were sitting side by side on a shelf, that the average buyer would be hard-pressed to tell the difference between the two, except for price.
Given that print servers thrown into routers and NASes are a crapshoot in terms of whether they’ll support your printer (and chances are they won’t if it’s a multi-function printer), I think the choice is a no-brainer. Unless you really, really, need BitTorrent downloads in your NAS, the 321 is the way to go.

