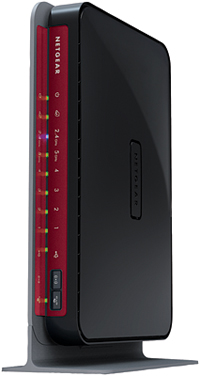
| At a glance | |
|---|---|
| Product | NETGEAR N600 Wireless Dual Band Gigabit Router Premium Edition (WNDR3800) [Website] |
| Summary | High performance dual-band, dual-radio 802.11n router with bandwidth metering external USB drive and printer sharing w/ UPnP AV / DLNA media server, ‘cloud’ file access and completely new admin GUI. |
| Pros | • Revamped user interface • Many new features including printer sharing and remote file access |
| Cons | • Lower routing speed than WNDR3700v2 |
Typical Price: $270 Buy From Amazon
Overview
If you’re looking to buy a NETGEAR router, you’re faced with a lot of choices. NETGEAR groups its routers into four categories: Simple Sharing; Work and Play; High Performance; and Ultimate Performance. The chart below (Figure 1, courtesy of NETGEAR) shows a category / feature matrix.
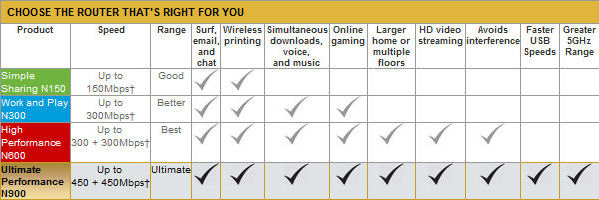
Figure 1: NETGEAR router category comparison
In this review, we’ll be looking at the new features found in the WNDR3800 N600 Wireless Dual Band Gigabit Router Premium Edition, which falls into NETGEAR’s High Performance category.
Tim’s previous coverage covered the 3800’s routing and wireless performance and touched lightly on its features. In this review, I’ll be covering the new features including the Genie Interface, Live Parental Control, CD-less installation and ReadySHARE USB storage and printer sharing capabilities.
Before diving into the review, I thought it might be useful to help decode some of NETGEAR’s nomenclature, which I first found confusing. Most of NETGEAR’s routers also have a designation of Nxxx, such as N150, N300, etc. So here’s a magic decoder ring.
First, you’ll notice that all of their routers with Nxxx designation are in increments of 150. 150 Mbps is the link rate or PHY rate for a single 802.11n stream. With that in mind, here are the rest of the N’s.
| 20 MHz mode max. link rate (Mbps) |
40 MHz mode max. link rate (Mbps) |
Notes | |
|---|---|---|---|
| N150 | 65 | 150 | Single band, single stream |
| N300 | 130 | 300 | Single band, dual stream.Some dual stream routers may employ three antennas. But the third antenna only enhances receive gain, which can help improve range. |
| N450 | 217 | 450 | Single band, three stream.This type has three antennas with a transmit / receive channel per antenna. |
| N600 | 130 | 300 | Simultaneous dual band (2.4 and 5 GHz) with dual-stream N. |
| N750 | 217 | 450 | Simultaneous dual band (2.4 and 5 GHz). One band supports two-stream N, the other three stream. You need to read the spec carefully to determine which one supports which. |
| N900 | 217 | 450 | Simultaneous dual band (2.4 and 5 GHz) with three-stream N on both bands. |
Table 1: NETGEAR’s "N" designations
Note that your wireless client must support the same number of streams in order to achieve the maximum link rates. Some lower-priced netbooks and notebooks support only single-stream N. Most support two-stream, with three stream N harder to find. Again, you must read your specs carefully!
Setup
The first thing that you’ll notice about the WNDR3800 is that there is no installation CD. The reason is that NETGEAR is the first manufacturer to realize that CD/DVD ROM drives are becoming scarcer as the world moves to netbooks, ultrabooks, tablets and Wi-Fi enabled smart phones. Some households might not have a computer with a drive at all!
Initially, I thought that a lack of a CD might cause some installation problems. Happily, I was wrong. NETGEAR has designed a way to do away with CD-based installation wizards entirely.
By following the six steps in printed Installation Guide, you’ll connect to your router in just a few minutes. NETGEAR supplies a yellow Ethernet cable that plugs into the yellow internet port on your router. The cable is even labeled “Plug into your Modem” on one end and “Plug into your router” on the other end.
Once you power up the router, you merely type http://routerlogin.net and you’re redirected to the web interface on the router. You don’t have to type in an IP address such as 192.168.1.1, though that’s the default address for the router.
If you prefer to connect wirelessly, by default, the WNDR3800 is preconfigured with a unique SSID (Network Name) and a unique Network Key. This information appears both on a label on the bottom of the router as well as on the protective plastic film on the top of the router. Note that the same WPA passphrase is used for both 2.4 and 5 GHz bands.
You can either manually configure your wireless connection using this supplied information, or you can press the WPS (Wi-Fi Protected Setup) button on the front of the router and use the WPS feature of your wireless client.
http://routerlogin.net takes you to the home page shown in Figure 2. Here, you’ll get your first glimpse at NETGEAR’s new "Genie" interface. At the top of the screen, there are Basic and Advanced tabs. Below the Basic tab, there are menu selections that correspond to the six status icons that appear on the right side of the screen. Most users will never need to click on the Advanced options, as the major features are accessible from the basic interface.
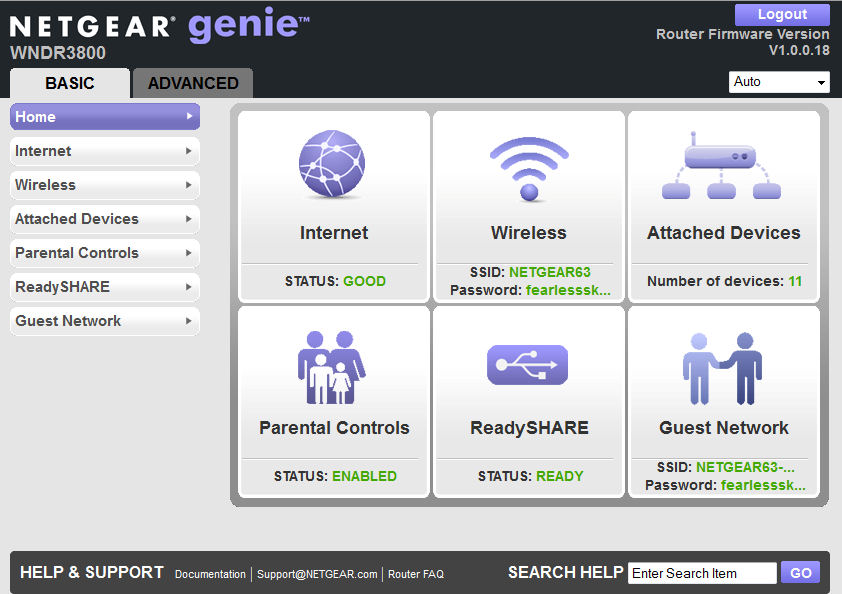
Figure 2: Basic interface home page
Feature Tour
Let’s take a walk through each of the main menus.
Internet
If the home page shows that your internet status is “GOOD”, you don’t even need to go to this page. However, if your ISP provides you with a static address, or you need a login for a PPPoE connection, you’ll need to visit here.
Wireless
This menu allows you to change any of your wireless settings for either the 2.4 GHz or the 5 GHz bands. You can change the network name, passphrase, enable/disable SSID broadcast, select the operating channel, change security options or change operating mode.
By default, the 2.4 GHz network is set up in single channel mode (20 Mhz or “up to 130 Mbps”) and on 5GHz network, the default is bonded channel mode. (40Mhz or “up to 300 Mbps”). For each band, you can also enable Wireless Separation which keeps wireless clients from “seeing” each other through the router.
One of the new features on the WNDR3800 is Clear Channel Selector. With Clear Channel Selector, the router periodically looks for the best possible operating channel with minimal interference (such as microwave ovens, cordless phones and other wireless APs) and traffic. Other routers also claim to have a clear channel or "auto set" feature. But they usually scan for other networks only when booting.
Clear Channel Selector appears to work. I live in an area that has numerous surrounding wireless networks, and the WNDR3800 made a pretty good choice by choosing Channel 1. And, over the course of 4 days, it changed channels in response to changing conditions. Figure 3 shows the wireless configuration settings.
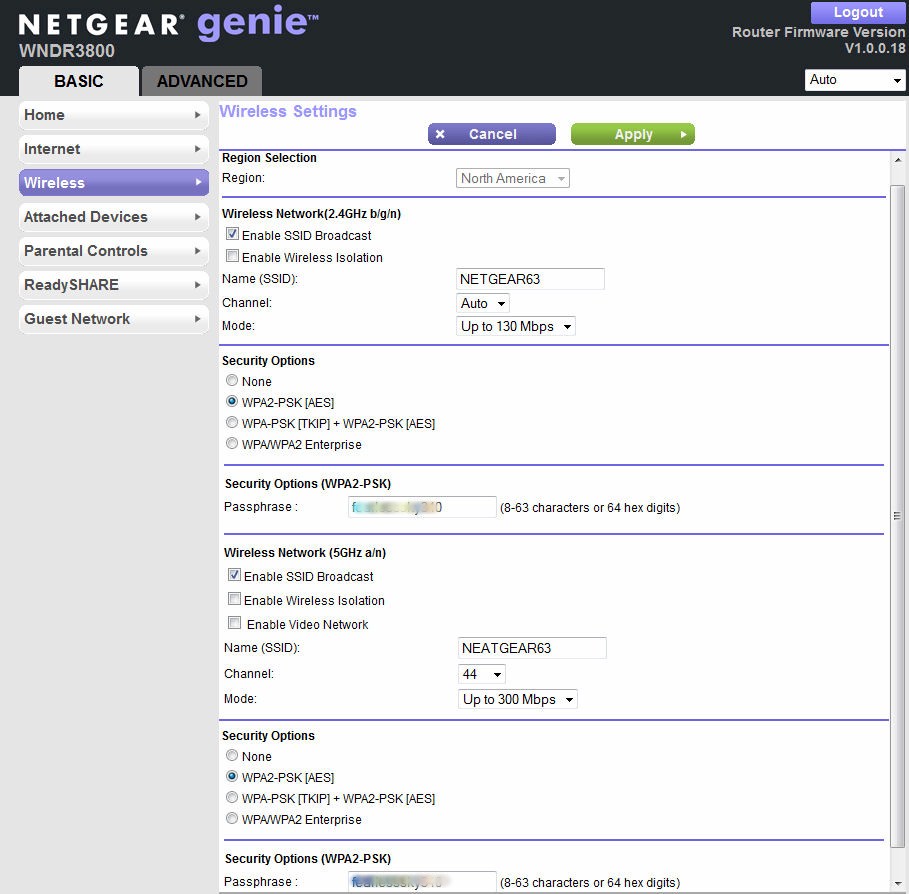
Figure 3: Wireless configuration
In addition, on the 5 GHz band, the WNDR3800 has a dedicated video mode that’s designed to reduce jitter and packet loss. NETGEAR recommends that you enable the video network for one of the two available 5 GHz networks, and connect to that network with your smart TV or media adapter. I didn’t test this feature.
Attached Devices
This menu displays each of the wired and wireless devices connected to your network. For each device, the IP Address, the MAC address and the device name is shown.
Parental Controls
Working in partnership with OpenDNS, the NETGEAR WNDR3800 includes free Live Parental Controls. There is a lot to investigate here, so I’ll come back to it shortly.
ReadyShare
This is NETGEAR’s storage and printer sharing feature. It also deserves a longer look, so we’ll come back.
Guest Network
This final option on the Basic tab allows you to set up individual guest networks on each band. Figure 4 shows the options for each wireless network. When computers connect to the Guest network, they receive an IP address on the same subnet as your LAN. However, you have the option of restricting access to your local network as well as isolating wireless guests from each other.
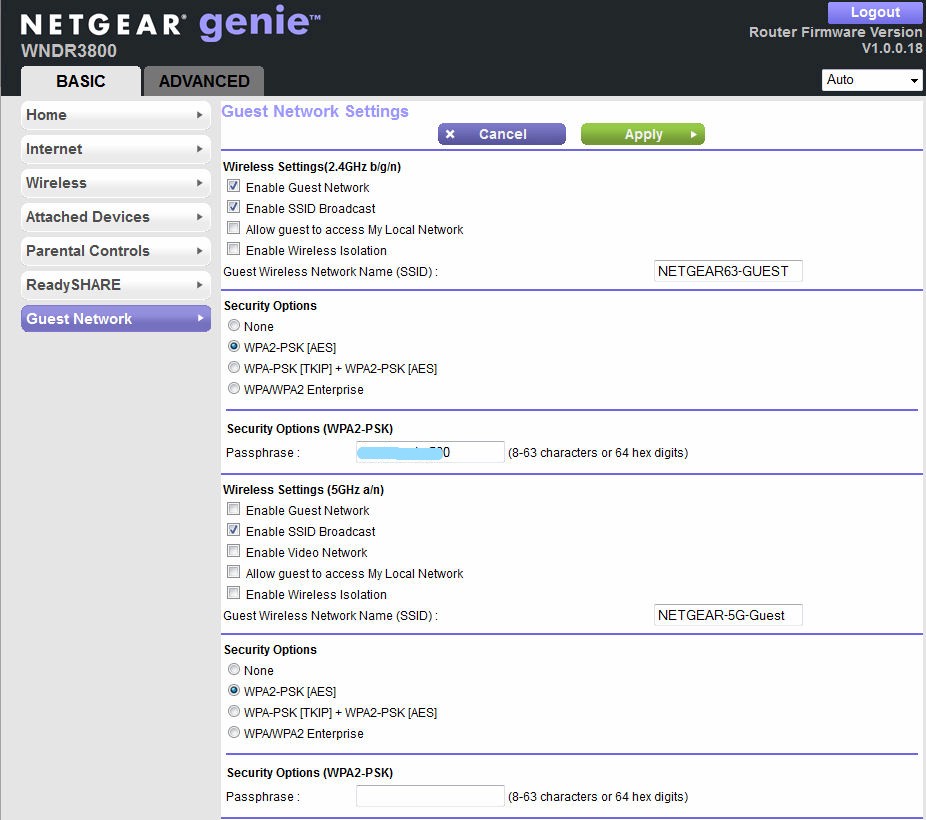
Figure 4: Guest Network settings for both bands
Parental Controls
Live Parental Controls works at the router level, so all traffic on your local network – even game consoles, iPads, and Smart Phones can be controlled. When you make a request for a web site, normally, the DNS lookup is done by your ISP.
With Live Parental Controls, the DNS request is forwarded by your router to OpenDNS. OpenDNS evaluates your request, applies your selected filtering rules, and either directs you to your requested site, or returns a webpage that informs you that your request has been blocked.
Setting up Live Parental Controls is simple. First you download the Live Parental Controls management utility from www.netgear.com/lpc. The management console is shown in Figure 5. Next, you choose to use an existing OpenDNS account or create a free account.
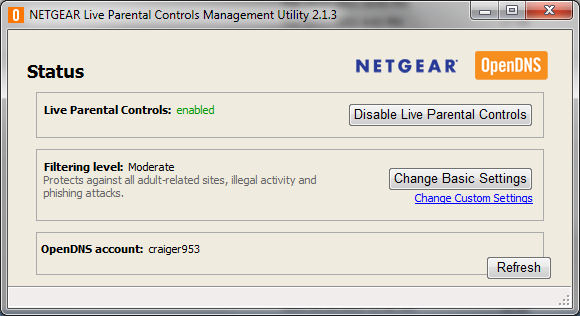
Figure 5: Live Parental Controls Management Utility
Finally, you choose the default filtering level to apply to your network(Figure 6).
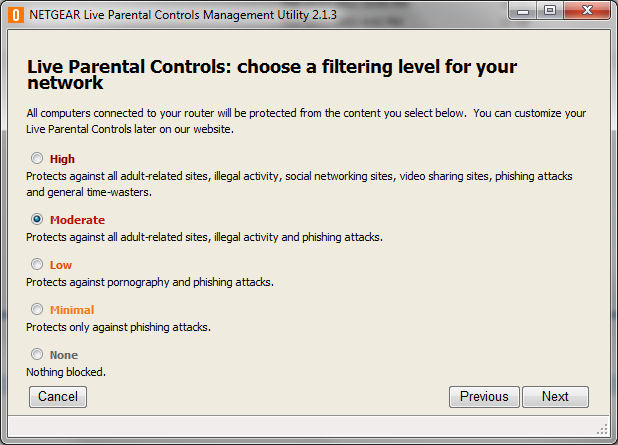
Figure 6: Choose a filtering level for your network
That’s all it takes to set up basic Live Parental Controls. If you want more granular control over your network, you can click on the “Change Custom Settings” link shown in Figure 5. This will take you to the OpenDNS web site.
Here you can view which of the 57 categories are blocked by each filtering level. You can also choose to add a time block with a different filtering profile. This would be useful, for example, to set a more restrictive filtering level for kids after school before their parents arrive home. Alternatively, you can choose categories and create your own customized filtering profile as shown in Figure 7.
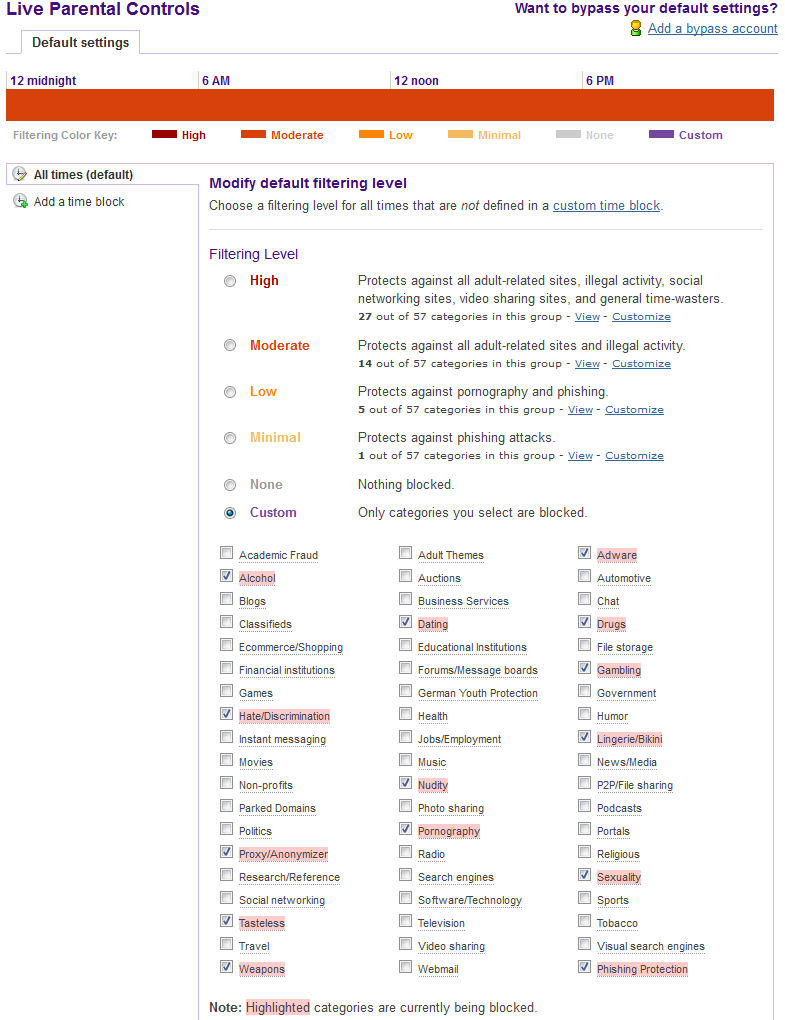
Figure 7: OpenDNS provides 57 categories of filtering
Of course, the default filtering level may not be appropriate for everyone in the household. Parents will probably want a less restrictive filter than what they want for their children. OpenDNS handles this with “bypass accounts”. Within your account, you can create bypass accounts with individual filtering levels and/or time blocks.
Figure 8 shows two bypass accounts that I created for my account. In order to use the bypass account feature, you need to download and install a small Windows utility. Currently, there doesn’t appear to be a Mac bypass utility but NETGEAR advises that one will be available sometime in the fourth quarter.
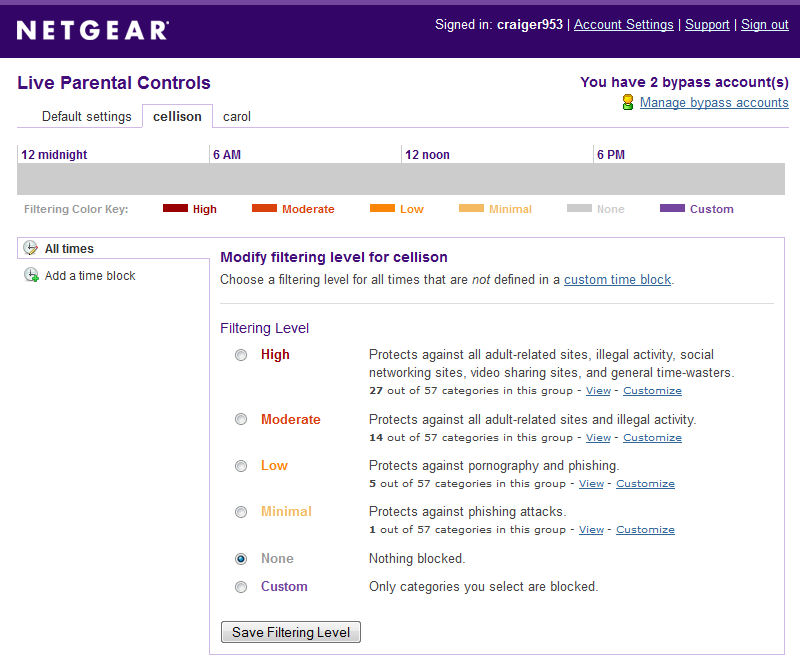
Figure 8: Setting bypass accounts
This utility must be running, and you must log in with the bypass account name/password (cellison in the example) in order to bypass the default settings. This bypass account disables filtering for bypass user cellison.
Should you attempt to go to a web site that’s blocked by your filtering profile, OpenDNS will send you a blocked page that explains why you didn’t arrive at your site (Figure 9.) You can also see why this service is offered for free – it’s supported by advertising.
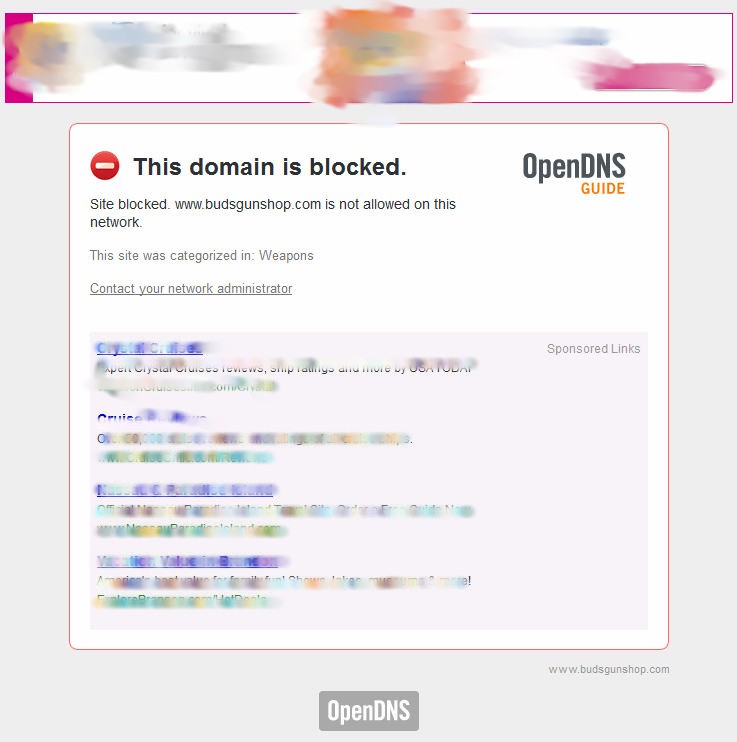
Figure 9: Blocked website
OpenDNS offers a VIP service for $9.95/year that eliminates the advertisements, allows you to create a customized block page, and keeps reporting metrics for a year.
ReadySHARE
The WNDR3800 has a single USB 2.0 port that can be used to either share the contents of a USB storage device, or to share a printer. There are three ReadySHARE services.
Basic
This allows an attached USB storage device to be shared on your local network. The default network name is \\readyshare and everyone on the network has full Read/Write access. There are only two users: admin, which has a password, and All which requires no password.
Figure 10 shows the advanced configuration for ReadySHARE Basic. Here you can see that the device is available at \\readyshare on the local network as well as via a web browser on the local network. De-selected, by default, is internet web access, as well as local and internet FTP access. The advanced settings page lets you also create/edit/delete network folders, change the network device name and change the workgroup.
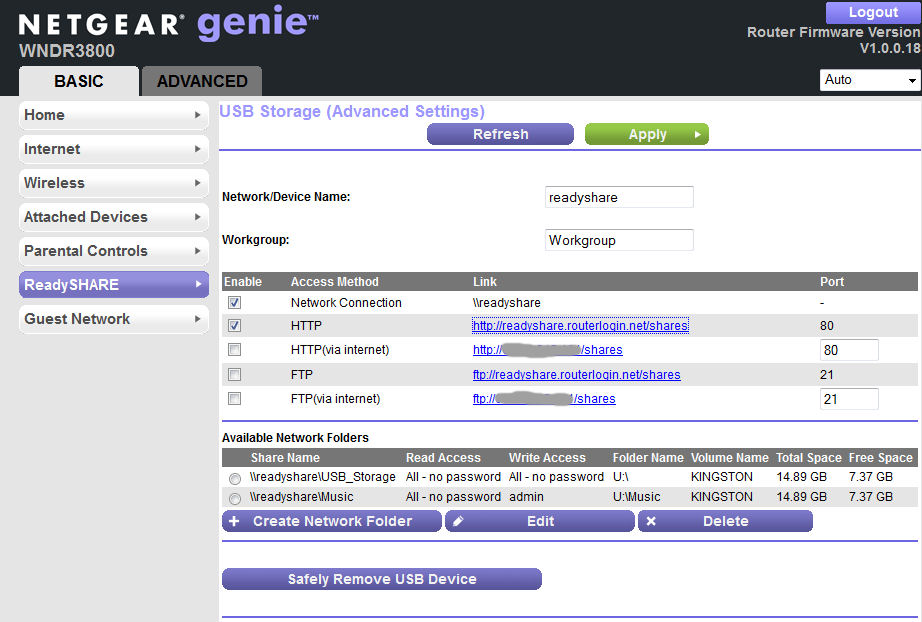
Figure 10: Advanced settings for ReadySHARE Basic
ReadySHARE won’t win any performance contests with even the cheapest full-fledged NASes. But the table below from Tim’s performance review shows that speed isn’t too awful as long as you’re not doing NTFS writes.
| WNDR3800 | WNDR3700v2 | WNDR4000 | |
|---|---|---|---|
| FAT32 Write (MBytes/s) | 12.5 | 9.9 | 6.1 |
| FAT32 Read (MBytes/s) | 13.3 | 14.2 | 6.9 |
| NTFS Write (MBytes/s) | 4.3 | 3.0 | 4.6 |
| NTFS Read (MBytes/s) | 12.0 | 12.1 | 4.3 |
NETGEAR router throughput comparison
ReadySHARE Cloud
By choosing this option, you get remote access to the storage device attached to the router’s USB port. It’s like having your own personal storage cloud that doesn’t have a monthly fee. Setup is a four step process.
First, you need to create a free ReadySHARE account.
Next, you enter the ReadySHARE Cloud user name and password to register the router with your account.
Now, log into http://readyshare.netgear.com to check your device.
Finally, if you want full access to the files on your storage device, you’ll need to install a Windows client. This windows client installs a Leaf Networks virtual network adapter on your computer and assigns it a 5.x.y.z/8 (255.0.0.0) address. The client enables your remote computer to connect to the storage your WNDR3800 router using a secure VPN. (Note: Leaf Networks was acquired by NETGEAR in January, 2010. Here’s a link to How Leaf Networks work.)
Thanks to a nearby unsecured wireless network, I was able to test remote access using the NETGEAR ReadySHARE cloud client. Figure 11 shows that storage device is available in Windows Explorer as though it were on my local network. Note the 5.171.62.239 IP address.
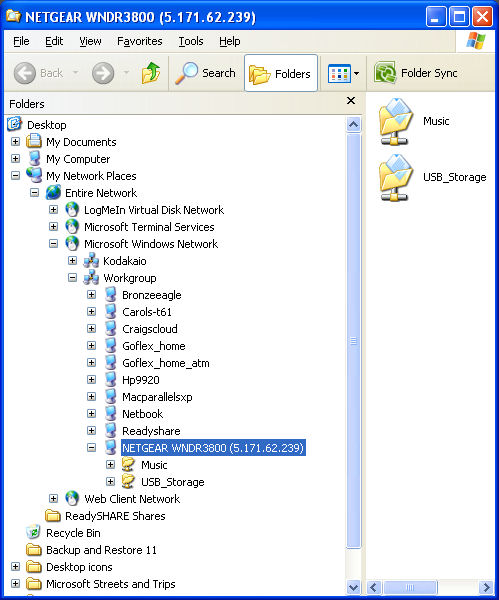
Figure 11: AccessingReadySHARE cloud storag
There’s also client support for iOS and Android. Unfortunately, there’s currently not a MacOS X ReadySHARE cloud client available. But NETGEAR advises that it’s under development and should be available "soon".
ReadySHARE Printer
By selecting this option, you can share a USB printer with everyone on your network. Simply connect your printer to the USB port on the back of the WNDR3800 and make sure that drivers for your printer are installed on each system that will be using it.
Then, download and install the Mac or PC client from www.netgear.com/readyshare. I tested this using a Kodak AiO ESP7250 printer/scanner and it worked flawlessly. I was able to scan from as well as print to the printer.
Advanced Tab
This tab provides access to a rich set of features for advanced configuration of your WNDR3800. The Advanced Home, shown in Figure 12, shows the status of each of your wireless network, basic router information and the status and details of your internet connection. There are two tabs for wizards and four additional tabs that open up to reveal additional configuration options.
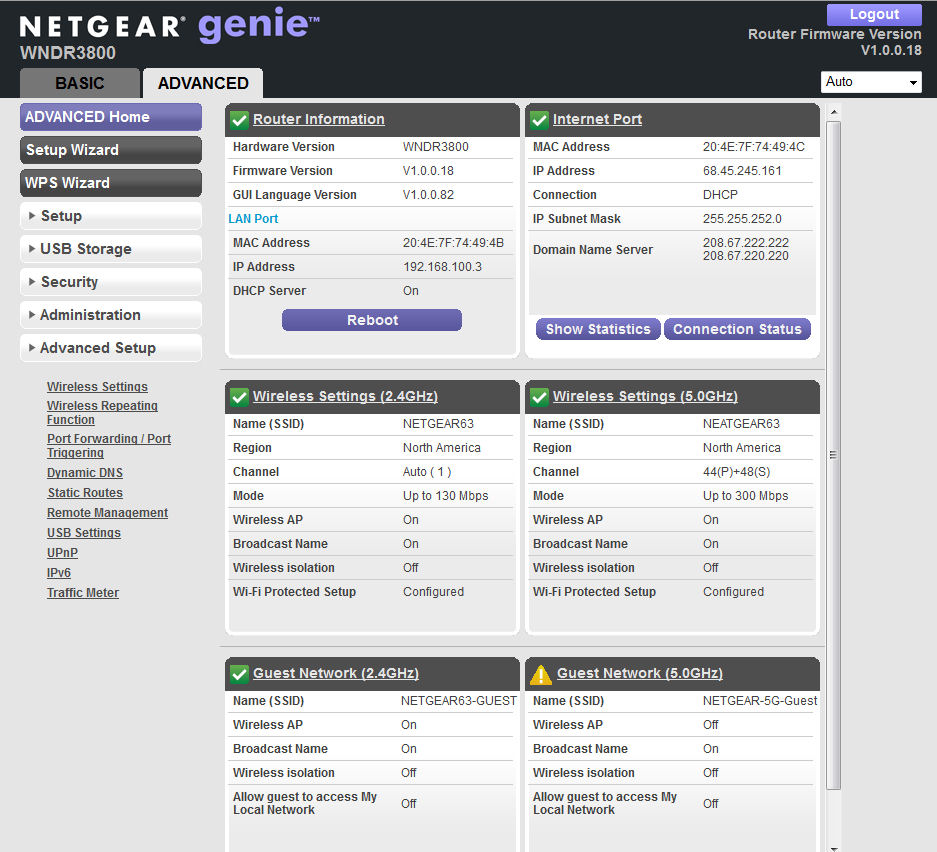
Figure 12: NETGEAR Advanced Home
The advanced setup tab contains all of the features you’d expect to find on a high performance router. You can set up blocks of time to disable wireless networking. You can also configure the WNDR3800 for WDS-based wireless repeating.
The WNDR3800 supports port forwarding, port range forwarding and port triggering. Unfortunately, there are no pre-defined port triggering applications, so you’ll need to know the ports used by your gaming applications (or they will have to use UPnP).
There is also support for Dynamic DNS, but only DynDNS is supported. UPnP is enabled by default, and you can view the UPnP portmap table by clicking on the UPnP menu. Under the USB Storage tab, you have the option of enabling a DLNA media server for media files stored on the storage device attached to the router. Optionally, you can also enable TiVo support so ReadySHARE storage can be used by your TiVo.
One of the interesting and fairly unique features is the Traffic Meter shown in Figure 13. This shows my traffic usage for the four days that the router has been connected to the internet. The traffic volume is stored in the router, so you don’t lose if even if you have to reboot the device.
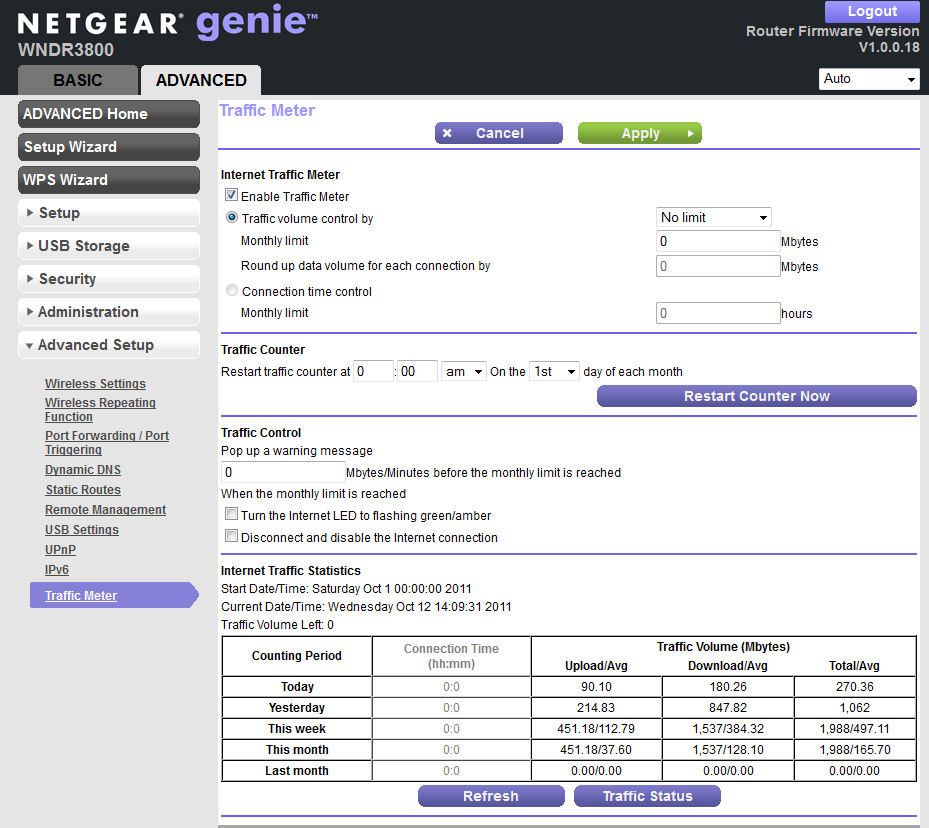
Figure 13: Traffic meter
Genie
My favorite new feature on the WNDR3800 is NETGEAR Genie. NETGEAR Genie is a downloadable standalone application that allows you manage, monitor and repair your network. Of course, the Genie standalone program has a very similar look and feel as NETGEAR’s new browser UI. They are both also referred to as "Genie", so it’s easy to get confused. The Windows version is fully-released and there is a beta version for Mac OS 10.6 and higher.
While you can’t configure all of the advanced options using Genie, you can configure the most common features that you’ll likely use. NETGEAR is gradually rolling out Genie support for their existing routers, but since the WNDR3800 is a new router, all of Genie’s features are functional.
Figure 14 shows the Genie application’s home screen. I like the direct searchable support link on the Genie home page. Since many of the menu items duplicate functions found in the browser-based interface, I’ll just touch on a few unique features.
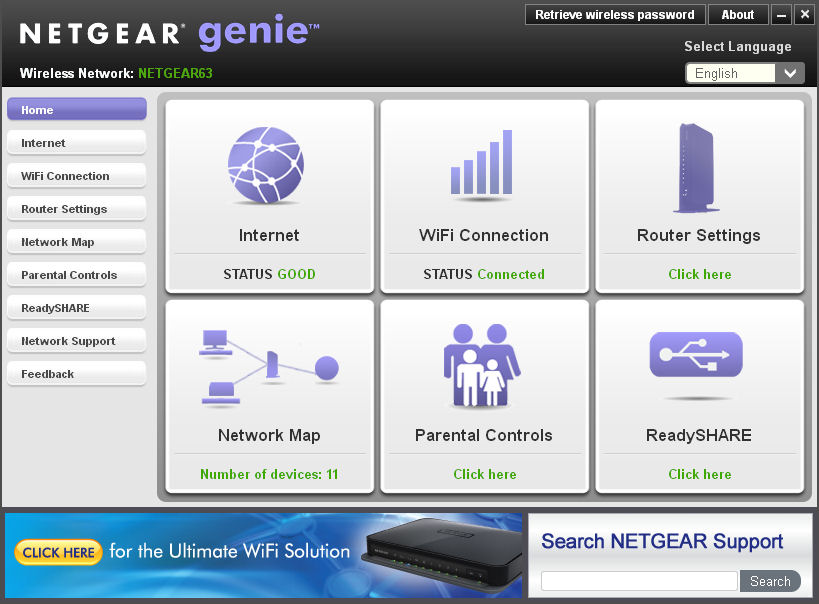
Figure 14: NETGEAR Genie home page
Internet
The Internet icon shows your current internet connection status. If you click on the icon, you’ll see a graph of the internet traffic for your current computer. Figure 15 shows the internet traffic on my computer while I was watching a Netflix video.
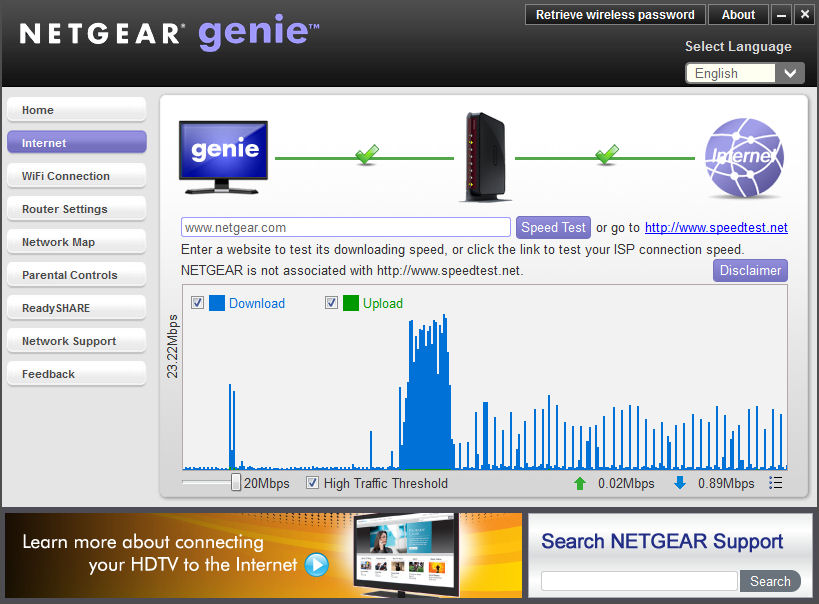
Figure 15: Internet traffic volume monitor
Wi-Fi connection
This icon shows your current Wi-Fi connection (if any) and the relative signal strength. If you click on this icon, three additional tabs are available. Figure 16 shows the number of wireless networks discovered on each channel. If you hover your mouse over one of the bars, the names of the wireless networks appear. The Connect WiFi tab shows nearby networks and allows you to connect. Guest Access takes you to the guest access configuration page.
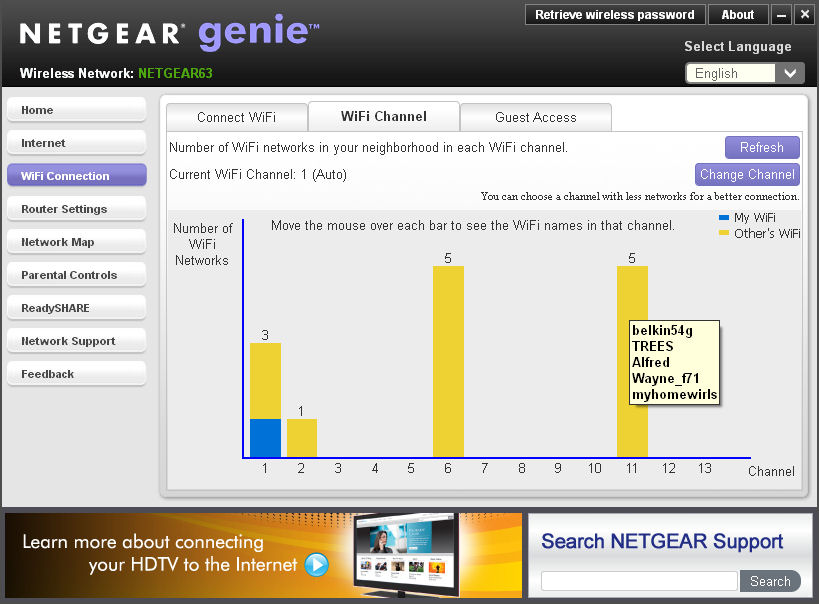
Figure 16: There are five networks on channel 11
Router Settings
When you click on this icon, you are prompted to log into the router with the admin password. Five tabs let you configure wireless settings, ReadyShare, Guess Access, view the Traffic Meter (similar to Figure 13), and update the router firmware. Note: it’s a known issue that Genie can only configure the 2.4 GHz wireless settings on a dual band router.
Network Map
I really like this feature. Genie analyzes your network and displays a map of the devices. It also makes a guess as to what type of device it is. You have the option of naming the device something other than its network name or IP address, and you can choose select a host type. Changing the host type changes the icon.
Figure 17 shows the network map of my home network. I have more devices than will fit onto a single page, so the map continues on a second page. The map shows Wi-Fi and wired connections but also shows devices that are no longer connected.
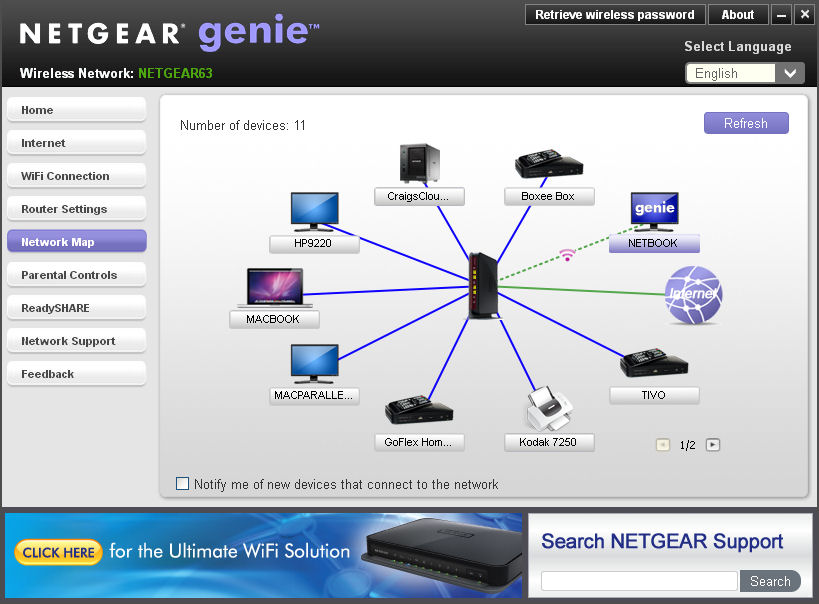
Figure 17: Genie network map
Parental Controls
This icon gives you the same functions as the Live Parental Control Management utility I covered earlier.
ReadyShare
This icon gives you the same functions as the ReadySHARE function in the web UI.
Network Support
This menu provides access to three tabs: FAQs; Tools (basic tools such as ping, trace router, DNS Lookup and Computer profile); and Support (links to downloads, forums, register your product and premium support).
Feedback
A form to provide feedback to NETGEAR.
Closing Thoughts
Even though the WNDR3800 falls in NETGEAR’s "high" (vs. "ultimate") performance category, it is currently the most fully-featured router in their product line. The WNDR3800 has a number of features that either differentiate it from its competition and from other NETGEAR products.
I’ve covered most of these items already. But to summarize briefly, here are a few bullet points:
- NETGEAR genie – a new user interface found both in the web UI and as a standalone application
- CD-less installation
- Live Parental Controls powered by Open DNS – it’s free but ad supported.
- Clear Channel selector – automatically and dynamically chooses the best wireless operating channel to ensure minimal interference and optimal performance.
- ReadySHARE Cloud – your own personal cloud storage – for free
- ReadySHARE Print – Share your USB printer by plugging it into your router
- DLNA server with Tivo support
- Dedicated 5GHz video mode
- Internet traffic meter
As with many new products, the Windows platform is fully supported, but MacOS support hasn’t been fully implemented yet. For the MacOS platform, there’s a ReadySHARE printer client and a beta version of Genie. Still under development, but scheduled for release fairly soon is client support for remote access via ReadySHARE as well as a bypass account utility for Live Parental Controls.
There is MacOS Time Machine support for the WNDR3800, but currently there’s only for 10.5 and 10.6. Time Machine support for 10.7 (Lion) should be available via a firmware upgrade "in a couple of weeks".
Note that I pass these "futures" along for your information, but not as guarantees. Vendors have many priorities, which often change. So when and if these features appear is entirely undetermined.
Open source fans will appreciate that there’s already WNDR3800 support from DD-WRT, Open-WRT and Tomato. I don’t know what features are included in the open source distributions. But it’s hard to imagine that they have support for all of the WNDR3800’s premium features.
My bottom line is that if you’re in the market for a full-featured dual band router, the premium features on the WNDR3800 make it well worth considering. Be sure to read Tim’s review to see if the performance is as good as the feature set.
 Buy N600 Wireless Dual Band Gigabit Router Premium Edition from Amazon
