| At a glance | |
|---|---|
| Product | eero Home Wi-Fi System (A010301) [Website] |
| Summary | Wi-Fi “system” using multiple units connected via Wi-Fi mesh. |
| Pros | • Easy setup |
| Cons | • Limited routing feature set |
Typical Price: $0 Buy From Amazon
Introduction
Updated 8/9/16 Corrected radio SoC part numbers
Updated 8/2/16: Link to wireless retest added
Many of you have probably already read everyone else’s coverage of eero‘s mesh Wi-Fi system by now. Some of the reviews contained gushing reports of miraculous cures of formerly troublesome Wi-Fi installations. Most others were at least complementary.
I decided to take my time with eero, given its first-in-category status. Ms. SmallNetBuilder and I used it for a few weeks, replacing our standard setup of main router and one Ethernet-connected access point. I then put it through our standard wireless router test suite (or at least tried to) and even ran special multi-client and multi-hop tests.
In the end, I can see how eero might have produced better results than some router / extender setups it temporarily replaced in other reviewers’ testing. But eero is no miracle cure for all Wi-Fi woes by any stretch. But I get ahead of myself.
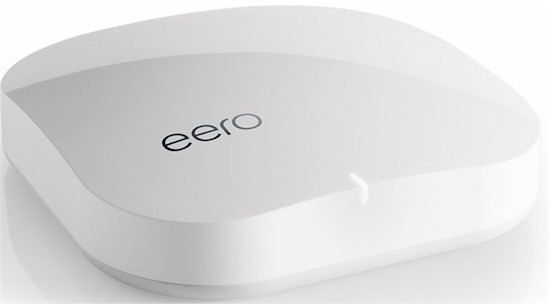
eero is an unassuming square glossy white box, with a 4.75" x 4.75" footprint and standing about an inch high. It’s designed to sit on a table or shelf, so has no wall or ceiling mounting slots. There is only one LED on the front that glows white when it is set up and all is well, red when something’s wrong and flashes blue during setup.

eero
The rear panel has a reset pinhole, power port, two Gigabit Ethernet ports and a USB 2.0 port that serves no purpose right now. The Ethernet ports are not designated WAN or LAN; eero automatically figures out what to do with each one depending on whether it is in router or bridge (AP) mode.
eero currently costs $199 for one or $499 for a three-pack. The three-pack comes with three power supplies, but only one Ethernet cable.
Inside
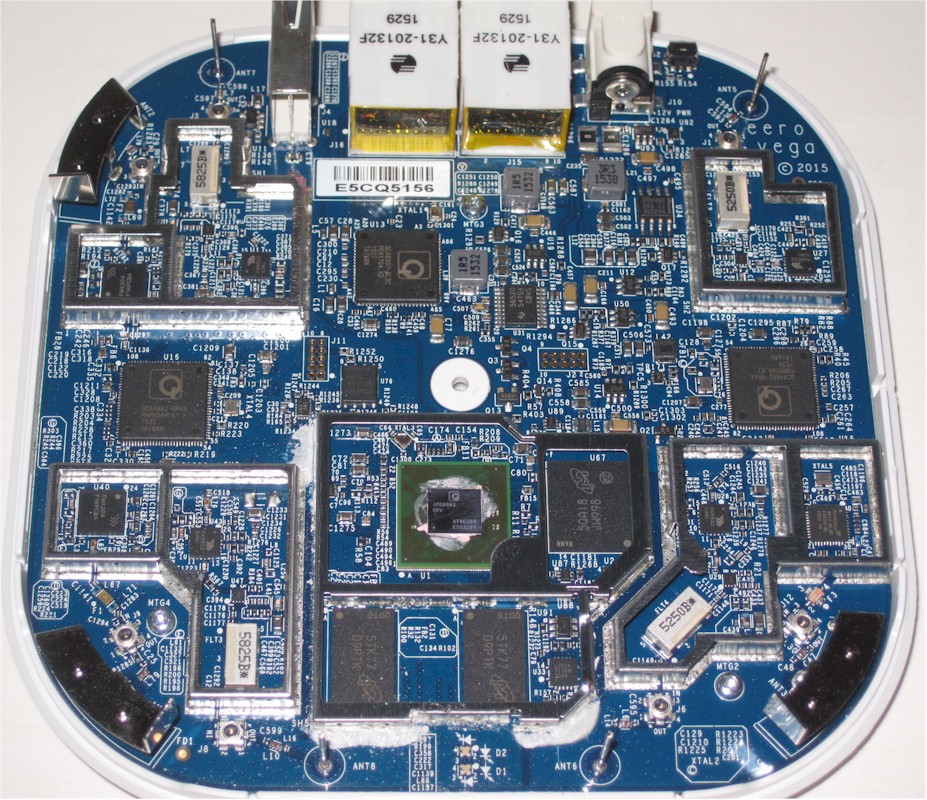
eero’s FCC inside photos are under temporary non-disclosure for an indeterminate time. So after testing was complete, I opened up one of my three eeros. The photo below has all RF can tops and heatsinks removed and is annotated because eero has a few tricks under its little white plastic hood.
As an early CNET article stated, eero is a Qualcomm / QCA based design. Inspection of its innards reveals it’s a 2×2 AC1200 class router with a twist. Instead of dedicated 2.4 and 5 GHz radios, one radio serves up both 2.4 and 5 GHz high band (Ch 149 – 163). The other is dedicated to 5 GHz low band (Ch 36 – 48).
You can see four straight-wire 5 GHz omni dipole antennas in the annotated photo below; two for each radio. Two bent-metal antennas serve the 2.4 GHz radio; the third is connected to the Atheros AR3012 Bluetooth 4.0 radio.
eero uses a Qualcomm dual-core IPQ8062 processor @ 1 GHz. This puts it more on a footing with current Qualcomm-based AC2600 class routers using 1.4 GHz IPQ8064 processors than other AC1200 class routers. Both Qualcomm SoCs have two Krait 300 ARMv7-A compatible cores.
![]()
eero board
eero’s other components are collected into Table 1, along with two conventionally designed AC1200 class routers for comparison.
Updated 8/9/16: Radio Soc part number corrected
| eero | Amped Wireless RTA1200 | Linksys WRT1200AC | |
|---|---|---|---|
| CPU | Qualcomm dual-core IPQ8062 @ 1 GHz | Qualcomm Atheros QCA9557 2X2 abgn WLAN SoC | Marvell Armada 38X dual-core @ 1.33 GHz (88F6820-A0 C133) |
| Switch | Qualcomm Atheros QCA8337 | Qualcomm Atheros QCA8337 | Marvell 88E6176 |
| RAM | 512 MB | 128 MB | 512 MB |
| Flash | 4 GB / 8 MB | 16 MB | 128 MB |
| 2.4 GHz Radio | – QCA9882 2×2 MU-MIMO 802.11abgnac radio – RFMD RFFM4204 2.4 GHz Front End (x2) |
In QCA9557 – Skyworks SKY65900 2.4 GHz power amp (x2) – Skyworks SKY15971 2.4 GHz LNA (x2) |
Marvell 88W8864 – Skyworks SE2623L 2.4 GHz Power Amp (x2) |
| 5 GHz radio | – QCA9882 2×2 MU-MIMO 802.11abgnac radio – RFMD RFPA5522 5 GHz power amp (x4) |
– QCA9882 2×2 802.11ac radio – Skyworks SE5023L 5 GHz power amp (x2) – Skyworks SKY85601 5 GHz LNA + switch (x2) |
Marvell 88W8864 – Skyworks SKY85601 4.9 – 5.9 GHz SPDT Switch with LNA (x2) – RFMD RFPA5522 4.9 GHz to 5.925GHz WiFi Integrated PA module (x2) |
Table 1: Component summary and comparison
The gallery below has more shots of eero’s insides, with additional commentary.
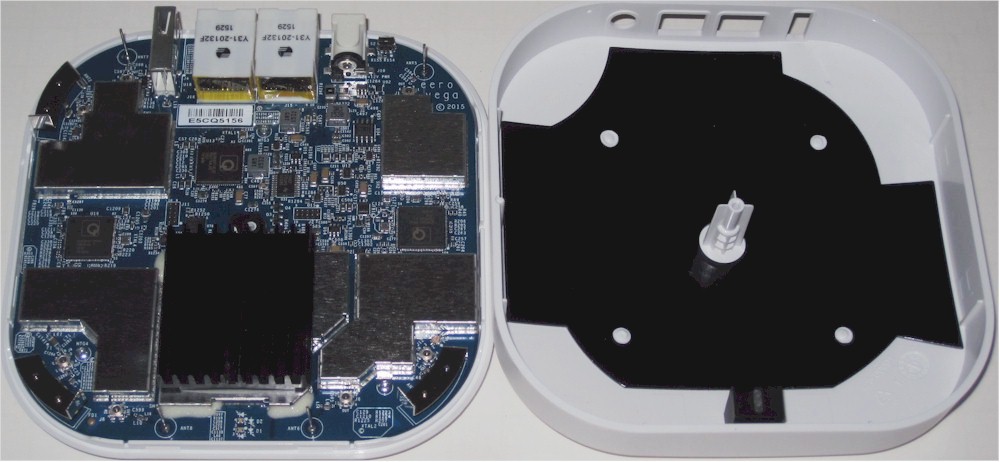
eero’s only heatsink sits atop the RF can enclosing the Qualcomm IPQ8062 processor, RAM and flash. That can’s top is epoxyied on tight. It took an hour of careful scraping to open it. The black piece affixed to the top is metal, most likely for RF control.
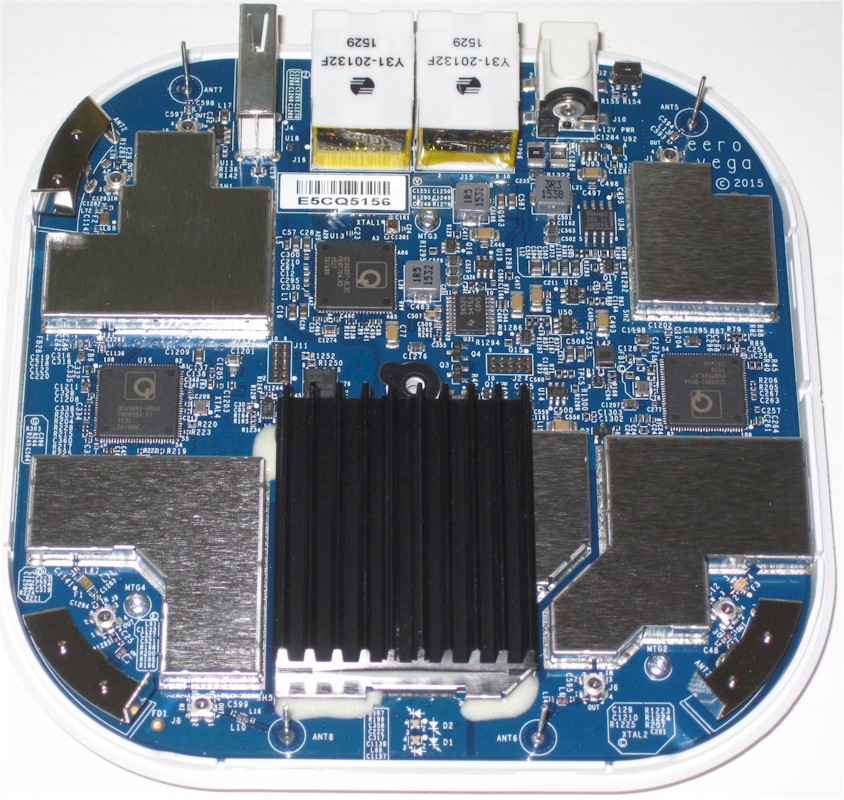
Closer view of board top. The QCA8337 switch at center top and QCA9882 radios left and right are clearly visible. None of these have heatsinks
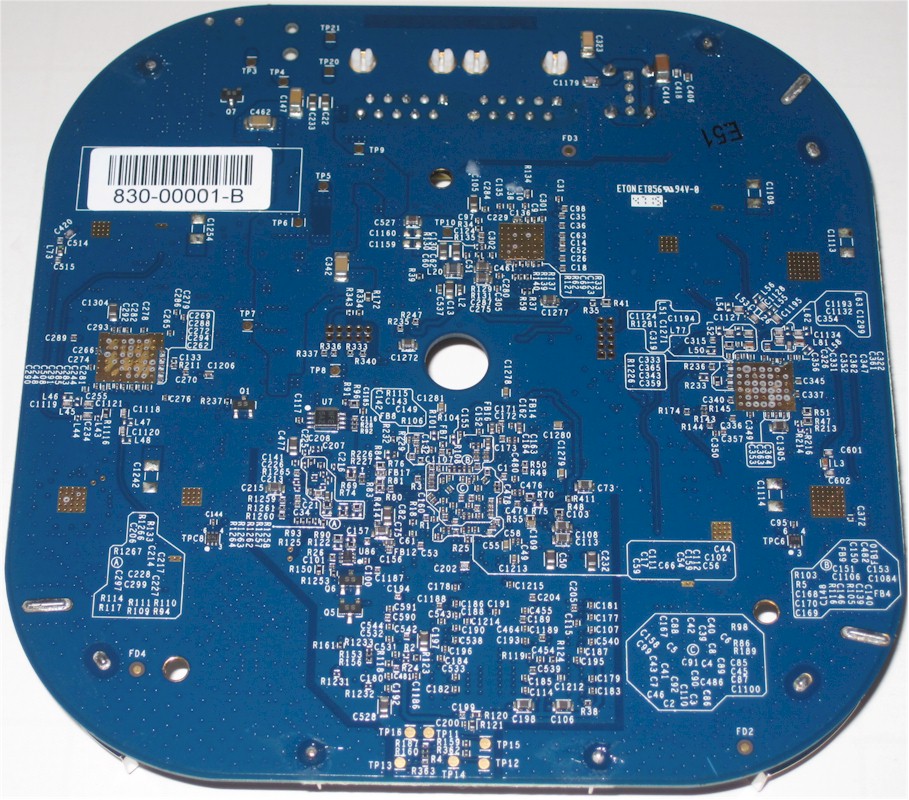
Not much to see on the board bottom.
Will all RF can tops removed, the RFMD amplifiers and RF front ends are visible. The 5 GHz filters are marked 5250B and 5825B. The Atheros AR3012 Bluetooth 4.0 radio is in the lower right RF can.
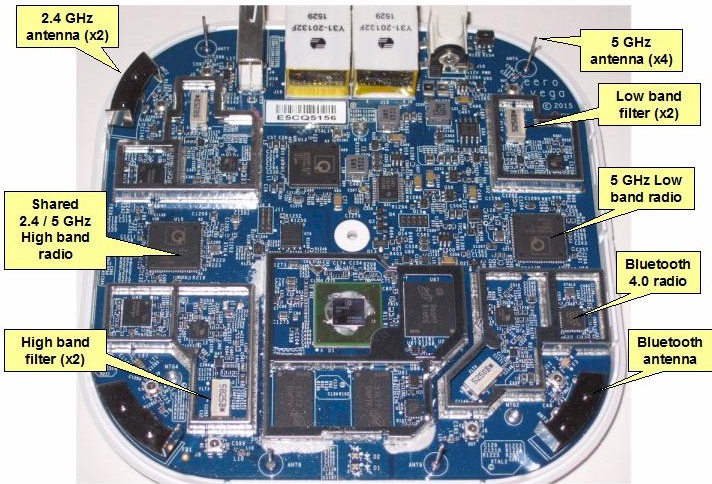
Here’s the annotated board view, to complete the series.
Setup
Like Google’s OnHub, eero is designed for people who don’t want to know nuthin’ about routers. So its feature set is, by design, as limited as possible to get eero connected to your ISP and your wireless (and wired) devices connected to the internet.
I’m not going to walk through setting up eero. The eero video below is a bit cutesy, but describes the process pretty well. You can also read eero’s setup FAQ if you want more detail and less cute. You will need an Android (4.4 and higher) smarthphone or iPhone (iOS 8 and higher) with an internet connection that also supports Bluetooth 4.0.
Although eero’s app will want to authenticate your account setup via text to your smartphone, you can change the number to one you know is untextable and eero will fall back and email the code to you. Note your account doesn’t have a password. You login using your mobile phone number or email and authenticate with a texted or emailed code.
Once your account is set up, installing an eero AP should go smoothly if your service provider doesn’t require any authentication and just lets your modem grab its IP address information via DHCP. This eero FAQ has more information about services that will or won’t work. The short story is, if your provider uses PPPoE, PPTP, L2TP or IPv6 only, you’ll have to use eero in bridge (access point) mode.
I initially let eero be my router, but quickly realized I depend on a lot of static IPs in my network. At the time of setup, eero’s Android app did not support IP address reservations and I hadn’t checked out the iOS app, which did. (eero has since updated the Android app so it also supports IP address reservations, which are required to forward ports.) So I switched eero to bridge mode and let my router go back to doing routing, but shut off its wireless so eero could handle Wi-Fi.
In Use
Eero’s app handles all configuration; there is no browser interface. If you try to hit an eero’s IP address, your browser will just hang because there is no webserver running. In fact, using Fing on an Android tablet connected to eero to run a service scan returned only UPnP running on port 1900.
eero’s app reminds me a lot of Google’s On app for its OnHub routers in its simplicity. It’s designed to get eero set up, provide some status information and configure a limited set of routing features. After you are set up, the app opens on the My network screen shown on the left in the composite image below. Tapping the hamburger reveals the main menu, shown on the right. Note that I used the iOS app running on a 5th generation iPod touch for the screenshots because it supports more functions.

eero My Network and main menu
It was a smart move for eero to prominently feature a built-in speed test on the My network screen. While convenient, it only measures wired internet down and uplink throughput to the Ethernet-connected eero and nothing about Wi-Fi throughput. You can initiate a speed test manually by swiping down on the My network screen. This works on both iOS and Android apps.
As shown below, the Number of devices currently on networks currently provides more information on iOS (right) than Android (left). Since eero recently enabled the port forwarding, IP reservation and DNS settings features that had been greyed out on the Android app, they’ll probably also fix the connected devices screen at some point.

eero Connected Devices – Android & iOS
I don’t know why the Android app was flagging eero cloud connection problems because everything was working fine. I would frequently see this message and all would seem fine at the time.
The last section of the My networks screen shows the eeros configured in your network. eero One is flagged as offline because I unplugged it. Note you can also add another eero from here. Neither the eero offline flag nor the add-an-eero functions are currently available on the Android app. Tapping an eero icon takes you to its Details screen, shown below. It’s a long screen, so the image is a composite.

eero Details screen
You can check each eero’s firmware revision here, but there is no way to force an update. eero’s cloud automatically takes care of that and doesn’t bother letting you know when the firmware revision changes. During the time I’ve been working with eero, eero OS went from v1.0.0 to v1.0.5 and to v1.0.6 as I write this up.
As I did with OnHub, I’ve taken a list of typical AC1200 class router features and edited it to show what eero supports. The takeaway is eero and OnHub features are similar, but with OnHub providing more information about device bandwidth use and the ability to temporarily designate a device to receive priority access to bandwidth.
Routing
- Static and Dynamic IP,
PPPoE, PPTP and L2TPWAN connections IPv6 WAN connectionsMAC address cloningMTU AdjustmentDHCP Server, range setting, lease time setting, and default domain- DHCP Client list
- DHCP reservation (by setting LAN Static IPs)
- Bridge mode (bypass NAT router)
- Port forwarding for single
or multipleports with TCP, UDP or both forwarded.Enable/disable for each entry. Port filtering – can set individual or range of incoming ports. Allows you to enable or disable TCP and UDP ports on network devices.Four level priority-based download QoS control. Bandwidth rules list based on IP or MAC address, port range and protocolDMZ Host- UPnP enable/disable
Can set "priority" device that receives more bandwidth for a settable time periodTotal and per device bandwidth monitor, real-time, last hour, last 7 days, and last 30 days- Internet up and downlink speed test
DDNS support for Dyndns (www.dyndns.org)NAT enable/disableRIP 1/2 dynamic routingStatic routes
Security
VPN Passthrough enable/disable for PPTP and IPsecDoS (denial of service) enable/disableEnable UDP Flood filtering (with settable threshold)Enable TCP-SYN Flood attack filtering (with settable threshold)Ignore Ping Packet from WAN port- Secure remote management via iOS and Android apps
- Ability to control multiple eeros
Block all network access by MAC and IP addressURL filtering (applies to all users, HTTPS not blocked)Internet access control – Rule based access control for host (domain name or IP address)IPv6 firewall
Wireless features
WEP, WPA /WPA2 Personaland Enterprise (RADIUS) support- One SSID for both radios
- Guest network
4 guest wireless networks per bandWi-Fi Protected Setup (WPS) support, pushbutton and PINAuto and manual channel setSSID broadcast enable/disableEnable/disable wirelessBeacon interval, RTS threshold, Fragmentation Threshold adjustmentsWireless MAC address filtering (allow or deny based on MAC address)WMM disableShort GI disableWireless access schedules5 GHz Wireless modes: a, a+n, a+n+ac (default)2.4 GHz Wireless modes: b, b+g, b+g+n (default)5 GHz channel width 20MHz/40MHz/80MHz2.4 GHz channel width 20MHz/40MHz5 GHz channels: 36, 40, 44, 48, 149, 153, 157, 1612.4 GHz channels: 1-11Transmit power adjust, 15%, 35%, 50%, 70% and 100%Wireless network bandwidth use per client
Storage features
SMB file sharing (no user accounts)FTP server. Can set port and control anonymous FTP and anonymous write protection. No secure FTPDLNA media server
The gallery below has screenshots with commentary of most of the eero app screens.
eero’s only heatsink sits atop the RF can enclosing the Qualcomm IPQ8062 processor, RAM and flash. That can’s top is epoxyied on tight. It took an hour of careful scraping to open it. The black piece affixed to the top is metal, most likely for RF control.
Closer view of board top. The QCA8337 switch at center top and QCA9882 radios left and right are clearly visible. None of these have heatsinks
Not much to see on the board bottom.
Will all RF can tops removed, the RFMD amplifiers and RF front ends are visible. The 5 GHz filters are marked 5250B and 5825B. The Atheros AR3012 Bluetooth 4.0 radio is in the lower right RF can.
Here’s the annotated board view, to complete the series.
Routing Performance
Routing throughput was measured using our standard router test process with the router using v1.0.5 firmware. Table 2 summarizes the results and includes the #2 ranked Linksys EA6350 and Netis WF2780 for comparison. As previously noted, I could not open ports for IxChariot to run its WAN to LAN test, so have only LAN to WAN results to report.
| Test Description | eero | Linksys EA6350 | Netis WF2780 |
|---|---|---|---|
| WAN – LAN (Mbps) | – | 836 | 730 |
| LAN – WAN (Mbps) | 825 | 769 | 774 |
| Total Simultaneous (Mbps) | – | 1130 | 899 |
| Maximum Simultaneous Connections | 45,673 | 7768 | 4096 |
| Firmware Version | V1.0.5 | 1.0.4 (Build 164719) | v1.2.30879 |
Table 2: Routing throughput
The IxChariot unidirectional composite plot shows a familiar throughput pattern for this test, alternating between maximum throughput around 950 Mbps and a lower baseline, around 780 Mbps in this case. I would expect WAN to LAN throughput to be similar, but have no data to back that expectation.

eero LAN > WAN routing throughput
Wireless Performance
Updated 8/2/16: Link to wireless retest added
eero is not Wi-Fi Certified. It supports only WPA2/AES encryption, so may not work with some older devices. It also does not support Wi-Fi Protected Setup (WPS). So any client you connect to it must be able to have its Wi-Fi network password entered.
eero was not as helpful as Google in supporting our test requirements. Google provided OnHubs configured with a special firmware load that allowed channel and bandwidth modes to be configured for both radios and to forward a wide range of parts needed by IxChariot for WAN to LAN and simultaneous up and downlink tests. Both special ASUS and TP-LINK OnHubs were returned to Google after testing. eero said it does not let the special firmware it uses for in-house testing out, for security reasons. So I had to test with what we had.
eero did reply to questions about whether transmit power is automatically managed (Yes), whether devices are band-steered (Not Yet), whether device load is balanced among eeros (Not Yet. Priority has been on load balancing inter-eero links) and whether 802.11k or v are supported (Not Yet, but 802.11r is supported for fast reassociation). I can attest to the last point. I checked for automatic client roaming between eeros with idle devices and found reassociation was virtually immediate (a second or so). If you don’t know what I’m talking about, this Apple support note clearly explains 802.11k, r and v.
Like Google OnHub, eero relies on connection to its cloud host for configuration and management. If that connection is interrupted, not only do you lose internet connection, but you also might lose local wireless connectivity, too.
I tested eero in router mode, with the wired LAN test machine connected to its LAN port and nothing connected to the WAN port, which is the way all wireless routers are tested. But when I started testing eero, I found it reliably dropped the wireless connection after about 5 minutes. eero said this behavior is by design, i.e.:
… our customer production firmware is designed to keep the LAN up when WAN connectivity is lost via ISP error, but not when the Ethernet is unplugged. There are a number of reasons for this, the primary one being that when Ethernet is removed from an eero, the customer is typically expecting it to become a wireless leaf node. So the eero starts searching for neighbors, and upon finding none, tears down its LAN while it hunts further.
So I had to also connect eero’s other port to my house LAN for testing.
eero provides no way to set channel or bandwidth mode. But I at least could set the band the NETGEAR R7000 bride mode standard test client connected to. I used a variety of Android apps to correlate the BSSID information provided by eero’s app to channels used and found Channel 1 was used for 2.4 GHz tests and Channel 36 for 5 GHz.
I confirmed 2.4 GHz was using 40 MHz wide channels (324 Mbps) and 5 GHz was using 80 MHz (702 Mbps) by checking link rates while running a test stream before testing. These link rates correspond to 40 MHz channel bandwidth, normal guard interval and 256 QAM modulation for 2.4 GHz and 80 MHz channel bandwidth, normal guard interval and 256 QAM modulation for 5 GHz. The test client was connected using WPA2/AES encryption.
I tried to force eero to use 20 MHz bandwidth in 2.4 GHz by setting up another access point on channel 1 in close proximity to eero. It’s been awhile since I tested 20/40 MHz coexistence, so I forgot that another network on the same primary channel will not trigger the mechanism. When I put the neighboring AP on channel 4, however, eero switched to 20 MHz mode within seconds and moved right to channel 4, too.
I then tried moving the neighboring AP back to channel 11 to see if eero would switch back to 40 MHz bandwidth. But instead, it switched right to channel 11 and stayed in 20 MHz mode. I tried moving the neighboring AP channel a few more times and each time eero would quickly follow. While all this was fun, setting up another AP in the test chamber to keep eero in 20 MHz bandwidth mode wasn’t practical. So I let eero do its thing, which was to use channel 1 in 40 MHz bandwidth mode.
eero were centered on the test chamber turntable as shown in the photo below. The 0° position for the router had the front facing the chamber antennas. I put eero on a platform to get it more in line with the chamber’s antennas.

eero in test chamber
Because eero couldn’t be forced to use 20 MHz bandwidth mode, its 2.4 GHz results are higher than usually measured for AC1200 class products. So I created a special test category for eero, so that it won’t be ranked with other AC1200 class products and screw up the rankings. So view the average 2.4 GHz charts below with eero’s unfair advantage in mind.

eero 2.4 GHz Average throughput comparison
The 5 GHz average throughput charts should provide a fair comparison to other AC1200 class routers. Although eero was tested on channel 36 instead of our channel 153 standard, both low and high bands now can use the same maximum transmit power and results should be comparable.

eero 5 GHz Average throughput comparison
For the throughput vs. attenuation profile plots, I compared the #2-ranked Linksys EA6350 and low-ranking Netis WF2780.
The 2.4 GHz downlink profile clearly shows eero’s advantage from using 40 MHz bandwidth. You would be wise to not count on this if you use eero in a typical setting with lots of neighboring 2.4 GHz networks. As I described, eero has 20/40 MHz coexistence enabled and obeys it quite well. eero’s range appears shorter than both other compared routers, dropping to a few Mbps at 54 dB of attenuation.

2.4 GHz Downlink Throughput vs. Attenuation
The 2.4 GHz uplink plot again shows a similar story, starting with high throughput at low attenuation (high signal). Throughput decline starts after the 6 dB test; downlink didn’t start to seriously decline until after 12 dB.

2.4 GHz Uplink Throughput vs. Attenuation
5 GHz downlink shows suprisingly disappointing performance. Although maximum throughput is highest, decline is steep and the connection drops earlier than it should have after the 24 dB test yielding 60 Mbps of throughput.

5 GHz Downlink Throughput vs. Attenuation
For 5 GHz uplink, eero starts out with much lower throughput than the Linksys (347 Mbps vs. 420 Mbps), again drops off quickly and again breaks connection sooner than it should.

5 GHz Uplink Throughput vs. Attenuation
As you think about these results, keep in mind that extreme range and throughput are not usually the focus of access points that are meant to be used as part of a system. In fact, you don’t want APs stepping all over each other causing co-channel interference that increases packet loss.
Multi-client Streaming Test
The pain many Wi-Fi users feel is from everyone in their household trying to watch streaming video at the same time. Success depends on the services you’re using, the protocols and stream rates they use, how big your internet pipe is and, yes, the robustness of your Wi-Fi network. I first considered using streaming video to load up eero. But the thought of trying to watch all those screens for signs of buffering or pixelation made me rethink that approach.
Instead, I turned to IxChariot and used UDP streaming. While I wouldn’t have anything to watch, this method would keep track of lost packets. It’s been almost 10 years (yikes!) since I last looked at the relationship of packet loss to video quality. But this study showed, depending on encoding method, 1% of UDP packet loss would make video unwatchable and small problems may be seen with as little as 0.05% packet loss!
The mix of eight dual-band N and AC class devices in Table 3 was assembled for this test.
| Device | Type | Connection – Utility test | Connection – Back Lab test | Comment |
|---|---|---|---|---|
| Acer Aspire S7 Ultrabook | 2×2 N | Ch 36 | Ch 36 | Intel Wireless N 7260 |
| Lenovo x220i notebook | 3×3 N | Ch 1 | Ch 1 | Intel Centrino Ultimate-N 6300 |
| Lenovo T450s notebook | 2×2 AC | Ch 1 | Ch 1 | Intel Wireless AC 7265 |
| Moto X Gen 2 smartphone | 1×1 AC | Ch 36 | Ch 1 | |
| Dell Venue Tablet | 1×1 AC | Ch 1 | Ch 1 | |
| iPod Touch Gen 5 (A1509) | 1×1 N | Ch 36 | Ch 36 | Broadcom BCM4334 in Murata 339S0171 Wi-Fi module |
| iPad Air (A1474) | 2×2 N | Ch 36 | Ch 36 | Broadcom BCM4324 in USI 339S0213 Wi-Fi Module |
| Galaxy Tab S 10.5 (SM-T800) | 2×2 AC | Ch 1 | Ch 1 |
Table 3: Streaming test client devices
An IxChariot script was configured using the IPTV video portion script (IPTVv.scr) and UDP. The only thing changed was the send data rate from its default of 1.451 Mbps. All eight devices received this same stream for 2 minutes. All devices could connect to either band. They connected as shown in Table 4 and stayed this way from run to run. No other networks were in range for this test.

UDP Streaming test IxChariot script configuration
For the baseline test, one eero ("Root") was set up in an adjacent Utility room with a sheetrock wall between it and all the devices sitting on a wire-frame rack approximately 13 feet away. Packet loss for each device is shown in the IxChariot plot below.
Only the iPod Touch, Lenovo x220i and iPad lost packets, with the Lenovo having the highest data loss of almost 1.5%, which should have rendered the video unwatchable. Please read iPad2 as iPad Air in all the plots; I incorrectly identified it at test time.

UDP Streaming test – Utility room – 5 Mbps
Increasing the stream rate to 10 Mbps significantly increased the Lenovo’s error rate to 12%. The two Apple devices had no errors in this test.

UDP Streaming test – Utility room – 10 Mbps
I decided to move the Root eero to the same room as the devices (Back Lab) and rerun the test, this time for 5 minutes. Once the eero was powered back up, I again noted where devices connected and found only the Moto X smartphone had moved from channel 36 to 1.
This small change seemed to have an unusually large effect on error rate with multiple devices losing over 10% of streamed data. Without changing anything, I reran the test about 20 minutes later and found performance had improved significantly. Although the plot below shows all devices having some packet loss, only the problem child Lenovo x220i had data loss over 1%.

UDP Streaming test – Back Lab – 10 Mbps
Although I can’t say I pushed eero to its limit, my conclusion for these tests is that the single eero handled itself pretty well. It moved an aggregate capacity of 80 Mbps spread across a mix of eight devices with potentially noticeable data loss on only one or two devices. If TCP/IP, HLS or another protocol that ensures packet delivery were used, I doubt problems would be seen in any of the video streams.
Multi Hop Tests
eero’s key claim to fame is its wireless mesh connected multi access point architecture. So this next set of tests set out to explore the throughput a few different eero configurations would yield. Since I was looking at throughput for a single device, I went back to my old standby, IxChariot’s TCP/IP throughput script. The test client was a Lenovo T450s notebook with a built-in Intel Wireless AC 7265 2×2 wireless adapter.
I tested four configurations shown in the floor plan diagrams below, with the test client connected using zero to two wireless "hops". The three eeros were creatively named "Root, "One" and "Two".
eero’s only heatsink sits atop the RF can enclosing the Qualcomm IPQ8062 processor, RAM and flash. That can’s top is epoxyied on tight. It took an hour of careful scraping to open it. The black piece affixed to the top is metal, most likely for RF control.
Closer view of board top. The QCA8337 switch at center top and QCA9882 radios left and right are clearly visible. None of these have heatsinks
Not much to see on the board bottom.
Will all RF can tops removed, the RFMD amplifiers and RF front ends are visible. The 5 GHz filters are marked 5250B and 5825B. The Atheros AR3012 Bluetooth 4.0 radio is in the lower right RF can.
Here’s the annotated board view, to complete the series.
Key parameters of the four test configurations are summarized in Table 4. For each test, I made sure the test laptop was connected to the eero shown before starting the test. I had no way of tracking inter-eero connections or traffic
| Test name | eeros used | Connection | Link rate (Mbps) | Hops |
|---|---|---|---|---|
| root | Root | Root, Ch 1 | 300 | 0 |
| root-one | Root, One | One, Ch 36 | 867 | 1 |
| root-one-two_butler | Root, One, Two | Two, Ch 36 | 867 | 2 |
| root-one-two_master | Root, One, Two | Two, Ch 1 | 300 | 2 |
Table 4: Wireless Hop Test parameters
The IxChariot plot below combines the downlink results for the four runs. What’s interesting here is that the one-hop "root-one" throughput is pretty close to the two-hop root-one-two_butler test. I’m not sure whether it makes a difference, but note the test laptop connected via 5 GHz for both these tests. Also note the "Two" eero was located pretty much right above the "One" eero for the root-one-two_butler test.
The root-one-two_master test shows the importance of getting your eeros placed correctly. Everything else in this test is the same; only the location of the "Two" eero changed.

Multi-hop test – downlink
The uplink plot shows a very different story. Throughput for three of the four tests is highly variable and at best only half the 179 Mbps obtained in the best-case zero-hop downlink root test.

Multi-hop test – uplink
Closing Thoughts
Mesh wireless is attractive to home users for the same reason wireless extenders have been flying off store shelves; no cabling required. So why should you pay $400 for two eeros with a very limited routing feature set, when you can buy the top-ranked AC1200 class TP-LINK Archer C5 router for around $80 and the top-ranked NETGEAR EX6150 AC1200 extender for around $100?
The answer boils down to ease of use and reliability. While wireless extender setup has become a lot easier, it still requires judgement by the installer, who has only fairly crude tools to help her. The other problem with extenders is that the only "tools" provided to monitor network performance post-installation are user complaints and confusion on which SSID to connect to. Although backhaul management is provided in some newer extenders, it’s fairly crude and will only improve if and when new firmware is available and installed.
In contrast, eero is designed as a multi-AP system that has had much effort put into learning how to manage backhaul traffic, plus a purpose-built dual-band radio designed to complement those algorithms. Since the system intelligence primarily lives in eero’s cloud, it has access to more computing power than economically feasible to put into a consumer unit and its algorithms can be constantly tweaked as the system learns. Of course, this cloud dependence is also eero’s greatest weakness, since an eero APs essentially turns into a glossy white objet d’art, should eero go belly-up or be acquired.
Although some folks think router hacking and tweaking is their idea of a good time, most of us just want our Wi-Fi to work. And we’ve shown we are willing to throw more and more money at achieving this result. You may think it’s crazy to pay $500 in hope of getting better Wi-Fi, but that’s what some folks were doing this past holiday season when ASUS RT-AC5300s were in short supply. And while those days seem behind us, price trackers still show RT-AC5300 ASPs around $375.
Given my albeit limited previous experience with business-grade Meraki mesh wireless, I was prepared to not be impressed by eero. But I am. Yes, it’s twice as expensive as it needs to be, but that’s just a matter of eero seizing an opportunity while it can. With AC1200 class routers now down around $100, I’m sure eero has room to move on price. If they got a three-pack down to $300 – $350 and a single to $125, eero could sell a lot more and secure its place as a mesh-wireless market leader.
And they’ll want to do that before Luma ships its mesh solution later this "spring" and D-Link starts shipping its "DKT-891 Unified Home Networking Kit" based on Qualcomm’s Wi-Fi SON technology in around the same timeframe. Both will appeal to the informed Wi-Fi buyer who is already sold on the multi-AP approach and both have more routing and security features to offer than eero currently does.
Price aside, eero is not going to be for everyone. If you have used your current’ router’s administration interface for anything other than setup, you probably won’t be able to deal with eero’s very basic feature set. You’ll also want to place the Ethernet-connected eero between the other two, to minimize the number of throughput-sapping hops your devices see. And if you don’t have many dual-band devices, they’ll compete for 2.4 GHz bandwidth that eero could otherwise use for backhaul.
Just as every auto maker is hard at work at producing vehicles that can drive themselves or at least take over more mundane driving tasks, consumer router makers do realize the days of the big honkin’ router are coming to a close. Sure, they’ll keep making them, as long as uninformed consumers keep buying them. However at some point folks are going to get wise to the fact that to get fast, reliable Wi-Fi you need multiple access points and the smarts to make them work smoothly together.
Quite frankly, most of us don’t have those smarts, but there are folks who do. The trick is to let those folks do the Wi-Fi driving. eero is worth taking for a spin.![]()