Introduction
In Part 1, I described using rsync to back up files from a NETGEAR ReadyNAS NV+ that I am retiring to a Synology DS109+. In Part 2, I showed how to set up rsync between the DS109+ and a QNAP TS-109 Pro. This time, I’ll show you how to use a Western Digital My Book World Edition II (white bar) as an rsync target.
The MBWEII doesn’t support networked backups in its out-of-the-box configuration, nor does it support scheduled backups to attached USB drives. But it turns out that if you’re not afraid of doing some Linux config file creation and editing, the MBWEII can become a relatively inexpensive rsync target.
MBEWII SSH & rsync
I was pleasantly surprised to find an SSH root access enable on the MBWEII (Figure 1). But if you have an older "blue ring" My Book World, you should be able to use it, too, although it will require a bit more work. Hacking WD MyBook World Ed has plenty of information that describes how to get SSH root access added. The simplest method is to visit Martin Hinner’s site.
NOTE: If you have firmware earlier than 1.00.14, upgrade your MBWE or MBWEII "white bar/light" and you’ll find the SSH Access / Root Access enable at the top of the System > Advanced page. Unfortunately, there isn’t an equivalent firmware for the original "blue ring" MBWEs.
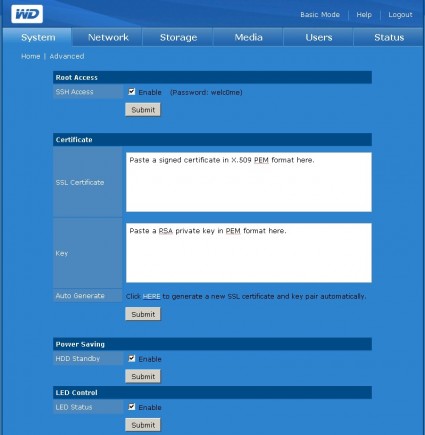
Figure 1: My Book World Edition II with SSH Enable
With SSH enabled, just fire up an SSH client such as PuTTY and login as root with the password welc0me. You can certainly get the job done with PuTTY and the vi editor that’s installed on the MBWEII. But I found WinSCP much handier for file browsing and file editing. WinSCP even includes a copy of PuTTY and lets you open it with a simple Control+P.
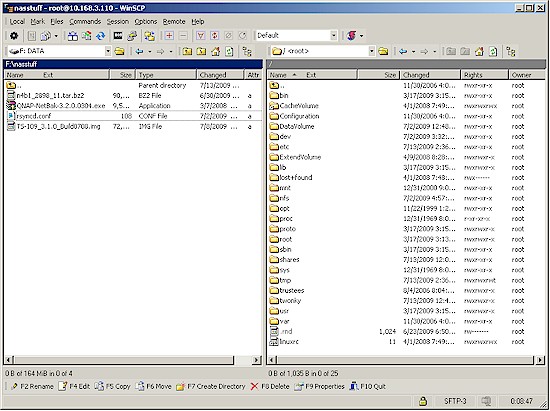
With WinSCP, you can just browse to a file, double click on it and edit. WinSCP automatically takes care of downloading the file for edit and uploading the edited file. Figure 2 shows the MBWEII’s root (/) directory in the right pane and a directory on my local machine on the left.
Figure 2: WinSCP accessing MBWEII
The first thing that I did once logged in was to see if rsync was available by just typing rsync at the command prompt. When I saw the rsync help shown in Figure 3 (because I hadn’t entered a valid rsync command), I knew I was in business. Now I just had to configure the MBWEII so that rsync was started as a daemon at boot time and provide a proper rsyncd.conf file.
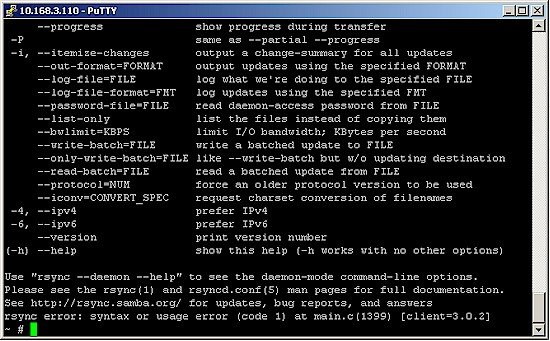
Figure 3: rsync works!
Modifying the MBWEII
WD appears to have embraced the hacking community because not only do they provide root access for the new MBWEs, but you don’t have to jump through hoops to get changes to remain after you reboot the NAS. The good news is your changes get written to disk. But the bad news is that because of that, you can mess up your MBWEII if you are sloppy or get too rambunctious with your edits.
The Hacking WD MyBook World Ed site has lots of information on recovering a bricked MBWE and even full backup images. If you’re going to be doing extensive hacking, I suggest you read through them to see if you can follow the instructions, which require a PC with a Linux distro running.
The simple edits that are required to get the MBWEII functioning as an rsync target carry minimal risk of bricking. But remember that you are modifying files on the drive and not just in RAM. If you do something that screws up the MBWE’s boot process, you could have some fun times ahead of you.
I found the basic clues to getting the MBWEII prepped as an rsync target here. Since rsync was already installed as a service, I didn’t need to edit /etc/services to add it. I did, however, have to add the following line to /etc/inetd.conf:
rsync stream tcp nowait root /usr/bin/rsync rsyncd --daemon
The more difficult task was figuring out the /etc/rsyncd.conf file. But, once again, the information on the Turning It Into a Rsync Server page got me pointed in the right direction. To save you time, here’s what I came up with:
[Public]
	path = /shares/Public
	comment = "rsync test folder"
	read only = no
[test]
	path = /shares/test
	comment = "rsync test folder"
	read only = no
	auth users = test
	uid = root
	gid = jewab
	secrets file = /etc/rsyncd.secrets
This rsyncd.conf file specifies two rsync "modules", or shares that can be used as rsync targets. The first, [Public], lets you use the MBWE’s default Public share as the target. Even though the Public folder isn’t password protected, I have found that you can use any username / password for rsync backup servers that won’t let you create a backup job without them (Synology, QNAP). I usually use admin / admin or whatever the admin interface login is for the rsync target NAS.
The read only = no line is important, even with a publicly-accessible share. Without it, you’ll get a read-only error when you try to connect to the target.
The second target, [test], is a folder that I first created via the MBWE’s GUI and gave read/write permissions to only the default admin user and a user test that I created with password test (Figure 4).
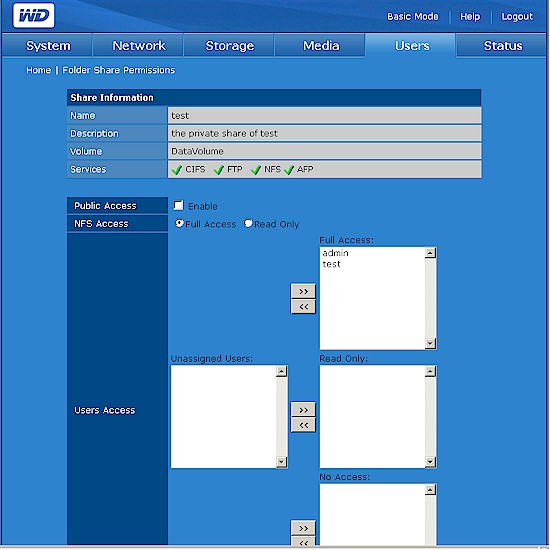
Figure 4: Setting the test share permissions
Using an access-controlled folder as an rsync target requires setting the auth users, uid, gid and secrets file parameters in the rsyncd.conf file:
- auth users is set equal to the folder name (test)
- uid, gid are the Linux user/owner and group IDs. I found these by checking the folder properties using WinSCP (Figure 5)
- secrets file is set to the path to the file that holds user and password information, one user per line in the format username : password. This file is usually named rsyncd.secrets and is also located in /etc. In this example, it contained one line: test:test.
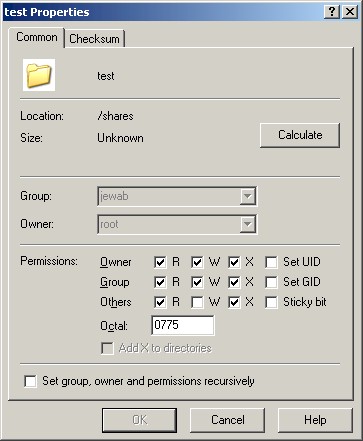
Figure 5: Checking test folder properties with WinSCP
Testing the rsync
With the rsync target now set, you need to either kill and restart the inetd process to start rsync as a daemon, or just reboot the MBWE.
I used the Synology DS109+ to run the test, creating a job as shown in Figure 6. Note that instead on the MBWE’s IP address, I used its host name. This is because of its nasty habit of grabbing a new IP address on each reboot when it is set as a DHCP client. If I were going to have the MBWEII on my LAN permanently, I would have assigned it a static IP or reserved an IP in my DHCP server.
Note that the backup module name is set to test, meaning this job is using the access-controlled test folder. If I wanted to use the Public folder, I just would set the Backup module to Public.
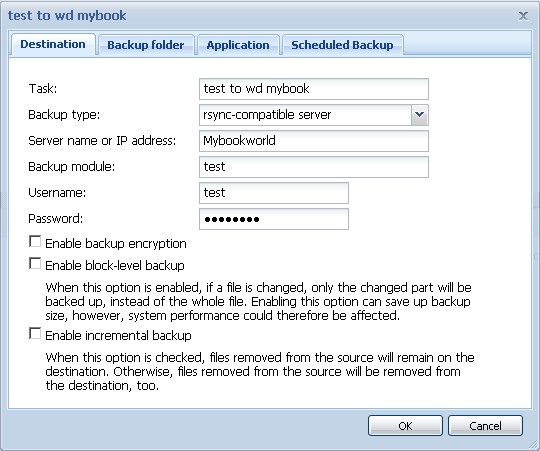
Figure 6: Synology to MBWE backup job
Once I had everything set up, a click on the Synology’s Back up Now button on its Backup page, ran the rsync successfully.
One thing I did note was a succession of these messages in the MBWE’s log:
07/13 16:52:03 MyBookWorld daemon.info rsyncd[9955]: connect from UNKNOWN (10.168.3.245)
07/13 16:52:03 MyBookWorld daemon.info rsyncd[9955]: name lookup failed for 10.168.3.245: Name or service not known
07/13 16:51:53 MyBookWorld daemon.info rsyncd[9954]: connect from UNKNOWN (10.168.3.245)
07/13 16:51:53 MyBookWorld daemon.info rsyncd[9954]: name lookup failed for 10.168.3.245: Name or service not known
07/13 16:51:47 MyBookWorld daemon.info rsyncd[9953]: connect from UNKNOWN (10.168.3.245)
07/13 16:51:47 MyBookWorld daemon.info rsyncd[9953]: name lookup failed for 10.168.3.245: Name or service not known
07/13 16:51:37 MyBookWorld daemon.info rsyncd[9932]: connect from UNKNOWN (10.168.3.245)
07/13 16:51:37 MyBookWorld daemon.info rsyncd[9932]: name lookup failed for 10.168.3.245: Name or service not known
I’m not sure what the problem is or why the rsync daemon is trying to do a reverse name lookup. But these messages don’t seem to affect the rsync process.
Next time, I’ll show you how to use Buffalo NASes as rsync targets.

