Introduction
Updated: 30 March 2011 – Misc corrections
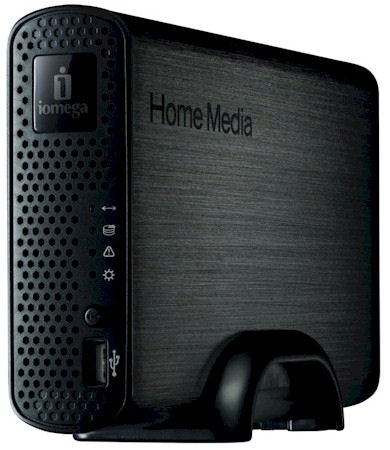
| At a Glance | |
|---|---|
| Product | Iomega Home Media Network Hard Drive – Cloud Edition (34766) [Visit website] |
| Summary | Single-drive NAS with USB print, media, iTunes servers and ability to form private cloud networks. |
| Pros | • Client software for Windows, Mac and Linux • Multiple backup options • Built-in DLNA /iTunes server • Supports Time Machine backups • No subscription ($) for cloud features |
| Cons | •Setup lacks needed setup wizard •Software not signed and no Windows Logo Support •Cloud features require router ports to be opened |
Manufacturers of consumer-oriented NASes face a very competitive landscape. Virtually all consumer NASes have rich feature sets that include a DLNA/iTunes server and remote web access. Other products layer on the ability to publish and host your own slide shows or include other advanced features such as a LAMP server. Considering that many of these NASes include the hard disk at prices that carry only a slight premium compared to an external desktop drive, they represent a very good value.
In marketing terms, to cut through the competitive clutter, you need a “USP” – unique selling proposition. Iomega’s new Home Media Network Hard drive, Cloud Edition (hereafter referred to as HMNHD-CE, for obvious reasons) has upped the ante for NAS manufacturers with the addition of, as the name implies, a Personal Cloud feature.
With a revamped Iomega storage manager that includes a VPN client that automatically connections to cloud software on the NAS, even a novice can set up his or her own private securely-connected network of HMNHD-CE’s. This "personal cloud" enables you to securely connect and access networked resources in multiple locations using the Internet. With the HMNHD-CE, there is no additional hardware to purchase, no ongoing subscription to pay and you manage your own “Personal Cloud”.
The HMNHD-CE has a somewhat rounded case, so unless you plan to lay the device on the long flat edge, you’ll need to use the included plastic stand. Figure 1 shows both the front and rear panels on the HMNHD-CE.
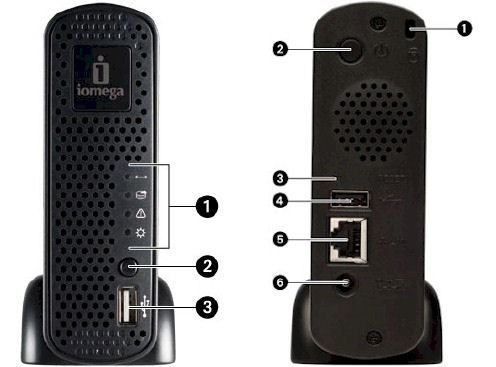
Figure 1: HMNHD-CE front and rear panels
Both the front and rear panels have holes for flow-through ventilation. Though the device doesn’t have a fan, you can hear the drive spin up/down when it enters/exits the power saving mode.
The front panel (left above) consists of indicator lights (1) for QuikTransfer, Drive Activity, System Status and Power; a QuikTransfer button (2) to initiate either copy jobs or file transfers; and a USB port (3) for storage expansion or printer sharing. The rear panel (right above) has a security slot (1); power button (2); reset button (3); a USB port (4); a Gigabit Ethernet port (5) and a power connector (6).
On The Inside
Fortunately, Iomega decided to beef up the internal components as compared to the earlier model of the Home Media Network Hard Drive. While Iomega stuck with PLX / Oxford, they traded up from the OXE810SE in the original, to a 600 MHz dual-core NAS 7820 in the HMNHD-CE. RAM size has also been raised from 64 to 256 MB.
The beefed up components resulted in quite a boost to performance, almost three times as fast as the original. Note there is no flash memory – the OS sits on the hard drive on its own EXT3-formatted partition. The data partition is formatted XFS. The evaluation unit used a Seagate Barracuda LP 2 TB (ST32000542AS). Iomega also has a 1 TB version of the HMNHD-CE (model 34763).
The HMNHD-CE is not designed to be user serviceable. And we couldn’t get the case open without risk of breaking it for our usual inside photos. So if the drive fails within three years (or only one year if you don’t register the product within 90 days of purchase), you’ll be returning it to Iomega for replacement or buying another NAS.
How It Works
PogoPlug devices like the Pogoplug Pro and Axentra-based products like the Seagate GoFlex Home provide primary access to their cloud resources via web-based interfaces. They also don’t require that you open ports on your router or mess with dynamic DNS clients.
Iomega has taken a different approach in creating its Personal Cloud technology. The HMNHD-CE is a full-fledged NAS in its own right and doesn’t require installation of any client software. Any device on a LAN that supports SMB/CIFS, can access its shares.
Iomega’s personal cloud is actually a private VPN established between the HMNHD-CE and client software that must installed on a device (computer) to enable access to shares sitting on the HMNHD-CE.
When you install and run the client software, it creates a virtual Ethernet adapter on your computer, and assigns an IP address to that adapter. The client software automatically logs into a VPN gateway that is part of the HMNHD-CE and uses IP addresses in the 5.10.0.0 network.
Updated: 30 March 2011
Iomega’s servers (actually TZO’s) provide dyanmic IP address mapping so that the client and HMNHD-CE can find each other. Iomega provides dynamic DNS service for the Personal Cloud features. TZO provides dynamic DNS for the standard remote access feature. But since there is no web portal involved, you must open a router port (50500) so that connections coming into your HMNHD-CE sitting behind your router’s firewall can be made.
Setup
I was disappointed in the setup experience on the HMNHD-CE. The quick start guide makes it appear to be a simple process. But the setup lacks a wizard to help you configure remote access enable security and actually set up the "cloud" features.
Each of these functions is not difficult. But a wizard to guide you through all the steps would reduce the learning curve. In particular, connecting to your personal cloud’s storage requires the installation of the client software. This wasn’t explained very well in the printed Quick Start guide and caused some initial head-scratching.
When you insert the CD, the Iomega Installer starts. Your only choice, other than User Manual, is Automatic installation. I was surprised to see that the installation program wasn’t signed by a publisher, and both Windows 7, (Figure 2) and my anti-virus warned me about the dangers of installing unsigned software. Similarly, I received warnings that the software hadn’t passed Windows Logo testing.
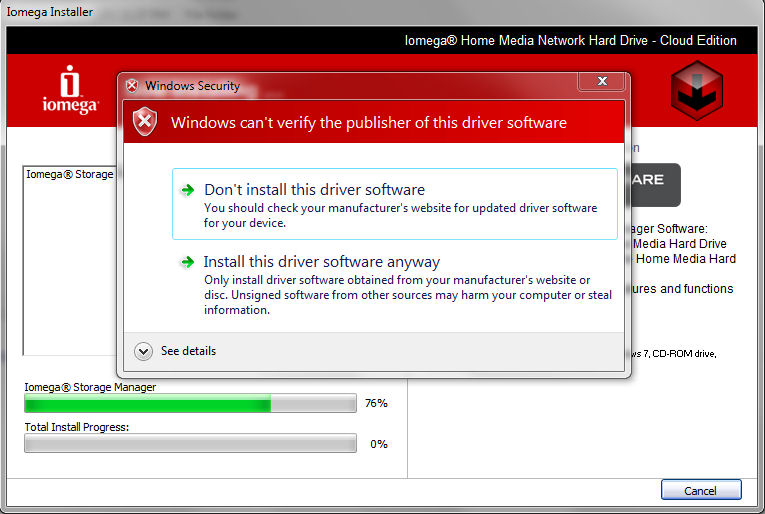
Figure 2: Windows 7 warning about installing unsigned software
When the software finished installing, I got a message that said “Installation complete”, but the Iomega Storage Manager then didn’t start automatically.
If all you arere looking for is shared storage, you don’t really have to run the setup program. By default, all security on the HMNHD-CE is disabled, and all users have access to all six default shares shown in Figure 3. The default name for the device is HMNHD-XXXXXX where XXXXXX is a random set of numbers and letters. Of course, you can give the HMD a more user-friendly name when you log into the browser-based administration.
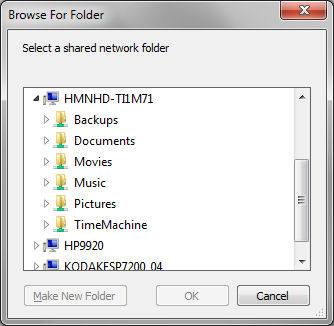
Figure 3: Default shares for the HMNHD-CE
Hands On
When you launch the Iomega Storage Manager, the screen shown in Figure 4 appears with the default shares shown. As you hover over each of the icons, a brief description appears above the share names. Since the most unique feature of the HMNHD-CE is the “Personal Cloud”, I’ll look at that in detail.
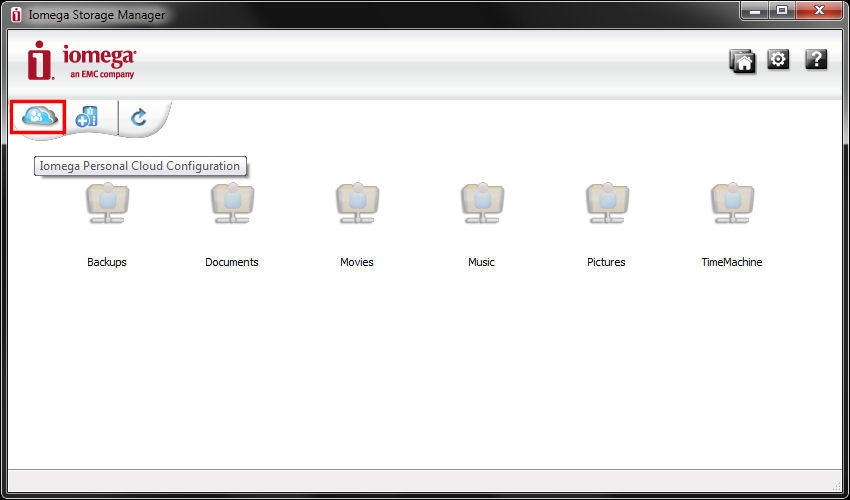
Figure 4: Iomega Storage Manager Main Screen
Creating and deploying your personal cloud is a multi-step process. You access the personal cloud tab by clicking on the icon that I highlighted with a red rectangle in Figure 4.
Next, you select My Personal Cloud shown highlighted in Figure 5. This screen also provides a good overview of the setup process.
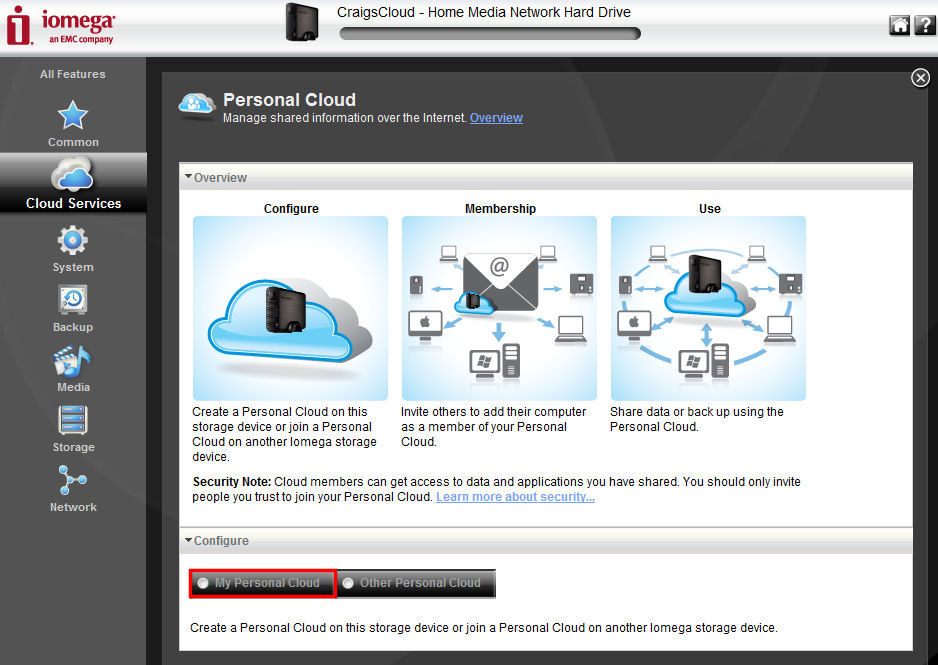
Figure 5: Personal Cloud Overview
The next screen, shown in Figure 6, prompts you for the name of your Personal Cloud and an email address. After checking the box and clicking “Next”, your Personal Cloud is configured.
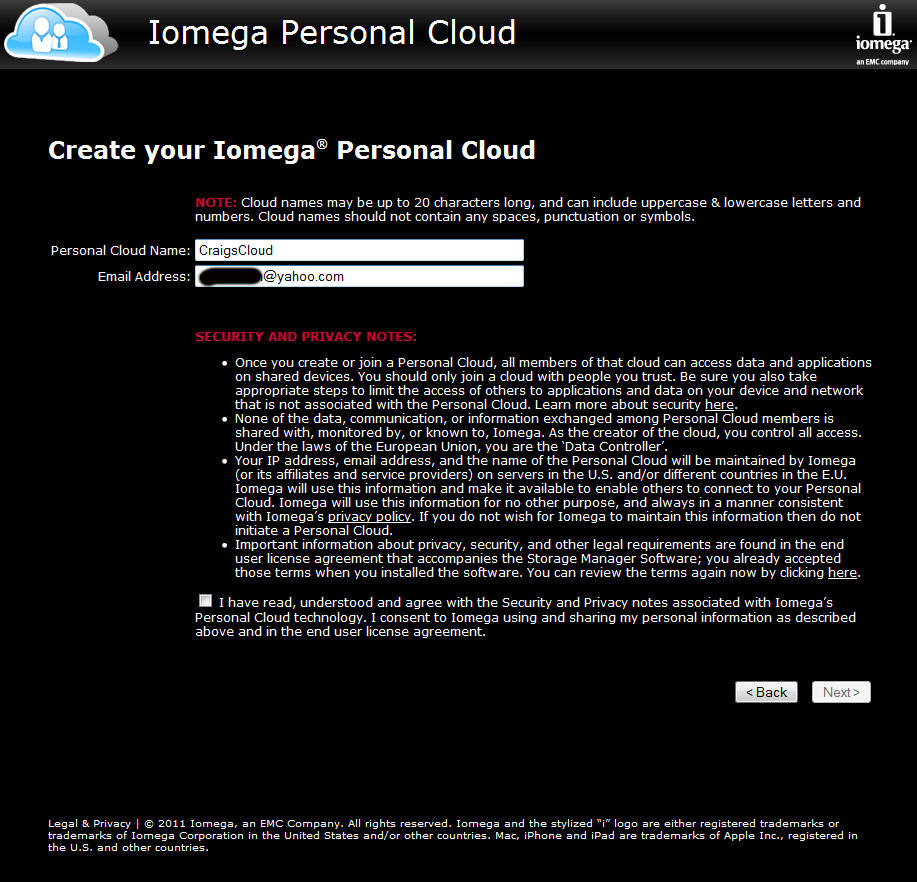
Figure 6: Personal Cloud Configuration
After a few moments, you should see that your cloud has been successfully set up (green check mark) as shown in Figure 7.
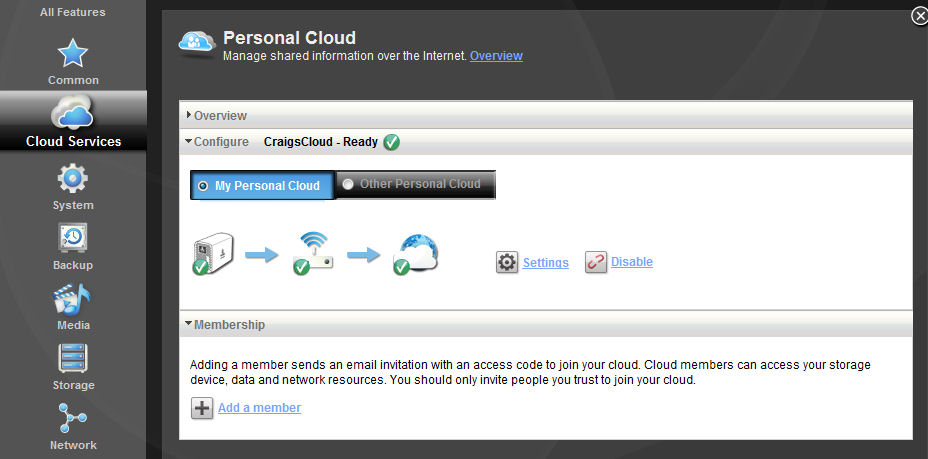
Figure 7: Personal Cloud Ready
Note that the Personal Cloud feature relies on port 50500 being opened to the HMNHD-CE’s IP address in your router’s firewall. The HMNHD-CE will attempt to do this automatically using UPnP NAT Traversal. But if it fails, you won’t get the Ready indication and you’ll have to open the ports manually.
The last step in setting up your Personal Cloud is to add members. You do this by creating an email invitation from within the HMNHD-CE cloud manager to those you want include in your personal cloud. The email contains a link to Iomega’s portal download site along with the unique embedded access code for your invitee. Optionally, you can also include a personal note in the invitation email.
Updated: 30 March 2011
Before you send out invitations, you should remember that all HMNHD-CE shares are public by default. So you might want to enable security and restrict access to user shares that you create. Also note that when your invitee installs the Personal Cloud client, all public shares on the invitee’s machine become part of the Personal Cloud and visible to all Cloud members. Iomega does not make this clear in its documentation and there is no warning displayed by the Personal Cloud client.
There are warnings about this in the screens shown in Figures 5 and 6. But the warning in Figure 5 should be expanded to better describe the risk to shared folders on client machines and highlighted. And we’re so conditioned to blowing past software terms pages, that the warning on the "Create Your Personal Cloud" page in Figure 6 is easy to miss.
When your invitees click on the email link, they will land at the Iomega Download page. (Figure 8). Windows, Mac OS and Linux clients are currently supported, but there are no clients for iOS, Android or any other mobile OS at this time. You can also add additional Iomega Network Storage devices to your Personal Cloud.

Figure 8: Cloud Software download page showing supported clients
When your invitee downloads and installs the software, they will join your Personal Cloud. The Iomega Storage Manager will create mapped drives on the invitee’s machine for each cloud share for which they have access rights.
If you have enabled security and created access rights, your invitee’s client will pass along its current Windows user name. If the user name and password don’t match what has been configured on the HMNHD-CE, the invitee will be prompted to create an account with a password. If the user name matches and the password doesn’t, the invitee will be prompted for the password you created for them when you created them as a user on your NAS.
As the Personal Cloud owner, you can manage the membership for your cloud. Figure 9 shows the current status of my personal cloud. In this image, Craig_s Desktop, NetBook and Todd_s NAS are currently connected to my cloud. The Macbook has been disabled, and Dean isn’t currently connected.
For each client, you can enable/disable cloud access, resend an email invitation, or delete it from your cloud. For Todd_s NAS, which is another HMNHD-CE, an additional Copy Job icon appears in the action column that would allow me to create copy jobs between my storage device and Todd_s NAS.
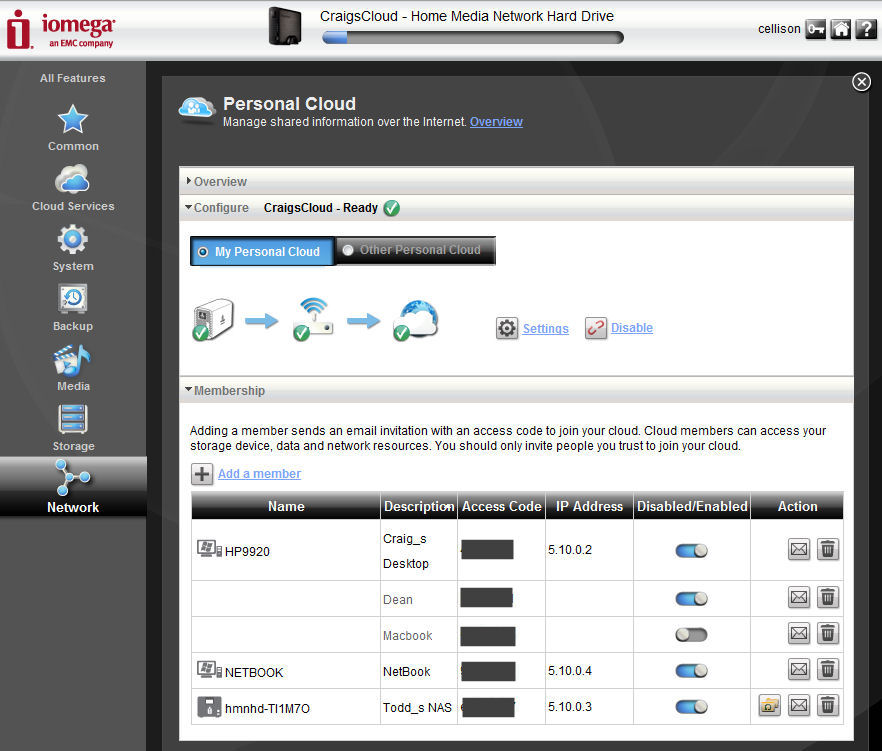
Figure 9: Personal Cloud membership and status
As part of my testing, I took Netbook to a remote site to see how the personal cloud worked in a real-world, offsite remote location. Iomega Storage Manager correctly created a mapped drive for each resource on the HMNHD-CE to which I had been granted access. I was able to drag and drop files between the local computer and the remote HMNHD-CE as though it was on the same LAN.
Of course, since the file transfers were going across the internet instead of my Gigabit LAN, transfers were slower. I also tested file copy speed between a computer on my network and Todd_s NAS, another HMNHD-CE located in Iomega’s test lab. Windows reported a file copy speed of between 150KB/sec and 160KB/sec so 17.2 MB took a little under 2 minutes to transfer. Most likely, my cable upload speed limited the speed of the file transfer.
I did have an interesting observation, however. At the remote office, before installing the client software on a Windows XP system, I was able to browse the resources on its 192.168.111.0 (local) network. Once I joined the cloud, when I browsed the network, the resources I was able to see were the ones on the 5.10.0.0 network. I was still able to map drives on the local network, but I had to use the resource’s IP address since name resolution was resolving to the remote network.
NAS Features
Viewed as a consumer NAS, the HMNHD-CE has the features you’d expect. It has a built-in DLNA & iTunes server with the default Movies, Pictures and Music shares automatically scanned by the media server. I loaded 28 GB of music into the Media share, and it all was scanned by the media server and played in iTunes on both my Mac and PC.
The HMNHD-CE also supports remote web access directly to it from any device that has an HTTPS capable web browser. As with setting up the Personal Cloud, setting up remote access also relies on UPnP to map a port (443) from your router to your HMNHD-CE. If UPnP is disabled on your router, most likely, the remote access setup will fail.
The HMNHD-CE provides one year of free Dynamic Domain Name Service through DDNS provider TZO.com as well as a two year SSL security certificate for your chosen domain name. You can choose your own domain for an additional charge or choose from the two free domains. (iomegalink.com or myiomega.com)
When you access your HMNHD-CE through a web browser, you land at a home page that displays a slide show. (Figure 10) Optionally, you can add or remove slide shows. If you click on the content tab, a list of public shares appears.
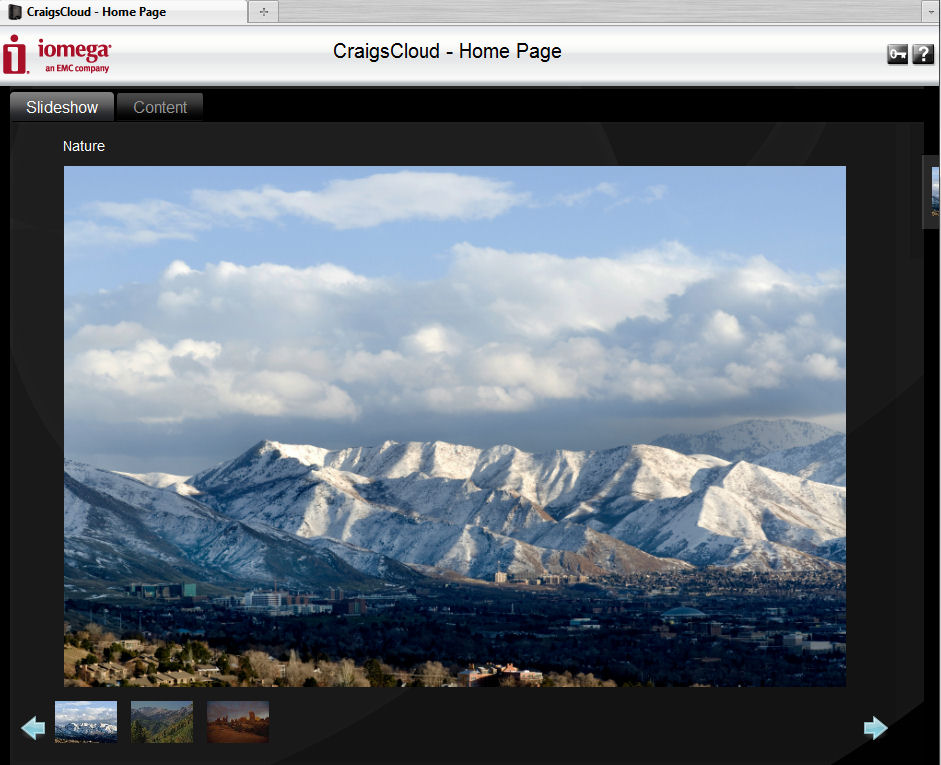
Figure 10: HMNHD-CE Browser-based remote access
If you want to either manage your HMNHD-CE remotely, or have web browser access to your password protected shares, you need to click on the key in the right corner of the screen to log in. Clicking on the Content Tab displays your available shares (Figure 11). Using your browser, you can upload or download files, delete files and create new directories. In all, the browser-based administration interface for the HMNHD-CE is quite easy to use.
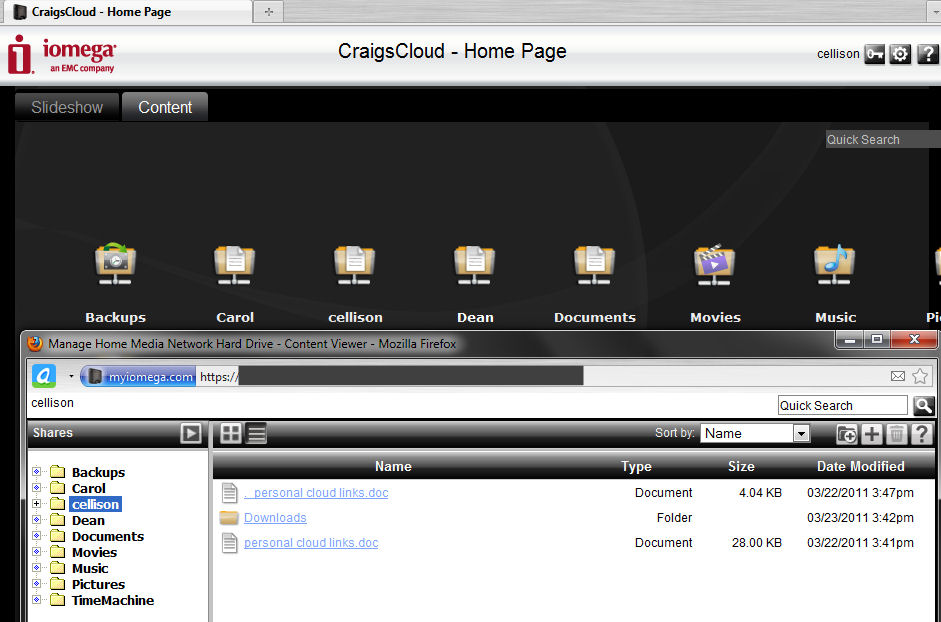
Figure 11: Available shares via the browser-based interface
Figure 12 shows the home page of the web UI. A couple of items stood out as I went through the UI. First, you can configure Users for the NAS, but the HMNHD-CE doesn’t support Groups. There is one preconfigured group for “Everyone”. The users you create under the Common->Users menu are used to control access to shares, but aren’t linked to the members of your personal Cloud. As you create a user, you have the option of automatically creating a private share.
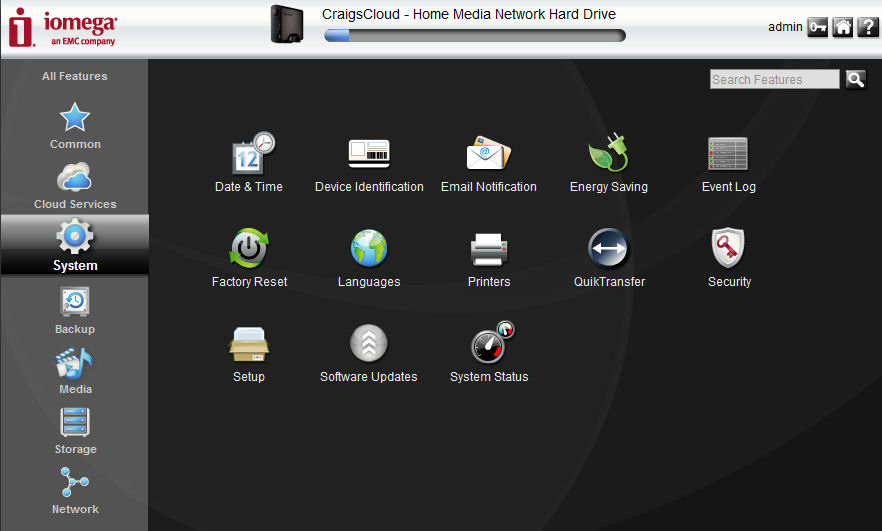
Figure 12: Browser-based administration home page
For each share, you can control user access (if security has been enabled) or grant everyone access. Figure 13 shows individual access restrictions for the Music share.
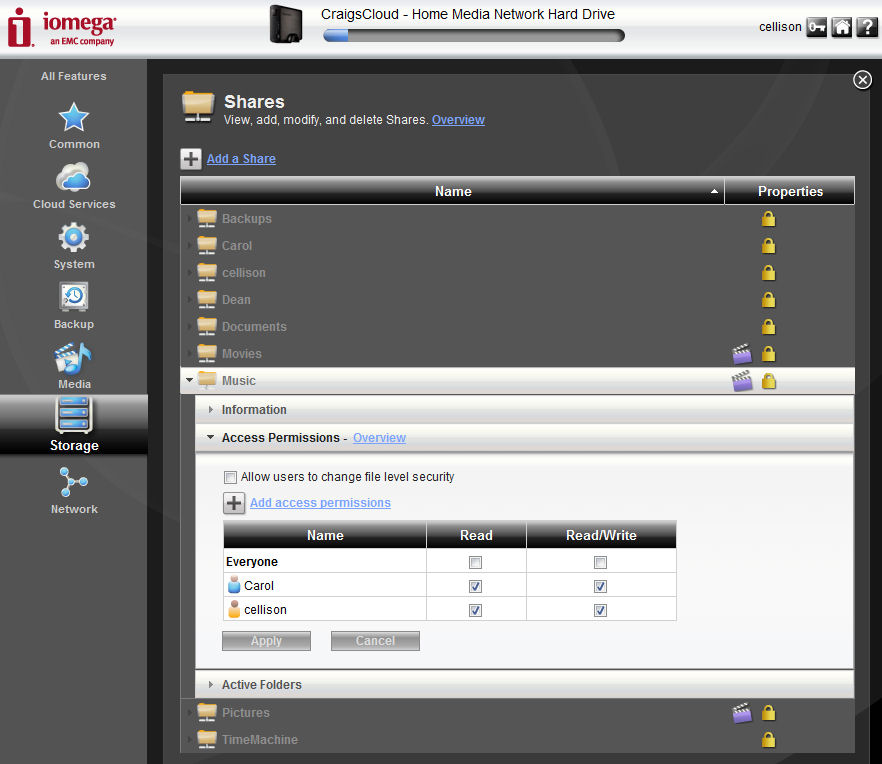
Figure 13: Access permissions on Music share
In addition, each share can be configured as an active folder. Active folders allow you to automatically copy files to You Tube, Facebook, Flickr, Torrent, email distribution, or resize photos. Figure 14 shows an active folder configured to upload the contents of the Movie folder to YouTube.
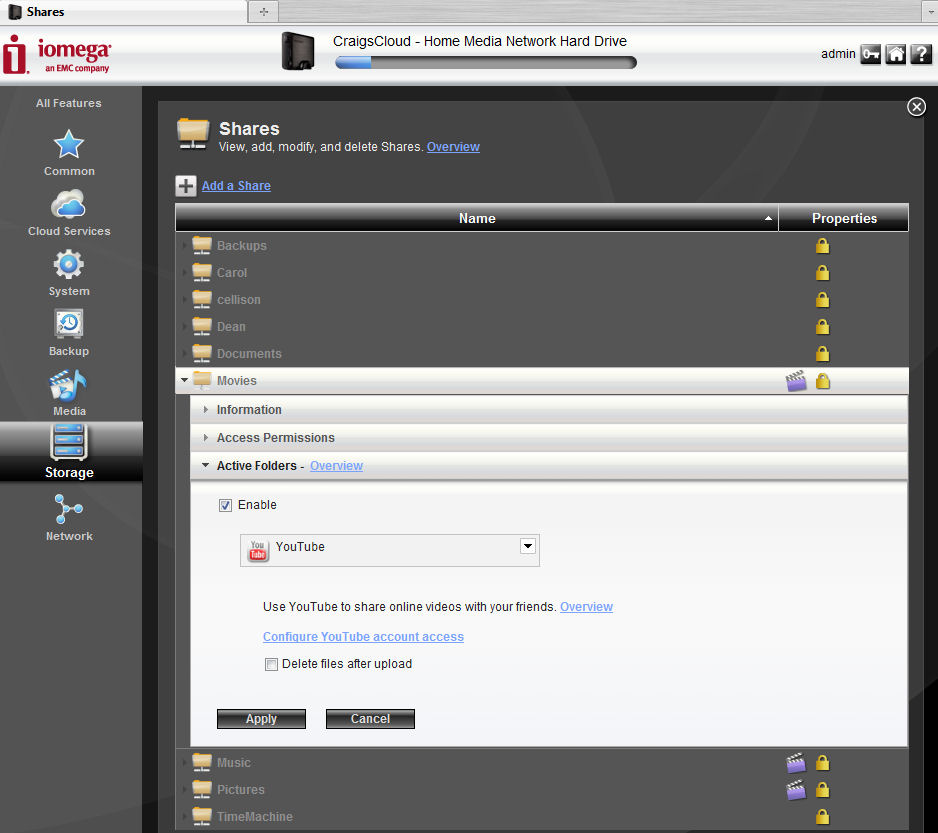
Figure 14: Active Folder configuration for YouTube
One of the reasons people buy a NAS is to back up valuable files. Here, the HMNHD-CE excels with a number of options. First, the HMNHD-CE includes one license each for EMC Retrospect HD for Windows, EMC Retrospect Express for Windows and EMC Retrospect for Mac. In addition, a free 2GB account to MozyHome Online Backup is included. (Note: EMC is the parent company of both Iomega and Mozy).
You also get a Copy jobs feature to copy files to any other NAS or to an external USB storage device attached to the HMNHD-CE either immediately or scheduled. The HMNHD-CE can also serve as a Time Machine target for your Mac. I configured my Mac to use the HMNHD-CE for Time Machine backups and it worked flawlessly. Finally, the HMNHD-CE can also back up to Amazon S3.
Other features of note include support for PTP (Picture Transfer Protocol) and a front panel QuikTransfer button. With PTP, you can attach the USB port of a PTP-enabled camera and automatically transfer photos. The QuikTransfer button can be configured to start copy jobs, or to transfer data from an attached USB storage device.
Performance
Performance was covered by Tim over on his SmallNetBuilder New To The Charts article. The Benchmark Summary below taken from that review shows file copy Write and Read speeds of 32 MB/s and 51 MB/s, respectively.
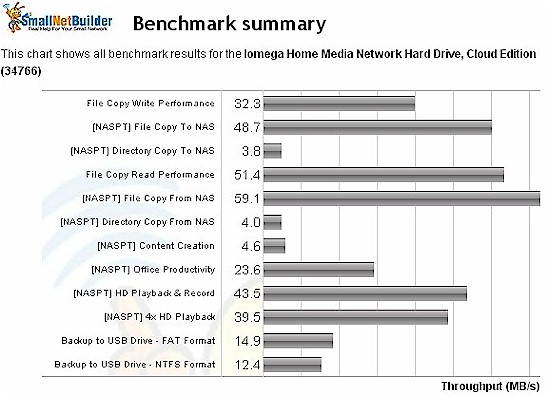
HMNHD-CE Benchmark summary
This is a significant improvement from the original HMNHD, which only managed 13 MB/s write and 28 MB/s read for Windows file copies.
Closing Thoughts
Iomega has broken new ground with the HMNHD-CE. Once I managed to figure out how to set up my Personal Cloud and get access to it, it worked well. And the ability to have mapped "cloud" drives on my notebook that work when I’m away from the office definitely improves my remote working experience.
However, the setup software definitely has the feel of a version 1.0 release. Inexperienced users may have some difficulty getting through Personal Cloud setup, especially if UPnP is disabled on their router. A setup wizard to guide a novice user through all of the steps of setting up the personal cloud, remote access and enabling security would be a welcome addition. After all, if you invite someone to your join your cloud or worse yet, enable remote access without enabling security, you might be surprised to find out that you’re sharing the entire contents of your HMNHD-CE with everyone on your cloud or, worse, the entire Internet!
It appears that Iomega has done its homework and created a unique alternative for those searching for an easy and affordable way to explore the advantages of cloud storage. The Home Media Network Hard Drive – Cloud Edition doesn’t make you trade performance for cloud access like the Pogoplug products do. And it doesn’t require ongoing subscription fees to get at all of its features like Seagate’s GoFlex Home.
But even if you could care less about cloud storage, a 2TB NAS with lots of media serving and backup features and decent performance for around $160 bucks is still a pretty good deal.
