Introduction
VLANs, or Virtual LANs, are a useful technology for segmenting a network. I covered some VLAN basics awhile back in this article. Implementing VLANs in a small network can be simple or tricky, depending on the VLAN capabilities of your switch and router. For example, what should you do if you want to use VLANs with a VLAN-capable switch, but your router doesn’t support VLANs?
A further challenge is determining what kind of VLANs to use. Some network devices support port-based VLANs, some support 802.1Q VLANs, others support both. What should you do if you want to deploy port-based VLANs, yet your switch supports only 802.1Q VLANs? In this article, I’ll answer these questions and provide configuration examples using NETGEAR, ZyXEL and Cisco switches.
Example 1: Port-based VLAN switch
Let’s say you have a VLAN-capable "smart" switch, but your router doesn’t support VLANs. Your goal is to segment traffic on the switch in multiple VLANs to prevent devices on one VLAN from accessing devices in the other VLAN, but allow all devices to access the Internet. A simple solution is to set up port-based VLANs on the switch.
Start by enabling port-based VLANs and creating three VLANs on the switch. VLAN 1 will be for the internet, VLAN 2 will be for one set of devices and VLAN 3 will be for another set of devices. Below shows a NETGEAR GS108Tv1 enabled for port-based VLANs with VLANs 1-3 created.
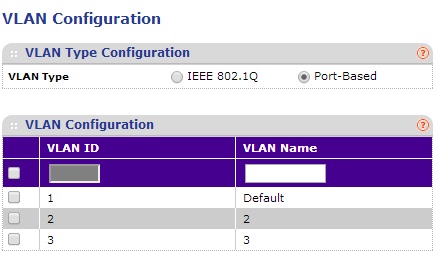
NETGEAR GS108Tv1 Enable Port-Based VLAN
Next, assign VLANs to the appropriate ports. Assign VLAN 1 to port 1 and connect your router to port 1 on the switch. Now assign VLAN 2 to ports 1 and 2. Finally, assign VLAN 3 to ports1 and 3.
In the screenshots below from a NETGEAR GS108Tv1, port 1 is a member of VLANs 1, 2, and 3. Port 2 is a member of only VLAN 2. Port 3 is a member of only VLAN 3. To add more devices to one of the VLANs, simply add their ports to either VLAN 2 or VLAN 3.
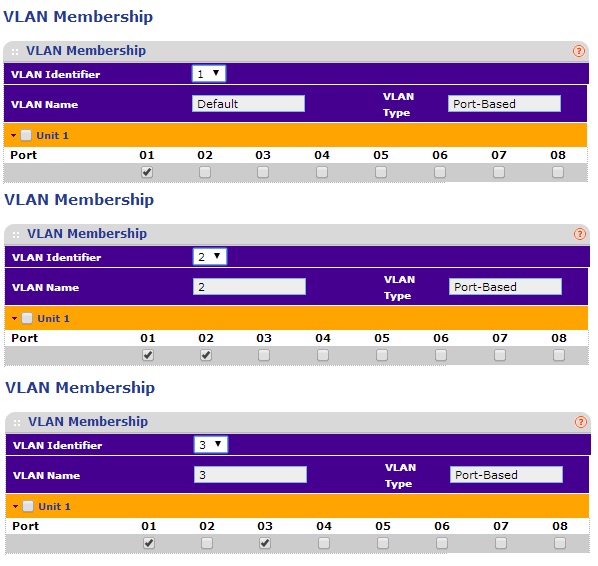
NETGEAR GS108Tv1 Port-Based VLAN Assignments
The end result of this example is devices in VLAN 2 can access the Internet and each other and devices in VLAN 3 can access the Internet and each other. But devices in VLAN 2 cannot access devices in VLAN 3 and vice versa.
Example 2: 802.1Q Switch
Let’s say you have a switch supporting 802.1Q VLANs, but not port-based VLANs, the same no-VLAN router and want to segment traffic as you did in Example 1.
It’s helpful to clarify some terms first. 802.1Q, sometimes referred to as VLAN tagging, is a standard technology that defines how data traffic is tagged with a VLAN ID. Tagging traffic with a VLAN ID allows the traffic to remain a member of a VLAN as it is passed from one port to another, or from one device to another. 802.1Q specifies that all traffic is tagged with a VLAN ID, except traffic on the port’s native VLAN. A port’s native VLAN is also known as the the PVID, or Port VLAN Identifier.
802.1Q VLANs can have different port types. An access port is an 802.1Q VLAN port that can be assigned to a single VLAN only. It is typically used to connect to end devices such as PCs. A trunk port is an 802.1Q VLAN port that can carry traffic for multiple VLANs and is typically used to interconnect 802.1Q VLAN capable switches and routers. Some switches use general ports, which are a hybrid between access and trunk ports and can carry traffic for multiple VLANs.
To implement the Example 1 solution using 802.1Q VLAN technology, enable 802.1Q on the switch and create the three VLANs as you did in the port-based VLAN example. In this example, I’m going to again use a NETGEAR GS108Tv1, which supports both port-based and 802.1Q VLANs. The below configurations will also work on many NETGEAR switches, including a NETGEAR GS108Tv2. As you can see below, I’ve enabled 802.1Q and created VLANs 1-3.
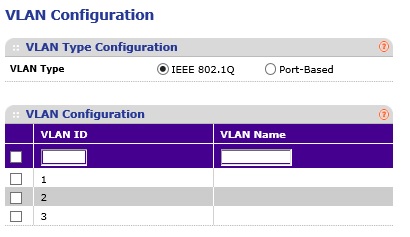
NETGEAR GS108Tv1 Enable 802.1Q VLANs
Then, if your switch allows for setting VLAN port type to access, trunk, or general, set the ports to general. Some switches, such as the NETGEAR GS108Tv1 and NETGEAR GS108Tv2 (and most NETGEAR switches I’ve reviewed,) allow all ports to be members of multiple 802.1Q VLANs so you don’t have to set VLAN port type. Other switches, such as the Cisco SG200-26, which I’ll cover in the last example, require you to change the VLAN port type to general for this kind of configuration.
Next, assign VLANs to the appropriate ports with the untagged designation, which is a “U” on the NETGEAR GS108Tv1, and make all ports untagged members of VLAN 1. Then make ports for one set of devices untagged members of VLAN 2 and set ports for the other set of devices untagged members of VLAN 3.
As you can see in the composite image below from a NETGEAR GS108Tv1, all ports are untagged members of VLAN 1, ports 1 and 2 are untagged members of VLAN 2, and ports 1 and 3 are untagged members of VLAN 3.
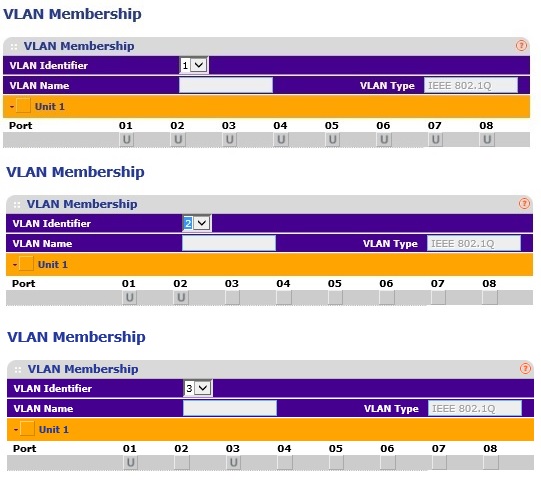
NETGEAR GS108Tv1 802.1Q VLAN Assignments
The last step is to set the PVIDs. Set the PVID on the port connected to the router as VLAN 1. Set the PVID on the ports for one set of devices to VLAN 2. Set the PVID for the ports for the other set of devices to VLAN 3. Below is a screen shot of the NETGEAR GS108Tv1 PVID settings.
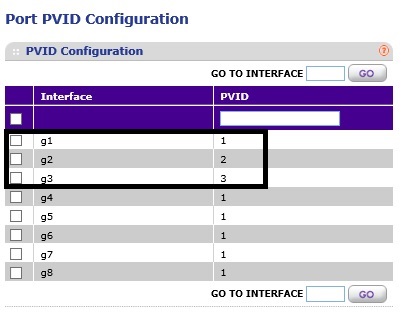
NETGEAR GS108Tv1 802.1Q PVID Assignments
With this configuration, the device connected to port 2 can’t access the device connected to port 3 and vice-versa. But both devices have internet access. To add more devices, configure their ports as untagged members of VLAN 2 or VLAN 3 and make their PVID either VLAN 2 or VLAN 3.
Example 3: ZyXEL GS1900-8HP
In the above two examples, I used VLANs 1-3. You can use any VLANs you want, as long as you have the port configurations correct.
To perform the same configurations on a ZyXEL GS1900-8HP switch, which only supports 802.1Q , create the desired VLANs. The ZyXEL switch, like the NETGEAR, doesn’t require you to configure VLAN port type. Just make all ports untagged members of the Internet VLAN, assign the appropriate ports as untagged members of their desired VLAN and, finally, assign PVIDs.
Here’s a configuration summary of the following screenshots:
- VLAN 2 = Internet, VLAN 3 = PC 1, VLAN 4 = PC 2.
- Port 6 is connected to my router. Port 6 is an untagged member of VLAN 2, 3, and 4 with a PVID of 2.
- Port 7 is connected to PC 1. Port 7 is an untagged member of VLAN 2 and 3 with a PVID of 3.
- Port 8 is connected to PC 2. Port 8 is an untagged member of VLAN 2 and 4 with a PVID of 4.
The first screenshot below shows the VLAN assignments…
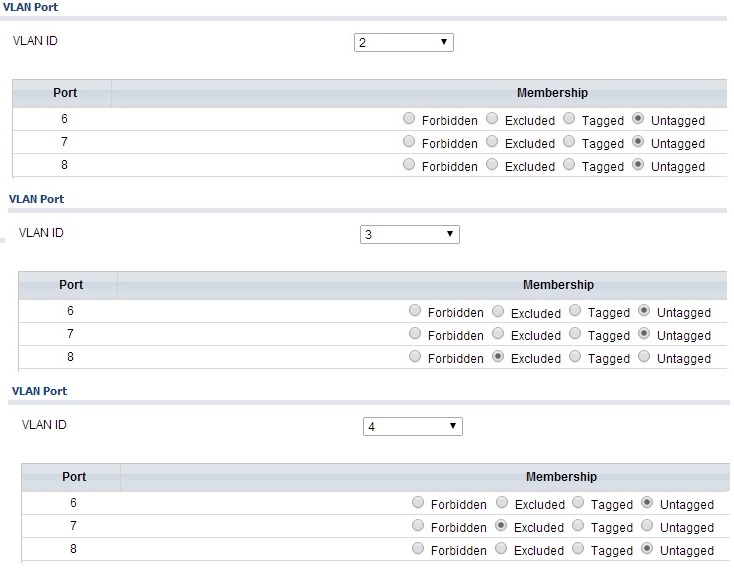
Zyxel GS1900-8HP 802.1Q VLAN Assignments
…the second screen shot shows the PVID configuration.

Zyxel GS1900-8HP 802.1Q PVID Assignments
With this configuration, PC 1 and PC 2 can access the Internet but not each other. To add another device in the same VLAN as PC 1 or PC 2, configure the port as an untagged member of VLAN 2 and an untagged member of either VLAN 3 or 4, plus set the PVID to either VLAN 3 or 4.
Example 4: Cisco SG200-26
To perform the same configurations on a Cisco SG200-26 switch, which only supports 802.1Q, the approach is similar to Example 3. Simply create the desired VLANs, configure the interfaces as general and make all interfaces untagged members of the Internet VLAN. Then assign the appropriate interfaces as untagged members of their desired VLAN and, finally, assign PVIDs.
The screenshot below shows the VLAN port-types, VLAN assignments, and PVID assignments on the Cisco SG200-26. Notice in the Mode column that all three interfaces are configured as “General.” I used VLAN 4 for the Internet and VLANs 51 and 52 for PCs. A “U” after the VLAN ID indicates untagged, and a “P” after a VLAN ID indicates PVID.
Here’s a config summary of the below screenshot:
- Interface GE10 is connected to PC 1. Interface GE10 is an untagged member of VLAN 4 and 51 with a PVID of 51.
- Interface GE11 is connected to PC 2. Interface GE11 is an untagged member of VLAN 4 and 52 with a PVID of 52.
- Interface GE12 is connected to my router. Interface GE12 is an untagged member of VLAN 4, 51 and 52 with a PVID of 4.

Cisco SG200-26 802.1Q Configuration
With this configuration, PC 1 and PC 2 can access the Internet but not each other. To add another device in the same VLAN as PC 1 or PC 2, configure the switch interface as general, make it an untagged member of VLAN 4 and an untagged member of either VLAN 51 or 52 and set the interface PVID to either VLAN 51 or 52.
While this example was done on a Cisco SG200-26, the Cisco SG200-08 and SG200-08P use similar configurations.
Closing
In all the examples, all end devices are in the same IP address range (subnet) and the router doesn’t support VLANs. It is also interesting to note in Examples 2-4 using 802.1Q VLANs, we don’t actually use tagging, since we set all ports to be untagged members of the various VLANs.
If you look closely at the VLAN assignments in the port-based and 802.1Q examples, you can see that the router/Internet port is a member of all VLANs for both port-based and 802.1Q. The difference is the PC ports are members of only one VLAN in a port-based config, whereas PC ports are members of the Internet VLAN and their native VLAN in an 802.1Q config.
These examples are limited to segmenting a wired network using VLANs only on ports of a smart / managed switch. In a future article, I’ll cover how to use 802.1Q VLANs using ports on both a router and switch, as well as how to use 802.1Q VLANs to segment a wireless network.
Below is a table of switches I’ve used or reviewed that lists whether they support port-based and/or 802.1Q VLANs.
| Switch | Port-Based | 802.1Q |
|---|---|---|
| Cisco SG200-26 | N | Y |
| Cisco SG500-28P | N | Y |
| HP PS1810 | Y | Y |
| LG-Ericsson ES-2026 | Y | Y |
| NETGEAR GS108Tv1 | Y | Y |
| NETGEAR GS108Tv2 | N | Y |
| NETGEAR GS510TP | N | Y |
| NETGEAR GS716T | N | Y |
| NETGEAR GS724TR | N | Y |
| NETGEAR M4100 | N | Y |
| TRENDnet TEG160WS | N | Y |
| TP-LINK TL-SG108E | Y | Y |
| TP-LINK TL-SG2008 | N | Y |
| TP-LINK TL-SG2216 | N | Y |
| ZyXEL GS1900-8HP | N | Y |
As you can see, only a few switches support port-based VLANs, yet all of them support 802.1Q VLANs. This is likely due to the fact that port-based VLANs aren’t standardized, thus there is limited interoperability between devices and limited functionality with port-based VLANs.
On the other hand, 802.1Q is a standard technology that is supported by most VLAN-capable switches. The bottom line, as shown in these examples, is you can use port-based or 802.1Q VLANs to segment any small network.
