Introduction

| At a Glance | |
|---|---|
| Product | Thecus High Performance NAS Server (N5200) |
| Summary | Five bay multi Terabyte-capacity BYOD NAS with RAID 0, 1, 5, 6, 10 and JBOD support |
| Pros | • Very high performance • Hot-swappable drives • NFS, AFP support |
| Cons | • Noisy • Firmware still a work in progress • Documentation lacking in key areas • Poorly organized web interface |
If the email and discussion forum postings asking when this review would be posted are any indication, the N5200 has a lot of people excited. Thecus has pushed the envelope—at least for the “prosumer” NAS market—and upped the ante by producing a five bay BYOD RAID NAS that throws in two more RAID modes (6 and 10) to boot.
Unfortunately, while the performance of the 5200 established a number of new highs on our NAS charts, its feature set and firmware maturity may disappoint Thecus fans who have been chomping at the bit to get their hands on one. But I get ahead of myself…
The 5200’s chassis attempts to strike a balance between something your wife would immediately banish from the living room media center and the utilitarian look that only a data center manager could love. The front panel is a glossy black, accented by the blue glow from the LCD status panel that you can see in the product shot above and less clearly in the annotated front panel photo in Figure 1 below.
At around 9.25″H x 7.5″W x 9.75″D, this NAS is on the largish side. And with two fans (the large “System Fan” and the smaller one next to the power connector) and five 7200 RPM hard drives, the 5200 definitely needs to be in a server room or closet unless you like the constant drone that it produces. Neither fan appears to be variable speed, either.

Figure 1: Front Panel
Rather than take up space describing each of the controls, you can use Figures 1 and 2 to conduct your own inventory and I’ll just provide some commentary. I have mixed impressions of the LCD status panel. The good news is that it provides a changing display of time / date, WAN and LAN IP addresses and RAID and System Fan status. The bad news is that the display doesn’t scroll sideways so that you can see entries longer than the 20 character display. You also can’t manually scroll from entry to entry using any of the four buttons below the display.
I found that the display stops its status rotation at some point (at least an hour) and the buttons don’t help you get it started again either. And speaking of the buttons, their longish shape somehow made me think they were up / down toggles instead of in-out pushbuttons. I got that one sorted out quickly, however.

![]()
Figure 2: Front Panel feature description
Thecus supplied my 5200 complete with five Western Digital WD3200KS-00PFB0 320GB 7200RPM SATA hard drives, so I didn’t have the pleasure of mounting the drives to the trays. But with only four screws and clear instructions with photos in the user manual if you need them, you shouldn’t have any problem with installation.
I didn’t like the tray design as much as that on the Infrant ReadyNAS NV, however. The 5200’s tray lever is plastic, feels flimsy and has two mechanisms that provide lever-opening resistance. One is a plastic catch that holds the lever closed that is not obvious and the other is the key lock that is. The key lock turns a tab that engages a slot in the disk tray plastic top and just prevents you from opening the lever vs. securing the tray to the enclosure. But the plastic catch also provides resistance against opening the lever, with the result that it took me a few tries until I figured out what was going on.
The NV’s latch is much more obvious, popping the lever up when you insert a paper clip into a hole in the lever. You also can’t get a grip on anything to pull on it until you pop the lever and the lever itself locks the disk tray to the enclosure, providing a much more robust and intuitive locking system.
Product Tour – more
Figures 3 and 4 provide a look at the 5200’s back panel. Once again there are some “unique” features. First is the eSATA port, which I didn’t try out, but that should allow you to expand the 5200’s storage. Then there is the type B USB 2.0 port (callout 3) that lets the 5200 serve as (big) external USB drive attached to a Windows PC.
I didn’t have any luck getting a prompt when I tried a Hyperterminal connection from my notebook to the “factory use only” serial port, but suspect that more determined folks will succeed. Finally, there is the four-port 10/100/1000 switch that implies that the 5200 can handle your LAN’s Internet-sharing duties as well as its storage needs (more on that later).

Figure 3: Back Panel

Figure 4: Back Panel feature description
Note that the power supply will accept a 100 – 240 VAC input with no jumpers to change. There’s also a slot for a Kensington cable lock right above the serial connector. The front panel power switch is certainly big enough, but a little too responsive for my taste. I prefer a press-and-hold-for-a-few-seconds approach to shutdown, but the 5200 needs only a brief push to initiate a short shutdown sequence.
Thecus makes no secret of what powers the 5200, which is an Intel Celeron M running at 600MHz with 256MB of DDR memory. To see what else is inside, I unscrewed the three convenient thumbscrews on the rear panel, tilted it back and lifted off the cover.

![]()
Figure 5: Inside the N5200
The main board looks like a custom design and has a single DIMM slot. That’s a 64MB Afaya flash microdisk at the bottom of the picture and the module to the left of the photo is a rider module that holds a Marvell-based 5 port gigabit switch using an 88E1145 “Alaska” tranceiver for the four LAN ports, 88E6151 5 port gigabit switch and 88E1111 Alaska Gigabit Single-Channel PHY for the WAN port.
Not visible in this photo is the drive backplane that plugs into a connector on back of the main board and is bolted to a sheet metal card cage. The backplane provides blind-mate connection to five 3.5″ SATA II drives, which will be formatted using the ext3 filesystem. Drives up to 750 GB are supported (a PDF list of supported drives can be downloaded here).
Setting Up
The 5200 is a BYOD (Bring Your Own Disk) product, so you’ll first need to mount drives on the supplied trays and plug them in. You then connect the 5200 to your LAN using its WAN port, plug in power, turn the rear panel power switch on and press the front panel power button to start her up. The 5200 comes with its WAN port set to 192.168.1.100, so you’ll need to either run the setup utility that comes on the 5200’s CD to change it, or set the machine you’re using to a 192.168.1.XXX address.
The 5200’s secure (HTTPS) access is enabled by default, but the product doesn’t automatically direct unsecured (port 80) requests there. You have to both specify the secure port (443) and make sure you include https in your URL or you’ll get the screen shown in Figure 6. Unfortunately, clicking on the link doesn’t properly rewrite the URL and instead gets you a “server not found” response. Both the normal and secure ports can be changed to avoid problems with other web-based products on your LAN.

Figure 6: Unhelpful response
After you get your URLs straightened out and enter the default username and password, you’ll be taken to the Product Information screen (Figure 7), which you also access via the Status > About menu.

Figure 7: Product Information / About screen
The System, Info and About screens under the Status menu would better have been condensed into one screen. Figure 8 shows the System screen and I’m skipping the Info screen, since all it contains is a System Description field that appears only on the 5200’s log in screen that you can change from its default of “N5200 IP Storage Server”. The System Fan Speed in Figure 8 is showing “Fail” because I had the fan panel disconnected while taking the internal photo. It normally displays “OK” instead of the actual fan speed if all is well in that department.

Figure 8: System screen
The Status menu also holds a Printer selection for its built-in USB print server. Thecus provides no information on the server or compatible printers and I didn’t test this feature. The Printer screen displays Manufacturer, Model and Status for an attached printer, plus a Remove All Documents link to empty the print queue.
RAID Configuration
You may have noticed that none of the Status screens provide any indication of drive or volume status. For that, you need to go to the Storage menu, Disks screen (Figure 9) where you would first check to see whether all of the drives that you had installed are present and accounted for. Clicking on the links in the Status column brings up a screen providing a few bits of SMART info including Power On Hours, Reallocated Sector Count and Current Pending Sector.
Note that the Disk Power Management selector is inoperative in the 1.00.03 firmware used for this review. Also absent is the ability to shut down and wake up the 5200 on schedule. Some readers have asked me to add a check to see what happens when power is restored after a sudden power failure. So I pulled the plug with the 5200 running, waited a bit, plugged it back in and found that it stays powered off.

Figure 9: Storage > Disks screen
Configuring the 5200’s drives for operation requires a visit to the RAID screen. Figure 10 shows the screen just after I initiated a RAID 6 build. You can see that RAID 6 cuts available capacity almost in half, but the build time wasn’t really 5187 minutes (86 hours!). Although the 5200 is available for use (at reduced performance) during RAID array build, I found it took around 4 hours to completely build all RAID configurations except RAID 6, which took more like 6+ hours.

Figure 10: Storage > RAID screen
Figure 11 shows the controls available on the RAID Configuration screen. I used all five drives in my RAID 6 configuration, but you only need to use four. (You can only use a maximum of four drives for RAID 10.) The Spare checkboxes and Add Spare button let you assign a drive to be automatically swapped in, should one drive of your RAID array fail. Thecus’ documentation says that RAID 6 and 10 can sustain two drive failures, while RAID 1 and 5 can have only one drive go bad and keep running.

![]()
Figure 11: Storage > RAID configuration screen
To test this with the 5200 configured in RAID 6, I pulled two drives with about 10 seconds’ pause between. The front panel LCD display quickly identified the “bad” drives and informed me that the system was running “degraded”. When I reinserted the drives, the front panel display properly reported the changes and kept me updated on the rebuild progress.
I wish I could say that the failure information presented in the web GUI was as easy to find and informative, but it wasn’t. You get no indication of trouble upon logging in and checking all the Status menus also comes up empty. You’ll need to navigate to the Storage > RAID menu to see what’s wrong or pick through the three separate logs.
In addition to being able to designate a RAID spare, the 5200 also supports RAID Migration and Expansion. RAID Migration is supported for RAID 0, 1 and 5 arrays and allows changing the number of drives or RAID level. Possible migration paths are automatically listed, such as changing a RAID 1 array with 2 drives to RAID 5 with 5 drives.
RAID Expansion allows you to substitute larger drives for smaller without having to completely kill an existing array and rebuild from scratch.
Note that, unlike a normal RAID build, all file services (SMB/CIFS, AFP, NFS, FTP, etc.) are not available during RAID Migration and Expansion. And if you lose power during either operation, your data will be no more. So plugging the 5200—or any other NAS for that matter—into a UPS is highly recommended.
Other Storage Menu Features
Once the 5200’s filesystem is established, you can start setting up folders (Figure 12). nsync, usbhdd and usbcopy folders are set up by default. The latter two are set as public (read / write accessible by anyone) and browsable. Although it’s hard to tell from Figure 12, the ACL button text is grayed-out for publicly-accessible folders.

Figure 12: Storage > Folder configuration screen
For non-public folders, a click of the ACL button pops up another window (Figure 13) where you can set file access permissions.

Figure 13: ACL configuration screen
The usbcopy folder is used by the USB copy feature that can be initiated from the 5200’s front panel. This feature copies the contents of a USB flash key, drive or digital camera (with a USB port) to a time-stamped folder. I tried two flash drives, which copied fine, and a Canon SD200 digital camera, which did not. Even when the copies worked, however, you would think the opposite from the “USB Copy failed” message displayed on the 5200’s LCD display. I also found that the USB copy LED didn’t illuminate during the copy and that there was no indication given that a USB device was ready for copy.
Most copies took two tries, with a “USB timeout” typically the result of the first try. I had to browse to the usbcopy folder to verify that files had indeed been copied, since check of the separate Info, Warn and Error logs showed no signs of the USB copy activity. When I went to delete the test usbcopy folders, one went away fine, but the other threw an “access denied” message. Try as I might, I wasn’t able to delete the folder or any of the files using the Windows file manager. I had to create an account and log in using the Web Folders feature in order to finally be able to deleted the file.
My adventures with the Target USB feature that employs the usbhdd folder also didn’t go smoothly. Target USB is what Thecus calls the 5200’s ability to act as an external USB drive when attached to a Windows PC via the rear-panel USB Type B port. The catch here is that you have to know enough to initialize, partition and format the space allocated to this drive using a Windows disk management tool. Once I called up XP’s Computer Management utility, however (via the Programs > Administrative Tools menu), and fired up the Disk Management utility (under Storage), my XP PC was able to recognize and use the drive.
The other items on the Storage menu are for the Snapshot and nsync features. Snapshot creates a copy of all current folders either on demand via the Manual feature, or on a monthly, weekly or daily schedule. One gotcha I found was that the default settings for RAID creation allocate space for the Target USB feature, but not for Snapshot. You’ll need to adjust the percentages of the Data and Target USB to leave space for Snapshot.
Nsync does not play the greatest hits of the once-popular boy band, but instead can back up selected folders to either another N5200 or an FTP server. I didn’t test this feature, but a once-over of its Add Task screen (Figure 14) revealed that it won’t back up the usbhdd and usbcopy folders that the system creates by default.

Figure 14: Add Nsync Task screen
I was surprised to not find any disk check features lurking in any of the 5200’s menus. Nor does there appear to be any way to manually initiate a RAID repair. I managed to get the 5200 into a state where its RAID Information screen was flashing a “Degraded” status at me and I didn’t find any helpful info in the log files to guide me. Without a way to start a RAID repair, my only option was to remove the array, lose my data and rebuild another array.
Network Menu
The 5200’s networking setup is a bit odd and, once again, fraught with half-done features. There is a very basic NAT router with DHCP server that is disabled by default. You enable it via the WAN menu’s IP Sharing Mode control (Figure 15), where you also can enable Jumbo frame sizes of 4000, 8000, 12000 and 16000 bytes.

Figure 15: WAN configuration screen
Once you enable IP Sharing Mode, however, don’t go looking for any of the usual router features such as port forwarding or filtering because they don’t exist. All the LAN menu (Figure 16) provides are Jumbo frame, IP address and DHCP server controls. But I discovered, and Thecus confirmed, that Jumbo frames are supported only on the WAN port and that they will be removing the Jumbo Frame control from the LAN screen in a future firmware update.

Figure 16: LAN configuration screen
Controls for the 5200’s many services are actually spread out over the Services, AFP, NFS, FTP and Nsync Target screens. Starting with the Services screen, the WebDisk (HTTP) and Secure WebDisk (HTTPS) services are both enabled by default, but web-based file access is for registered users only—no public access. The SMB/CIFS service is enabled by default, but UPnP is disabled.
The AFP screen holds enable / disable (default) and Zone setting controls, while the NFS screen just has enable / disable (default), as does the Nsync Target (enabled by default). The FTP controls allow enable / disable (default) and setting FTP encoding, but no control of anonymous FTP—which appears to be enabled. I could find no ability to disable FTP access for individual users or groups, which would be give me pause to enable it.
If I had plugged in a 3Com 3CRUSB10075, Zyxel G220USB or PCI GW-US54mini USB wireless adapter before booting the 5200, a WLAN option would have appeared to allow configuration. A check of the User Manual info revealed that only WEP encryption is supported, however.
Accounts and System Menus
The Accounts Menu holds options for Authentication method and is where you manage Users and Groups. The Authentication screen controls are shown in Figure 17 and include settings for specifying WINS, Windows Active Directory (ADS) or Windows NT servers to handle user authentication chores. This is also where you set the Windows workgroup name, which I would have preferred to see with the SMB/CIFS controls.

Figure 17: Authentication screen
The Users and Groups menu items bring up very similar screens. Figure 18 shows the screen for modifying the “testgroup” I had set up. The group currently has no members, but I could add the “test” member in the Users List by selecting it and using the left arrow button to move it into the Members List box. Note that user and group permissions are not set here, but by using the ACL button in the Storage > Folder screen.

Figure 18: Group screen
The last menu of interest is System (Language just allows selection of Japanese, two flavors of Chinese, Spanish, French, Korean, German or Italian for the user interface). The Notification screen allows selection of Beep and Email notification of errors, but both didn’t do much for me. Disabling Beep Notification doesn’t block all beeping and I couldn’t get the email notification to work with my email account that required a unencrypted username and password log in for SMTP access. The Email notification feature provides plain, login, and cram-md5 options as well as on and off, but the user manual provides no guidance as to their use and there is no button to send a test email.
I didn’t find the Logs feature to be very helpful, either. There are separate Info, Warn and Error logs that can be cleared (“truncated” in 5200 lingo) and downloaded. But the assignment of information to the various logs didn’t seem logical. Figure 19 shows that the Info log is where notification of physical removal and replacement of drives gets sent. But messages about RAID recover get sent to the Warning log and the Error log receives notifications of when “degrade” mode kicks in. Unfortunately, I saw no indication of email warning sends (or more importantly send failures) to help me figure out why I didn’t receive any email from the 5200.

![]()
Figure 19: Logs screen
The System menu selections include Time for manual or NTP-based time setting and Config Mgmt to save and restore system settings. The Factory Default, Firmware Upgrade, Administrator Password, Reboot and Shutdown and Logout selections need no explanation. I couldn’t, however, find a way to change the admin idle logout time.
Performance – 100 Mbps
As I do with all NAS testing, I used IOzone to check out the file system performance on the 5200 (the full testing setup and methodology are described on this page). I connect everything to a NETGEAR GS108 10/100/1000Mbps switch for gigabit-speed testing. The GS108 I have supports jumbo frame testing, which all currently-shipping versions should now also support.
NOTES:
- Firmware version tested was 1.00.03
- Default RAID settings were used, which included a 64 KB stripe size.
- Drives used were five Western Digital WD3200KS-00PFB0 320GB 7200RPM SATA hard drives with 16MB of cache supplied by Thecus
- Keep in mind that the maximum raw data rate for 100Mbps Ethernet is 12500 Kbytes/sec and 125000 Kbytes/sec for gigabit
I first tested the N5200 in JBOD and RAID5 modes with a 100 Mbps LAN connection. The results are shown in Figures N and N along with results from comparable products, i.e. the Synology CS-406 and Buffalo Terastation. Any data points that lie above the 100 Mbps Ethernet line are due to caching effects.
Figure 20 shows that the N5200 is at the top of the chart in both JBOD and RAID 5 modes when writing.

![]()
Figure 20: Write performance comparison – 100Mbps (click image to enlarge)
Read performance shown in Figure 21 is a bit more of a horse race since caching is out of the picture. Once again, the N5200 is the best of the bunch, with closely-matched JBOD and RAID5 results.

![]()
Figure 21: Read performance comparison – 100Mbps (click image to enlarge)
Performance – 1 Gbps
The gigabit performance plots are a bit more involved, so I separated them into two sets of charts. The first shows gigabit performance with a mix of JBOD and RAID 0 results. JBOD and RAID 0 aren’t exactly the same thing, but are close enough in function that NAS manufacturers tend to use the terms interchangeably and support only one or the other. The N5200, however, supports both JBOD and RAID 0 modes.
Figure 22 shows the 5200 in JBOD mode and the Synology CS406 in RAID 0 mode, both with and without 4 K jumbo frames enabled. The Buffalo Terastation plot is JBOD mode and no jumbo frames. It is clear that the 5200 significantly outperforms the Synology and Buffalo products. All products display a downward trend in performance as file sizes increase, but the effect is more pronounced in the N5200—perhaps because performance is so high for small file sizes.

![]()
Figure 22: Write performance comparison – JBOD, RAID0 – 1 Gbps
The second set of charts shows shows RAID 5 performance, this time including results for the Infrant ReadyNAS NV. The NV wasn’t included in previous plots because I have only RAID 5 data for it. The most up-to-date data I have was taken without jumbo frames enabled, which is what is shown in Figure 23.

![]()
Figure 23: Write performance comparison – RAID5 – 1 Gbps
There is a lot going on here, so I’ll point out some key points. First, the 5200, both with and without jumbo frames, once again outpaces the other products significantly. The “RAID5 build” plot line represents reduced performance when I ran a test during the 4 or so hours that the 5200 took to completely build a RAID 5 array.
The Synology CS402 and Infrant NV are the next best in performance. The CS406 outperforms the NV with smaller file sizes, but the NV does better on 128 MB and larger files, even without a boost from jumbo frames. Finally, the Buffalo Terastation brings up the rear, which can be expected given that it is the oldest design among the products compared.
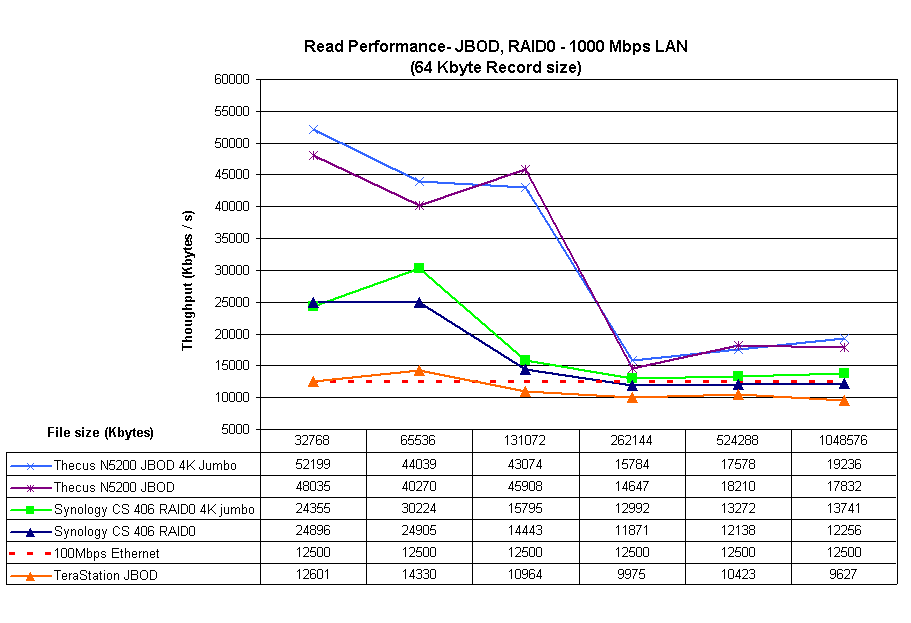
The 5200 generally beats the crowd for read performance, but the story is a bit more interesting. Figure 24 shows JBOD and RAID 0 results the jumbo frames don’t seem to help much. Performance is once again high for small file sizes, but only you get to 256 MB files, the 5200 drops much closer to the rest of the pack.
![]()
Figure 24: Read performance comparison – JBOD, RAID0 – 1 Gbps
For RAID 5, Figure 25 once again includes the Infrant NV, which turns in an impressive performance much closer to the 5200, even without the benefit of jumbo frames. The NV’s throughput vs. file size profile also more closely matches the 5200’s than do the CS 406 or TeraStation.

![]()
Figure 25: Read performance comparison – RAID5 – 1 Gbps
Those of you looking for RAID 1 results won’t find them because I didn’t run the tests. And with all those other wonderful RAID modes available, why would you want to use plain ol’ RAID 1 anyway? (Just kidding.)
RAID 6 and 10
Finally, I again braved the long RAID rebuild times and created RAID 6 and 10 arrays. RAID 6 is commonly described as an extension of RAID 5 that allows for additional fault tolerance by using a second independent distributed parity scheme. RAID 10 is a striped array using RAID 1 arrays as segments and yields the fault tolerance of RAID 1, but with higher performance.
Thecus’ manual says that both RAID 6 and 10 arras can have two drives go south and still keep running. As I mentioned earlier, I actually tried this while running an iozone test on a RAID 6 array and can confirm that the test kept running as I pulled and then reinserted two drives.
For those of you wondering about the relative performance of RAID 5, 6 and 10, just feast your eyes on Figures 26 and 27.

![]()
Figure 26: Thecus N5200 Write performance comparison – JBOD, RAID 5, 6, 10 – 1 Gbps
It’s a bit hard to tell given the scale of the plot and the natural variation in performance, but it looks like RAID 6 results in a performance hit that’s close to what you get while a RAID 5 array is rebuilding. And it looks like RAID 10 is the way to go for the best combination of performance and data robustness.

![]()
Figure 27: Thecus N5200 Read performance comparison – JBOD, RAID 5, 6, 10 – 1 Gbps
Closing Thoughts
It’s not that hard to build a RAID 5 NAS (see Build a Cheap and Fast RAID 5 NAS if you want to take a shot at it). The tough part is making one that doesn’t take an MCSE or CCNA to set it up and keep it running. With the N5200, Thecus has clearly succeeded at making a RAID NAS that leads the (current) pack in performance. But, just as clearly, they have also produced a NAS with a user interface that only a geek could love and with plenty of work left to do.
GUI design and user-friendliness don’t appear to have been at the top of Thecus’ design goals for the N5200 and it shows in many ways. Documentation manages to cover the “what” and “where” for the most part, but is sorely lacking in the “why” and “how”. There is no help available in the web interface, either, which is poorly organized and makes you hunt down important status information. As far as support, the Thecus website doesn’t have a knowledge base, FAQ section or Forum. And while there is phone support from 10AM to 5PM Pacific time, you’ll pay for the call.
Prospective buyers looking to use the 5200 as a media server will need to look elsewhere since the product includes no media servers. Thecus appears to be focused more on SMB than home use with the N5200, given its support for multiple networked file systems and Active Directory instead of UPnP AV and iTunes.
My bottom line is that if you’re looking for the fastest NAS for file serving and backup and don’t mind a funky user interface, sparse documentation, and immature firmware then you might take a chance on the 5200. But if it were my money, I’d go for an Infrant ReadyNAS NV (or NV+ if you want a front-panel display). The NV has a longer track record, mature firmware, much better user interface, more extensive feature set including multiple media servers and client backup, and is about $100 cheaper for a BYOD model. It’s also more compact and much quieter—although it still won’t be sitting within earshot of my media consumption space.
Thecus has succeeded in raising the feature bar for “prosumer” NASes to include five bays, RAID 6 and 10 and speeds that make good use of a gigabit LAN connection. But its reach has exceeded its grasp in producing an all-around polished product that anyone could feel comfortable buying.