In Part One of this series, we established a working definition of our target, i.e. what has to be done, and in what order, to Cerberus the lowly IDS firewall to make it a UTM Appliance. In Part Two, we started the conversion by installing and configuring multi-WAN support, Squid, IDS and anti-virus features. In Part 3, we added and configured Content Filtering, Traffic Control, Load Balancing and Failover.
In this last part, we’ll wrap things up with Monitoring and Logging configuration, performance testing, final grading and reflection on the whole process.
Monitoring and Logging
There are numerous packages for logging and interfaces to external monitoring packages, summarized in Table 1.
| Capability | Explanation | Features |
|---|---|---|
| Built-in Logging | Protocols for logging system events | SNMP, Syslogd, WebGui |
| RRD Graphs | System Resources Graphic Monitoring Tool | CPU Load, Traffic Throughput, Quality Handling, and Shaping Queues |
| Snort | Alert Tracking and Status | Barnyard2 package interface, Dashboard Widget |
| Squid | Web and Cache statistic | LightSquid |
| System Status | Hardware and Package Status | Dashboard, PHPsysinfo, WebGui, BandwidthD |
| External Interfaces | Monitoring and Management Agents | Zabbix, Radius, ntop |
Table 1: Logging and monitoring packages
Several of these are built in, RRD Graphs are available is available from the Status menu, SyslogD can be configured there too, under Status->System Logs->Settings. SNMP is a built-in, find it under Services->SNMP.
Installing the others is straightforward, and can be found in the packages menu, these include LightSquid, BandwidthD, PHPsysinfo, and the Dashboard, including several dashboard widgets (Snort, Havp status). The interface to Barnyard2 is included with Snort.
The only issue with a couple of these packages, LightSquid, ntop and BandwidthD, is that they are not fully integrated into the pfSense webGui – the pfSense banner and menus disappear, but backing out of the reports will lead you back to the web GUI.
Here are some screenshots of some of the logging and reporting options:
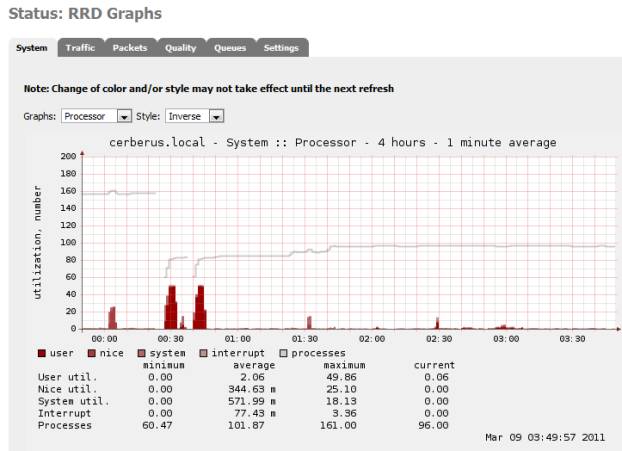
Figure 1: RRD Graphs
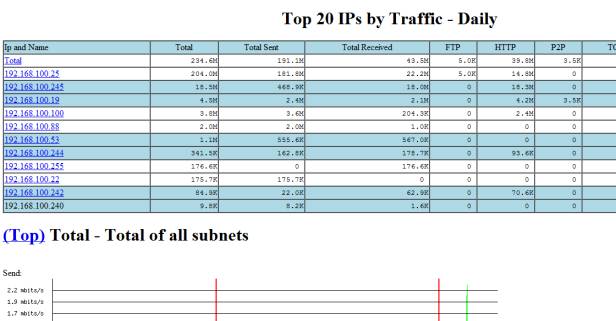
Figure 2: BandwidthD add-on Package
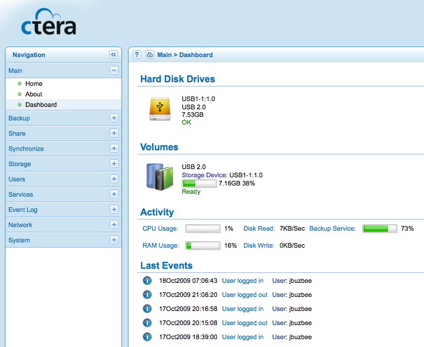
Figure 3: Dashboard
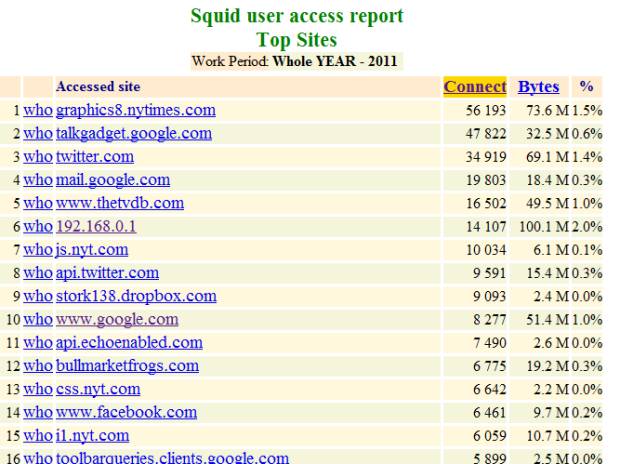
Figure 4: Light Squid
Performance
First, a bit of review. Cerberus was introduced in Build Your Own IDS Firewall With pfSense as an inexpensive build (around $350) for an IDS Firewall. The build list is in Table 2.
| CPU | Intel Atom D525 (Pineview-D) Dual Core, 1.8GHz (13W) processor | Incl in mobo |
|---|---|---|
| Motherboard | Supermicro X7SPA-H-D525 Mini-ITX Server | $180 |
| RAM | 2 x non-ECC DDR3 1066MHz SO-DIMM (running @800MHz) | $50 |
| Storage | WD Scorpio Blue 2.5” 250Gig drive | $40 |
| Ethernet | Intel 10/100/1000 PCIe NIC | $30* |
| Case | Antec Mini-Skeleton-90 | $90 |
| DVD | Sony DVD-ROM | * |
Table 2: Cerberus component list
That previous article explained the whole decision process, the components and why. On top of that hardware we installed pfSense, Snort, and IP Blocklist – all to provide an extraordinary level of protection for a home network.
As an IDS Firewall, Cerberus made a good showing, not a speed demon, but in the top third of SNB’s router performance charts. Running iPerf as the server on Cerberus, directly over gigabit LAN to jPerf, Figure 5 shows an average throughput of 236 Mbps, with a peak of 253 Mbps with a fair amount of CPU headroom left over.
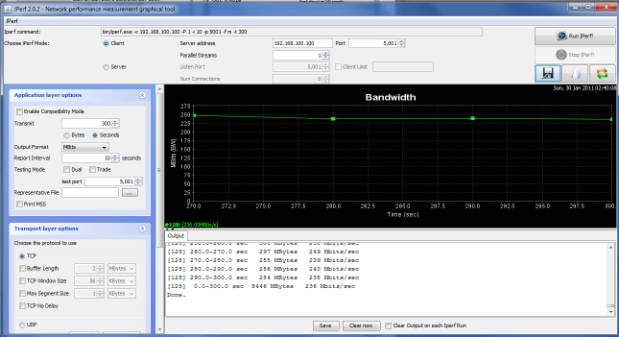
Figure 5: Running iperf on Cerberus as IDS
In our goal to convert Cerberus to a UTM, we poured on a whole lot of additional functionality. We added Squid and Squid Guard for caching and content filtering, we expanded Snort to cover three interfaces instead of just the single WAN interface, added HAVP and its scanning engine ClamAV for anti-virus, and instituted QOS and set-up multiple WAN load balancing and fail-over.
And finally we added some minor packages, SpamD for anti-spam, and DNS Blacklist and Country Block for targeted content filtering, BandwidthD, Lightsquid and Darkstat for reporting. In all, a complete package, our UTM.
So how did Cerberus the UTM fare performance-wise? Let’s look at Figure 6, running the same iperf test, under the same conditions that we used for our IDS Firewall.
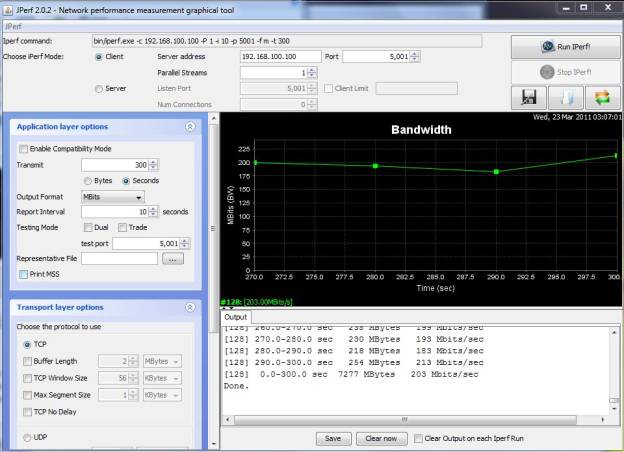
Figure 6: Running iperf on Cerberus as UTM
This time, I measured an average throughput of 203 Mbps, with a peak of 231 Mbps; CPU hit a utilization of just over 80% with using about 93% of available memory. Not too shabby, only a 14% drop in performance, but without CPU headroom. This shows how much we overestimated the processing requirements of pfSense; a dual core Atom 510 would probably been sufficient vs. the D525.
Conclusion
Without a doubt, Cerberus has been transformed. Take a look at the packages and features we have enabled in the summary Table 3.
| Package/Feature | Pros | Cons |
|---|---|---|
| Snort IPS/IDS | Comprehensive, Quick Rules engine supporting dynamic rules | High Memory Demands, Requires both thoughtful configuration and administration |
| Squid Proxy Server | Fast capable proxy server, allows for traffic throttling | Not just point and shoot, doesn’t work with QOS |
| HAVP/ClamAV Anti-Virus | Non-Blocking, Easy to set-up | Not comprehensive, non-commercial AV scanning |
| pfSense QOS | Wizard-based setup, queue based administration | Limited Level-7 Support |
| pfSense Multi-Wan Load Balancing and Failover | Provides for resilient failover | Not integrated with QOS or packages, uses simple load balancing algorithm, complex non-intuitive set-up |
| Squid Guard Content Filtering | Full featured content filtering down to who and when, ability to use external well maintained lists | Difficult install, no stock blacklist, poor documentation |
| IP Blocklist | Dynamic list based blocking | Slow, manually updated list administration has bugs, lists can be a mixed bag |
| DNS Blacklist | Quick and simple category-based host blocking | Static list requires manual updating |
| Country Block | Easy and quick blocking of country CIDRs | Geared more towards anti-spam |
| SpamD Anti-Spam | Simple, clever spam protection | Not integrated into pfSense, set-up requires hacking |
| Reporting: RRD, BandwidthD, LightSquid | Comprehensive and easy to set up, dynamically updated | Not fully integrated into webGui |
Table 3: Cerberus UTM packages
So can Cerberus take home the UTM Crown? Have we hit our target? Let’s take a look at the big picture. The first step is reviewing the summary of grades from Part One:
| Function | Grade |
|---|---|
| Intrusion Prevention & Detection | A |
| Anti-Virus | C- |
| Content Filtering | B |
| Anti-Spam | D |
| Traffic Control | B |
| Enterprise Capabilities | C |
| Overall Grade | C+ |
Table 4: Cerberus UTM grading
I do feel this is an accurate grade, based on functional capabilities. But the overall grade does not reflect what you personally might need from a UTM – in that case the grade drops to that of your most urgent requirement. If you are being pummeled with spam, or run an environment with a lot of unknown users, where anti-virus is significant, the grade you give pfSense drops dramatically. If home network protection is most important, the grade gets much better.
We could stop now, and say Cerberus is a UTM, sort-of. But that would be disingenuous, because of what we learned in the upgrade process. There are three other important aspects of our system in grading whether we hit our goal. These are: our installation experience; how well the system performs; and finally, the degree of integration, i.e. how well do the pieces work together.
The installation experience varied greatly, spanning the spectrum from seamlessly simple, with the installation of HAVP, our anti-virus solution, to the convolutions of origami we saw with installing SquidGuard, the cornerstone of content filtering. None of the more significant packages was what would be called turnkey.
It is understood that difference between an amateur and a professional is consistency – a professional chef makes the same dish over and over and it tastes the same, we cook at home, the meal can vary dramatically. PfSense’s install processes are not consistent.
pfSense Installation Process Grade: C-
Performance is the bright spot, even with several layers on top of our TCP/IP stack, a multitude of processes poking and prodding packet after packet, Snort, QOS, load balancing, and a couple proxy servers, Cerberus still rendered excellent performance.
pfSense Performance Grade: B
Now the big one, the degree of integration: the pieces just don’t meld together to form one appliance. Squid doesn’t work with QoS, HTTP traffic will remain unmetered. The reporting tools, LightSquid and BandwidthD, are only partially integrated into the webGUI. And most significantly, virtually none of the packages are compatible with the critical enterprise aspect of running multiple WAN connections, not the built-in QoS, not any of the various proxy servers.
pfSense Integration Grade: F
If a UTM is defined by the six functional groups we identified in Part 1 of this article, then yes, pfSense and Cerberus is a UTM, all the boxes are checked. But if a UTM is an appliance where all the pieces work together, are really unified, then no, we can’t say that Cerberus is a UTM. The whole must be bigger than the sum of the parts, or a checklist of functionality.
What we learned in this upgrade is that pfSense is a patchwork of packages, some excellent, others not so much. But overall, the pieces don’t gel. The updated scorecard in Table 5 calculates out to a C. But it feels more like a Fail, or if you are charitable, an Incomplete.
| Function | Grade |
|---|---|
| Intrusion Prevention & Detection | A |
| Anti-Virus | C- |
| Content Filtering | B |
| Anti-Spam | D |
| Traffic Control | B |
| Enterprise Capabilities | C |
| Installation Process | C- |
| Performance | B |
| Integration | F |
| Total Grade | C |
Table 5: Cerberus final UTM grading
This judgment, our final grade, only applies to our well-formed definition of what a UTM is, and does not imply that pfSense is not suitable for solving your problem, especially if you don’t need Multi-Wan. If all you want to do is protect your home network, Cerberus is an all-star.
However, there is hope on the horizon. While writing this article, pfSense moved the long awaited Version 2.0 out of beta. 2.0 is reported to sport fully integrated multi-wan support, and expanded support for packages like SpamD. So we may get to do this all over again!
In writing this, I’d like to thank Tessa Maish for her keen editing eye, and Tim Higgins for his invaluable input.
