Introduction
| At a Glance | |
|---|---|
| Product | Cisco Valet Wireless HotSpot (M10) |
| Summary | Single-band N router with 10/100 switch and goof-proof setup. |
| Pros | • Extremely simple to set up for Windows and MacOS users • Setup automatically sets admin password and wireless security • Built-in password protected guest LAN • Subscription free parental controls |
| Cons | • Same password for router admin and wireless security |
The introduction of Cisco’s new Valet wireless products should remove any remaining doubt that, going forward, Cisco, not Linksys products, will be heavily marketed to consumers of home networking products.
In addition to the two new Cisco-branded entries, the Valet (Model M10 – $99.95) and the Valet Plus (Model M20 – $149.95), Cisco also re-shuffled, renamed and dropped SKUs in the Linksys product line. Gone are the venerable “WRT” series of routers, now replaced by new Linksys-branded “E” series models. Even the marketing collateral shows a different focus. The Linksys “E” series of routers, now pared down to four SKUs, are still called “Wireless N Routers”, while the Valet products are called a more consumer-friendly “Wireless HotSpot”.
In reality, there’s a very close correlation between the new Cisco Valet and "E" series products and the Linksys “WRT” routers that they replace. Tim’s Inside Story: Linksys E-Series and Cisco Valet article does an excellent job of unraveling all of the changes. I couldn’t improve on his table, so I’ve copied it here for your convenience.
| New | Old | Chipset |
|---|---|---|
| Valet (M10) | WRT160N (V3) | – Broadcom BCM4716 Intensi-fi XLR 802.11n 2.4 GHz Router System-on-Chip – Switch: Broadcom BCM5325 |
| Valet Plus (M20) | WRT310N (V2) | – Broadcom BCM4716 Intensi-fi XLR 802.11n (2.4/5 GHz) Router System-on-Chip – Switch: Broadcom BCM53115 |
| E1000 | WRT160N (V3) | – Broadcom BCM4716 Intensi-fi XLR 802.11n 2.4 GHz Router System-on-Chip – Switch: Broadcom BCM5325 |
| E2000 | WRT320N | – Broadcom BCM4717 Intensi-fi XLR 802.11n (2.4/5 GHz) Router System-on-Chip – Switch: Broadcom BCM53115 |
| E2100L | WRT160NL | – CPU: Atheros AR9130 400MHz Wireless Network Processor – Switch: Realtek RTL8306SD – BB/MAC: In AR9130 – Radio: Atheros AR9102: Single-band 2×2 MIMO 802.11n Radio |
| E3000 | WRT610N (V2) | – CPU: Broadcom BCM4705 – Switch: Broadcom BCM53115 -5 GHz: Broadcom BCM4322 Intensi-fi Single-Chip 802.11n Transceiver -2.4GHz: Broadcom BCM4322 Intensi-fi Single-Chip 802.11n Transceiver |
Table 1: Valet, E-series and WRT comparison
For years, the Holy Grail for wireless router manufacturers has been to create a product with a simple, “bullet-proof” setup. Not only does a smooth, trouble-free setup experience benefit the consumer, but it also helps manufacturers by reducing consumer returns and help line calls. Cisco’s Valet products are targeted at the technically unsophisticated, i.e. those who don’t necessarily understand technology but just want it to work.
The “secret sauce” behind the Valet’s remarkable ease of use is an entirely revamped setup / installation technique. The story from Cisco is that they took the teams from the Network Magic and Flip aquisitions, put them in a room and told them to create new auto-setup technology that anyone could use.
Over the years, I’ve reviewed a number of wireless routers, but found that each of the setup "wizards" that some of them came with left something to be desired. But two words describe the new Valet setup: Nailed it!
The Valet setup was the smoothest and simplest setup of any router I’ve tested. Best of all, it works for both Mac and Windows and with any manufacturer’s wireless client adapters. I generated screen shots of the setup on both platforms, but there was no need to – the setup screens were virtually identical for both OSes.
I don’t often comment on product packaging, but the Cisco Valet packaging also deserves special mention. The product box is wrapped in cleanly designed white sleeve that shows a large image of the product, the new Valet logo and the tag line, “Home wireless made easy”.
The back of the sleeve shows a young woman and man, each with a wireless notebook with the additional tag line, “The simple way to create your own wireless hotspot”. Below the image are four bullet points that highlight the benefits of the Valet. The bottom of the package simply states system requirements and sports a small Wi-Fi certification logo. Cisco wisely eliminated all of the speed, range and 802.11n technical jargon usually found on packaging for wireless routers. The Valet’s target customer would just have been confused by that information anyway.
The box inside the sleeve is well constructed and feels solid. Even before starting to configure the Valet, my test subject (my wife) commented that the solid packaging gave the impression that the product would be dependable. And what a difference color can make! The case of the Cisco Valet is essentially the same form factor as used on the new Linksys “E” series of wireless routers. But instead of a shiny black case, the M10 has a soft-finish eggshell white case, and, in the case of the M10, a light blue accent. My wife made a special comment on how attractive the device looked compared to the many other routers that have made their way through my office.
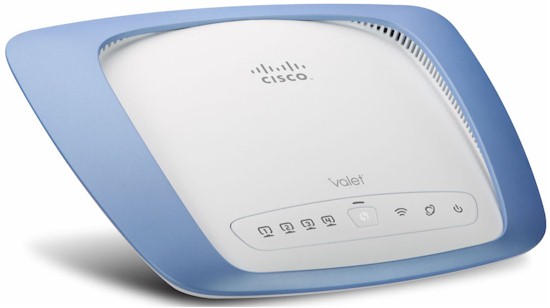
The front, or in this case, the top of the Valet, shown in Figure 1 has the traditional LEDs found on all Cisco and Linksys products. There are four individual blue LEDs to indicate wired connections and activity, a WPS (Wi-Fi Protected Setup) button should you choose to manually set up wireless security, a wireless indicator that flashes to show wireless activity, an Internet icon to show connectivity and activity on the WAN port, and finally, a power indicator. On the Gigabit-capable Valet Plus, the LAN and WAN port LEDs are multi-colored – Blue for 10/100 connections, and green for Gigabit connections.

Figure 1: Cisco Valet front panel
There’s really nothing too noteworthy about the rear panel, shown in Figure 2. The rear panel has a color coded port (yellow) for the WAN connection, and four blue ports for the LAN connections. There’s also a reset button, and the power connector. In keeping with the consumer-friendly design, the “wall wart” and the power cable are white, instead of the traditional black found on most other devices (except Apple’s).

Figure 2: Cisco Valet rear panel
On the Inside
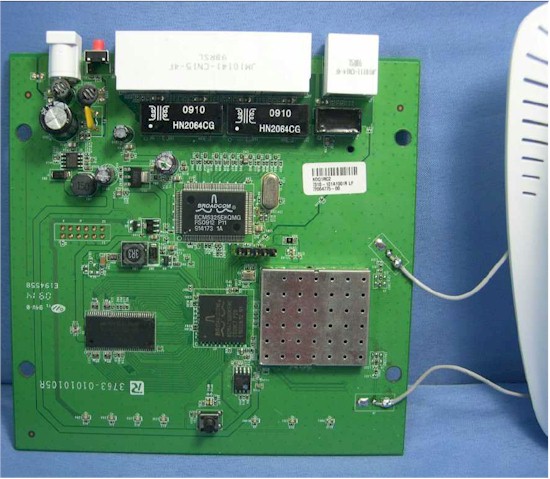
Figure 3 shows the interior of the Valet M10. As noted above, it uses virtually the same components as found in the now discontinued Linksys WRT160N and the new E1000 models. The M10 is powered by a Broadcom BCM4716 Intensi-fi XLR 802.11n 2.4 GHz Router System-on-Chip. And the 10/100 switch is a Broadcom BCM5325.
Figure 3: Cisco Valet M10 board
Setup
Unlike many wireless routers/hotspots, there’s really not too much to talk about for setup on the Cisco Valet. When you flip open the box top, the inside of the lid contains “Your key to simple setup” – i.e., a USB key with the Cisco Connect software. Cisco has distilled the installation of the Valet to three simple steps, listed on the inside lid of the package below the key:
1. Insert the Easy Setup Key into a USB port on your computer
2. Click Connect to your Cisco Valet.
3. Follow the on-screen instructions to install your Cisco Valet.
Call me a cynic, but I really didn’t expect setup to be as easy as this makes it seem. However, the next few screen shots will show you just how simple it is.
When you insert the key, depending on your system configuration, the Cisco Connect software may run automatically, or you may have to click on an icon to start it. On the Mac, the package is mounted on your desktop, and you just have to open the installer drive and click on the icon.
The first time you insert the USB key, it installs a small program, Cisco Connect, onto your computer. Out of the box, the software assumes that haven’t installed the Valet. So the initial screen (Figure 4) prompts you to connect the Valet to power and your Internet connection. Should you need more detailed information, a click on “Show me how” provides additional assistance.
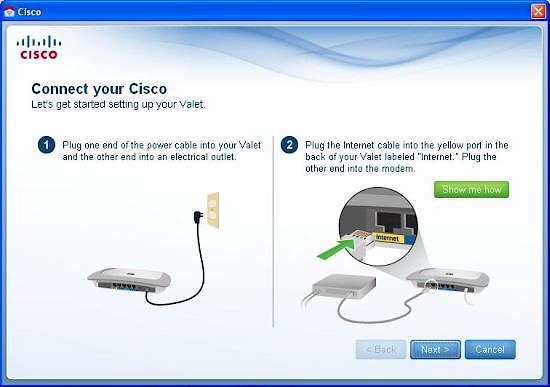
Figure 4: Connect Wizard start
When you click on Next, the screen shown in Figure 5 tells you to be patient while your computer is connected to the Valet. Though the screen warns that it could take up to five minutes, in reality, it took much less time. You do get a spinning wheel so that you don’t think the program has quit on you. But there are no progress indicators or status messages to let you know how things are moving along.

Figure 5: Connection in progress
In just a few moments, you get a reassuring “Congratulations” screen (Figure 6) showing that setup is complete.
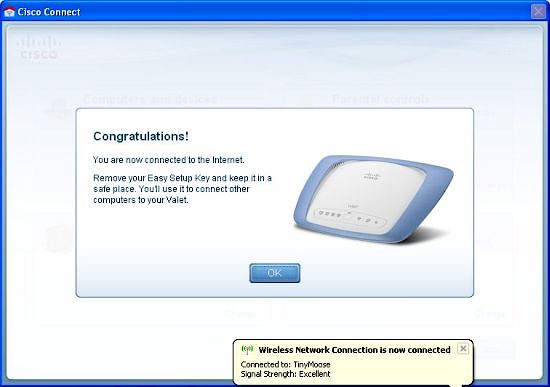
Figure 6: Setup done
During this initial setup process, all of the “heavy lifting” was done completely in the background, with no decisions or interaction needed. The installed Cisco Connect program provides a very simple four panel interface (Figure 7) This is certainly not intimidating to even the least technically savvy.
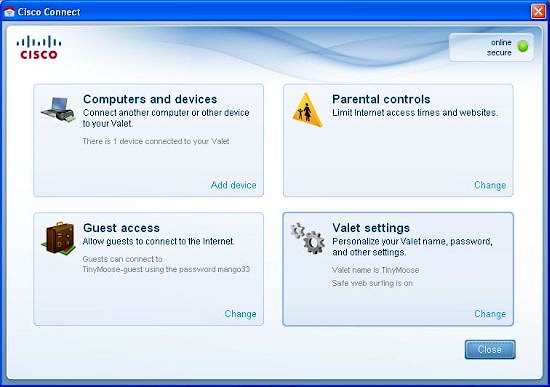
Figure 7: Main menu
During the setup process, Cisco Connect creates a “safe” name for your hotspot. From my observations, it looks like they combine an adjective and a noun. My first test yielded the name “TinyMoose”. The second time, it generated the name “ShortCedar”.
Setup also configured WPA wireless security with a pre-shared key and set a secure password to protect access to the hotspot. In fact, the Wi-Fi PSK is the same as the device password. This is a huge improvement over other router configurations that don’t force you to change the admin password, don’t set up wireless security, or worse, don’t do either. At the end of setup, you have a secured “hotspot” protected by a secure password. No more default “Admin/Password” as found on some other devices. All of the configuration data is stored on the “Easy Setup” USB key to facilitate setup and installation on other computers.
Setup – more
You can also configure guest access from the main menu. Guest access allows you to share your Internet connection with guests without having to compromise the security of your network. Like parental control, it’s easy to configure. Figure 8 shows that you can either enable or disable guess access, change the guest access password, and specify how many users, up to 10, are allowed to use the guest network.
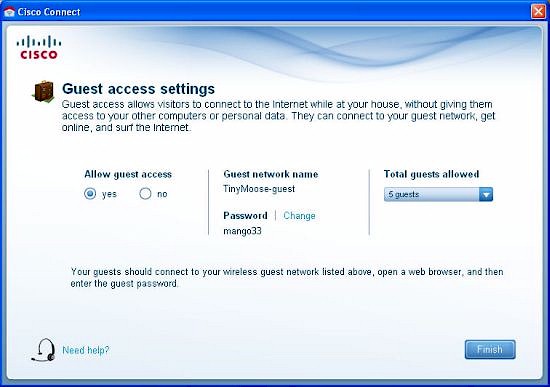
Figure 8: Guest access configuration
The guest network uses your network’s name and appends “-guest”. Figure 9 shows a partial listing of nearby networks including “TinyMoose” and “TinyMoose-guest”.
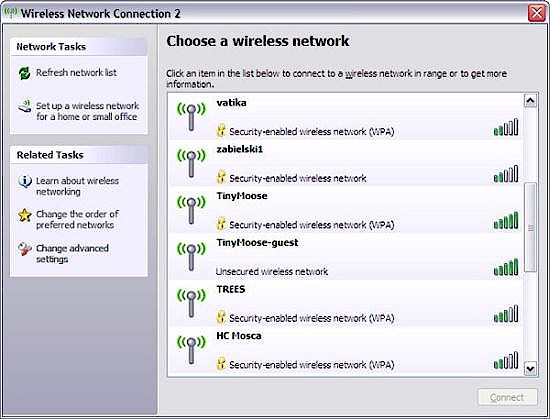
Figure 9: The Valet automatically sets up a guest network
The guest network is “open”, i.e. unprotected by WEP, WPA or WPA2, but uses a browser-based captive portal. So guests have to enter a password before being allowed to access your Internet connection. The guest network runs on a different IP subnet (192.168.33.0/24) than the default 192.168.1.0/24 network.
Parents will especially appreciate the simple built-in parental controls (Figure 10). Parental controls apply to computers not users, so you don’t have to worry about having to log into some type of security menu. You have somewhat limited control of time periods to allow Internet access for school nights, weekend night, or, you can block Internet access altogether.
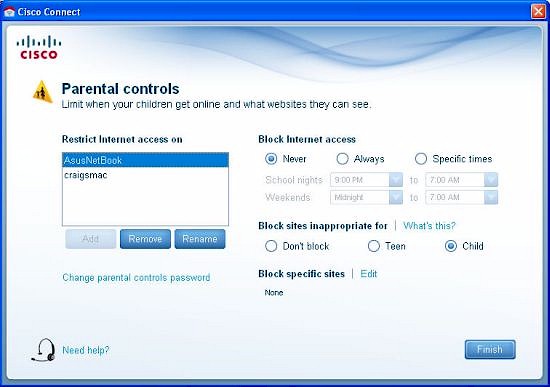
Figure 10: Simple parental controls
Working with unnamed security partners, Cisco also allows you to specify age-appropriate filtering for either a child or a teenager. Additionally, you can block up to eight specific sites that might not be caught by the web filters.
Using Cisco Connect, you can change controls for any registered computer from any other computer. In Figure 10, I have already configured two computers, each with a different level of access. Since Cisco Connect is installed on each computer, this option is protected by a separate parental control password , to prevent children from changing parental controls
The other two main menu options let you add additional devices to your network, or further configure your Valet. Adding computers is done via a wizard.
Hands On
As noted, you can’t ask for a simpler setup process. There is, however, a potential glitch. For those still running XP, Cisco Connect will only work with SP3. If you elected not to upgrade from SP2, as I did on one of my computers, Cisco Connect won’t run.
Parental control seemed to work fairly well. I enabled parental controls for one system as “child” and tried to go to various web sites. In appropriate sites were blocked with the message below in Figure 11. Note that for the Child profile, social networking (MySpace, Facebook) and IM was blocked. Optionally, parents can type in the parental control password to provide one hour of unrestricted surfing.

Figure 11: Blocked content
While the Valet does provide a secure wireless connection and a password to secure the device, they are the same password. And, on any computer with Cisco Connect installed, there are actually three ways to get the password. First, if you select Add Devices the WPA-PSK key is shown. Second, under Valet Settings (Figure 12), the WPA-PSK key is shown on the left. Finally, the password is stored in an XML file on each computer that has Cisco Connect installed.
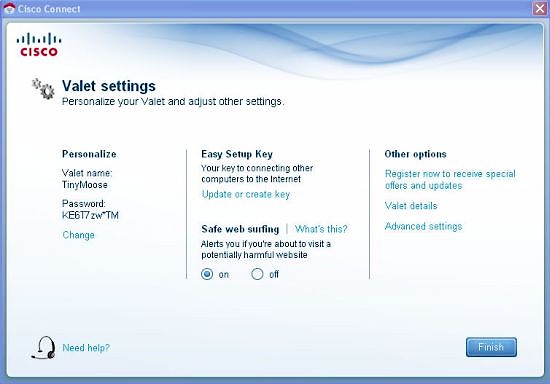
Figure 12: Valet settings page w/ plaintext password
A click on “Advanced settings” takes you to a page where you can copy the key to your clipboard and then be routed directly to Linksys/Cisco’s standard web user interface designed for the more technically inclined. (Figure 13). A popup warns that if you use the web utility to configure the router, you may no longer be able to use Cisco Connect.
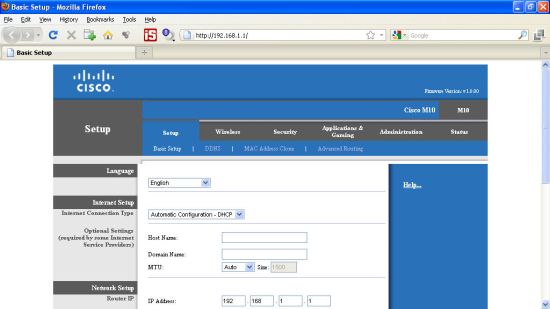
Figure 13: Web admin interface (via Advanced Settings link)
Routing Performance
Testing and analysis by Tim Higgins
Although the Valet’s target customer isn’t supposed to care about performance, I know that most SmallNetBuilder readers do. So Table 2 summarizes the results of the Valet’s routing tests (described here), which are decent for a router with 10/100 ports.
| Test Description | Throughput – (Mbps) |
|---|---|
| WAN – LAN | 88.2 |
| LAN – WAN | 80.2 |
| Total Simultaneous | 86.3 |
| Max. Connections | 8,180 |
| Firmware Version | v1.00.0 |
Table 2: Routing throughput
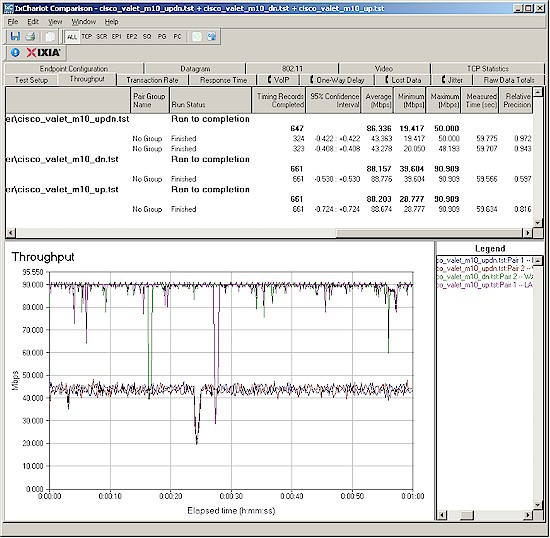
Figure 14 shows the IxChariot aggregate plot for WAN to LAN, LAN to WAN and simultaneous routing throughput tests, which shows steady throughput in both directions.
Figure 14: Cisco Valet M10 routing performance
The Maximum Simultaneous connection result of 8,180 leads me to believe that there is an 8K session table, which should be more than enough for gaming or P2P use.
Wireless Performance
Testing and analysis by Tim Higgins
I used our standard open air test method described here to test the Valet’s wireless performance. Testing was done using our standard wireless test client, an Intel Wi-Fi Link 5300 AGN mini-PCIe card in a Dell Mini 12 running WinXP Home SP3 and version 13.1.1.1 of the Intel drivers with all client-side defaults left in place.
The Valet was loaded with 1.00.0 firmware. All factory default settings were left in place, except setting channel 1 for the 2.4 GHz band.
I started with running quick tests with the Valet set to WEP 128, WPA / TKIP and WPA2 / AES wireless security modes and found that the router properly limited link rates to 54 Mbps when using WEP and WPA / TKIP. Given the ease of the Cisco Connect software, I didn’t bother running a WiFi Protected Setup (WPS) test. Anyone buying this product would just be using the magic setup key to add any new wireless clients.
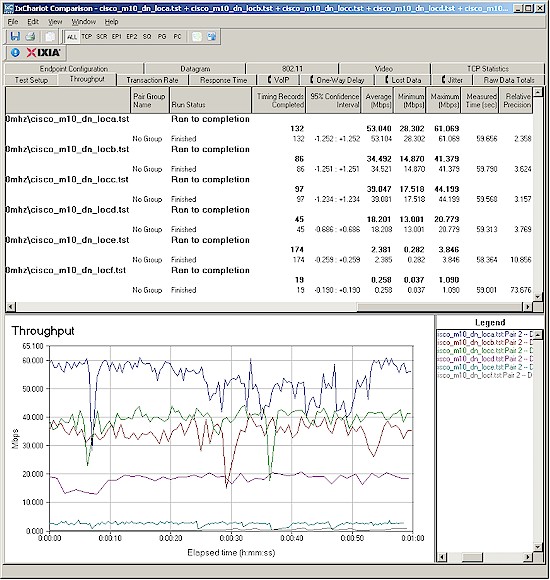
Figure 15 shows the IxChariot aggregate plot for all 2.4 GHz band downlink tests using 20 MHz channel width. Throughput variation is about the same as I’ve seen with other N routers, although it does settle down a bit as signal levels drop.
Figure 15:Cisco Valet wireless throughput – 2.4 GHz, 20 MHz mode, downlink
The Valet didn’t set any wireless speed records, even when using 40 MHz bandwidth mode. Highest speed measured was 65.2 Mbps (Downlink, 40 MHz bandwidth, Location A). Although it was able to stay connected in all six test locations, throughput in weakest signal Locations E and F sometimes dropped below 1 Mbps, which would be barely usable.
The other plots can be viewed via these links: 2.4 GHz uplink- 20 MHz BW; 2.4 GHz downlink 40 MHz BW; 2.4 GHz uplink 40 MHz BW.
For a competitive comparison, I generated a Performance table selecting a few other single-band N routers: D-Link DIR-655 [A4], ASUS RT-N13U and the Linksys WRT160NL, which use Atheros, Ralink and Atheros chipsets, respectively.
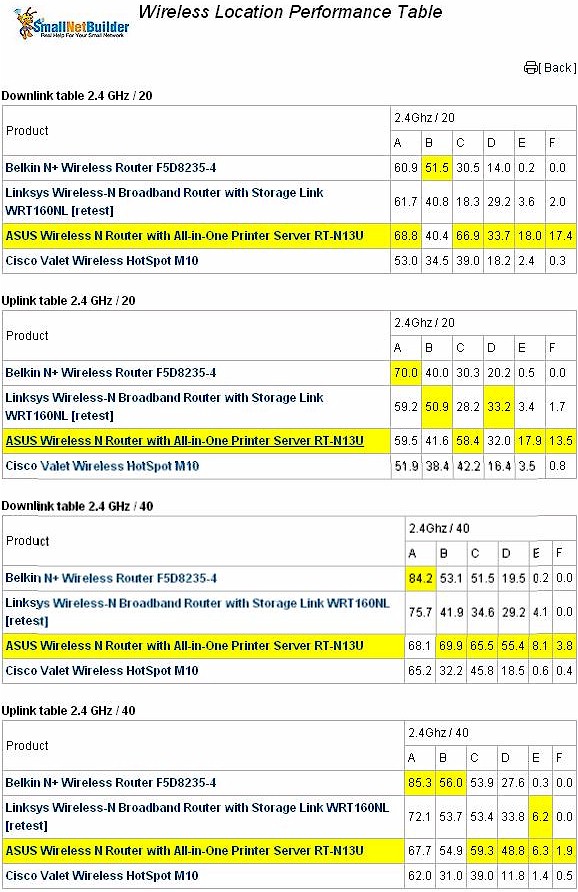
Figure 16: Wireless Competitive Comparison
The clearest winner in this comparison group is the ASUS RT-N13U, which uses a single-chip Ralink chipset. Looking at the Average throughput charts, which average together results from all six test locations into a single number, the Valet tends to sit in the lower half to lowest one-third of the rankings.
Use the Wireless Charts to further compare and explore the Valet’s performance.
Closing Thoughts
There’s a lot to like about the Cisco Valet: the easiest setup on the market; an attractive design that doesn’t need to be stuffed into a closet to gain spousal approval; guaranteed wireless security as part of the basic setup; built-in, subscription-free parental controls; a guest wireless network; and a cleanly designed package that looks great on retail shelves.
Though it adds a bit of cost, the Cisco Connect program, supplied on a USB key, really does provide easy installation and client connection for either Windows or Mac OS machines. And, the use of a USB key also means that netbooks, which lack a built-in optical drive, will also set up nicely.
From a performance standpoint, the M10 doesn’t break any speed records. But routing throughput is good for even fiber-based connections and “N” technology will most likely provide coverage for most homes for browsing and email. But I wouldn’t count on it—or any other N router—for whole-home HD video streaming.
My main concern is that the use of the same password for both router admin access and wireless security is a shortcut that perhaps Cisco should not have taken in the name of easy setup. Or at least they should not have made it so easy to see the password via multiple methods.
I was initially prepared to not like a simple, non-techie device like the Valet. After all, I’ve been reviewing wireless routers for years, and put myself in the “features freak” category, i.e. you can’t have too many of them. But I also understand that the Valet products are designed for a very different market than the hard core geek.
For its intended market, the Valet really nails it; from the consumer-friendly packaging, the attractive aesthetic colors, to the bullet-proof setup. You do, however, pay a premium. The very, very similar (Cisco doesn’t like to compare the two product lines) Linksys E1000 lists for $20 less than the M10 Valet. And although the E-series products don’t come with the USB key, they all do include the same Cisco Connect software on the install CD.
As a technical guy whose phone number seems to be on speed dial for friends and family, I’ll be recommending the Valet M10. The simple set up, as well as the wizards that guide people through adding additional computers, both work as advertised. Most likely, if they follow my recommendation, my phone won’t ring for setup support. For that, Cisco has a published 800 number.

